Search This Blog

Monday, December 31, 2012

Christmas nightdresses

My Christmas smocking effort was a nightdress for each of my granddaughters. I used the Primrose Lane, Victorian Dreams for Girls pattern for all three.

So preoccupied was I with the building work that it seems I did not take a single photo of the nightdresses in the making. I thought I had taken some of the smocking in progress - but either I am mistaken or the photo fairies have wiped my cameras clean! I have mislaid one camera - so just maybe I will find them.
Fortunately, the two youngest girls liked their nightdresses so much on Christmas Day that they put them on and wore them for the rest of the day! 

You get the idea. 

Brigid's is long, a blue polished cotton smocked in blue with four crocheted medallions  (purchased not made by me) on the hem.


Thursday, December 27, 2012

Millie Molly Dolly Bags

http://peppermintpatcher.wordpress.com/millie-molly-dolly-bags/
I came across this pattern while looking for something else (as one does) and thought it would be great to make for my granddaughters so I bought a pdf pattern from The Peppermint Patcher. The pattern seems to have disappeared from the shop since I bought it but it still features in the Peppermint Patcher's blog.


It took me about two days to make these bags. I was a bit hampered by our building work. My stash is accessible behind racks of wine, my cutting out space was a bit of my desk and my ironing board the top of my office cupboard.

I intended to take more photos of the work in progress, but ended up just focusing on managing the project in the space.


The clothes are mostly from bits left over from dresses I have smocked for the girls at one time or another. One has pink underwear and the other pale green spots.


The clothes fasten at the shoulders with press studs. I am a bit nervous that they will be too hard for the girls. I could have replaced them with velcro, but  think the press studs give a better look if they work.

The project tested my skills at working with fusible batting and fusible webbing. I also used the three lines of stitching option on my machine for the first time!


It is a really fun project and went down a treat on Christmas Day.

The press-studs were fine - much better than velcro would have been.

Monday, December 24, 2012

Wizard of Oz Tree Ornaments

My final Christmas ornament effort has been a Bucilla Wizard of Oz kit, purchased because I didn't think many boys would want ballet bears as gifts off the tree!

I got mine after last Christmas from Herrschners, but I don't know if they still have them. I bought two, so I can replenish any that go as gifts ready for next year.


I began with the Scarecrow, who was a lot of fun to make - really jolly, with not too much bling and a happy face.

The Lion had some interesting stitching - Ghiordes knots for his mane, for example.


Each character has a Christmas accoutrement - candycane, or sequin scarf or, in the case of the tinman, a holly wreath.


Dorothy has a nice couched skirt. plaited hair - and a basket with Toto in it.


I didn't make the snowflake, but did manage the land of Oz - somewhere over the rainbow. That was a lot of sequins!

So the tree is decorated and the presents wrapped. I have managed to make quite a few presents and not blog about them. More on those after Christmas.

It has been really hectic this last week. We moved into our extension on 19 December and we are still unpacking boxes. I have quite a pleasing pile to take to the Op Shop. But we are ready for Christmas.


Merry Christmas to all my blogging friends. I hope we all have much Joy in the season.


Friday, December 14, 2012

Christmas fabric baskets

While I was working on the toy chest etui, I spent a few hours over a couple of days giving myself a break from  and making some easy bag/baskets to hold Christmas goodies. I used a couple of charm packs I had bought while they were on special. It is great to be able to run these bags up without measuring, cutting or figuring out how.


I'm not sure yet whether I will use them as they are, or insert elastic in the tops - depends what goes in them. With elastic they make great bags for a single ball of wool.

I made 8 and have shown them both sides.


A very satisfying result.

Friday, December 7, 2012

Beaded Magi: Melchior


I bought three Mill Hill beading kits - the three Magi - to try out for Christmas. I haven't used paper before as a basis for stitching or beading and wanted to try it out.

With Christmas fast approaching I decided to have a go with Melchior - the one who happened to be on the top of the pile!


These kits have a lot going for them. Once you have the thread sorted and labelled and the beads likewise, the project fits easily into a bag and away you go.

The downside is the need to hold them in one hand - not at all good for my left hand thumb joint, and the reason I try to use sitting or lap frames.


The colours are great and the beads add depth, dimension and lustre.

I sat outside stitching this for the best part of a day using the natural light.


I had to use my wrist brace for most of this work.

The Magi's gift is stitched separately on the canvas and then attached to his hand.


Never having used this perforated paper before, I was very careful about cutting out.


I decided to back the ornament with some of the hand-made felt I had left from an earlier project. The gold colour made it quite a good match and gives a bit of strength to the ornament. The paper by now was rather soft and felt a bit weak at the point of the hand.

My granddaughter said he is 'cool' - so I mark that up as a success!

I am not sure that his two companions will be done in time to join him on our Christmas tree this year, but I guess Magi are used to waiting.


Saturday, December 1, 2012

More ballet bears!

The ballet bears I made last year for the Christmas tree were a great hit and all found their way to good homes with happy girls - big and small! At the end of last year I snapped up three more of these Bucilla kits for future Christmases. So I dug one kit out and cut and stitched my way through it's 6 ballet bears for this year's tree.


After the concentration of the Toy Chest cross-stitching, the disembodied body parts of ballerina bears took some adjustment, but I was in the swing of it pretty quickly!


 Ballet bears were soon peering at me over the top of my workbag
I rather like the idea of 18 of these hanging on the Christmas tree and walking out the door with visitors, but I'm not sure I will get another two sets made this year. Still, 6 is an encouraging start.

Monday, November 26, 2012

Toy chest etui: pincushion top


The final piece!

By the time I came to it, I had most of the border, the lettering and a few vine stitches in place.

 The inside satin-stitch frame went in fairly easily - it's fairly careful counting to get the gaps for the greenery to go through, but otherwise straightforward.


I discovered at the end that I miscounted and not left enough space for the intended clay geometric motif. Rather than unpick the tiny stitches I opted to adapt the geometric motif to fit. It's a bit of a squeeze - and looks worse in the photo than on the fabric.

I'm not too distressed about this - I may yet choose to remove the geometric design altogether. The pincushion will always remind me that I got to the end and adapted!


This is the finished piece on the frame.

Below is the finished piece off the frame. The two small dots in the top right are my blood - from a finger prick early in the piece!

I am, of course, itching to construct, but I don't have a workspace at the moment with our building work. Given that I have some Christmas projects to do, I am intending to put the construction aside until after Christmas.


Saturday, November 24, 2012

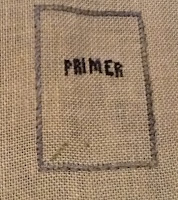
Toy chest etui: Primer pincushion bottom

I am now on the home stretch - the two pieces of the pincushion are the last items from the single piece of linen on my frame.  When the pincushion is stitched I can remove the whole piece from my frame and think about construction. There are two extra pieces for the chest, but they are separate.


The pincushion is a Primer - stitched like a box with a lid.
I had a little bit done from left-over thread.
This piece tested my original decision to do the back-stitch outline of each piece before I started. I still don't think I could have done without it - unless I had outlined each piece in tacking, and replaced the tacking with back-stitch when finished. I'm not sorry I skipped that!

With this piece I had quite a bit of difficulty with the borders. It was really difficult to see what I was doing on either side of the back-stitch line that marks the central rectangle. As well as a very crowded thread line, the sage thread is pale and blends.

Also, of course, I am tired and wanting to finish.

After working on it for the best part of a day, I took a break in the evening and worked on some ballet bears for the Christmas tree.

In the morning the satin stitch border came much more easily.

I also fixed that lower -left corner of the cross-stitch border (upper left on this photo), where I think I must have been stitching in my sleep!


The final product.

Now for the last piece - the front cover of the primer/pincushion.