Search This Blog

Monday, February 21, 2022

Bush Sentinelle Experiment 2

This is the first of the orange-based Sentinelle prints from Dijanne Cevaal. I began with the leaves, which again, I kept to a minimal gimp line held down with three strands of green silk.


The gum blossoms, as with the first panel, I worked in satin stitch and pistol stitch, using both silk and linen threads.  This time I worked from bright red at the top of the dress to  orangey-gold at the bottom.

I used variegated silk around the cuffs and shades of grey on the koala.
To manage the necessary join in the metre of fabric I used a zip at the top, rather than an overlapping envelope closure


and this time I fussy-cut around the leaves in her head-piece, removing entirely the ring of the halo.
My idea was to embroider the leaves, extending them out into the fabric, to create a sun goddess effect. I began with gold at the shoulder level, moving into oranges, then reds, intending to reach the deep red of the blossoms in the fabric in the top centre. It didn't work. 

The result was more like horns than the sun. While historically, horns were often a goddess symbol, they were not what I was looking for here, so i removed the lines that were red-blue and replaced them with colours in the red-gold range.

Much better.

I used gold thread ( silk and linen) in satin stitch for the dots (gems) around her head and added some bordering stitches to almost eliminate the black print.
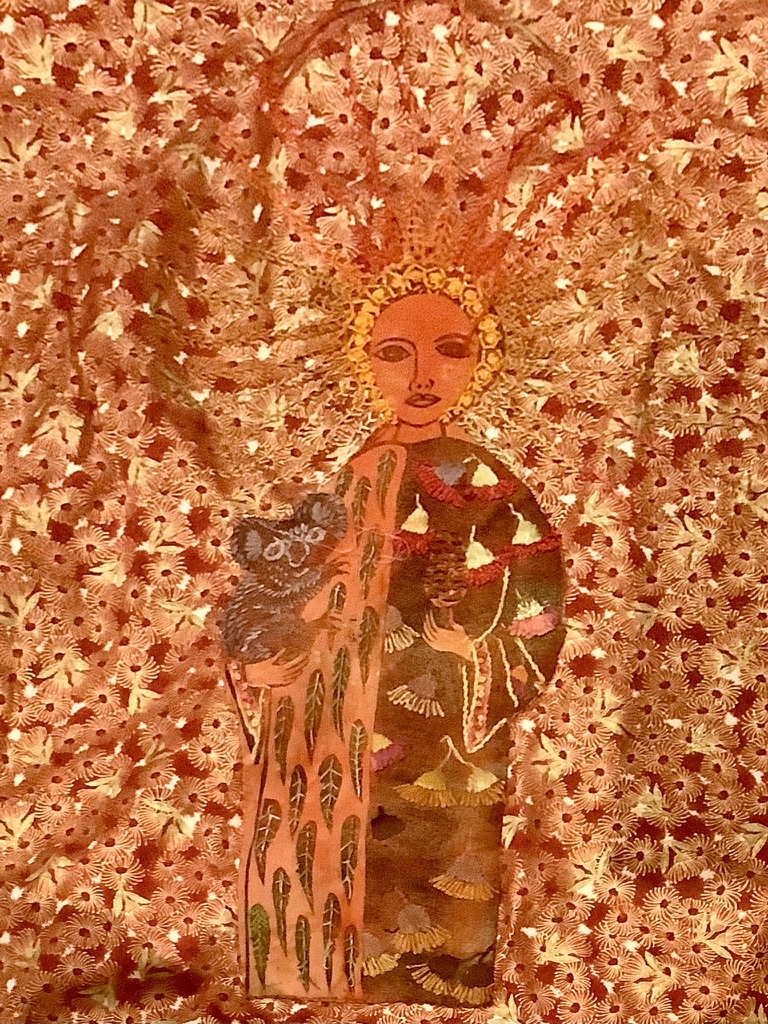
I was pretty pleased with the result, but felt that the contrast between the two sides of her clothing was too stark. I had begun with the intention to embroider only the unprinted sections. 

I modified this approach and added seed stitches to the dark side of the cloak.


It achieves the impact I was looking for, blending the figure into the background, with a sense of dimension and power.


I knew when I chose this fabric, that it would be effective. It exceeded my expectation. I've learned a great deal about colour in working it. The look of the fabric changes with the imposition of each colour. I now want to see the impact of working it with red, rather than gold, predominating. It occurred to me I could work the remaining orange Sentinelle on the back of this cushion cover instead of on the more traditional banksia fabric I had chosen for it. Katherine however, pointed out how good it would look to have two cushions either end of a sofa worked to show the contrast, so I have ordered another 1.25 metres of the fabric.  That will be Experiment 4.

Monday, February 14, 2022

Bush Sentinel Cushion Cover Experiment 1


One of my daughters needing new cushions gave me a reason to get out the Dijanne Cevaal Bush Sentinel panels I have had for a couple of years now. I bought them during the bush fires in 2020, intending to embroider them for cushions.  The pandemic overwhelmed the bush fire moment. I still think the panels are interesting and have potential, but I have been puzzling about how to use them in a way with which I am comfortable. The dilemma has been how to integrate a very European-influenced image into a much older history and tradition of Australian bush. The moment seems opportune, since koalas have this week been declared an endangered species due to the destruction of their habitat in NSW and Queensland.

I have four panels, two in a yellowy-gold and two in a deep orange. The cushions need to be 60cm square and the fabrics I had in mind were only half metre lengths. I ordered a metre of two more fabrics from the Aboriginal Fabric Gallery in Alice Springs, Goanna Dreaming by Heather Kennedy and  Bush Plum by Polly Wheeler Napurulla and  two more from Find a Fabric in Queensland, . 

When the fabrics arrived from Alice Springs they seemed to work with the yellow-gold fabric.  I also bought from the Gallery a small book that was helpful.   I haven't been able to find out much about the author, except that he has published a number of booklets that are held in the National Library of Australia and three of his booklets, are sold by First Nations businesses.  I found the chapter in this book really helpful. It gave me an idea of how to link this European-derived figure to the First Nations fabric - the notion of sentinel to spirit and landscape.

My next challenge was to frame up a panel so I could stitch it. The shape, especially its narrowness, did not lend itself to a hoop. I dug out a scroll frame I had purchased somewhere alone the line, but never used, and the jointed Nurge seated stand and managed to get them working together. The clamp on this stand is inflexible but could be made to work with this frame.

I also gave in and used double-sided tape to attach the panel to the scroll. The tape on the scroll was so tough I couldn't get a needle through it.

The result, however, was excellent. The clamp needed continual tightening, but the system allowed me to get on and do the embroidery comfortably.
I worked the gum blossom in padded satin stitch and pistol stitch using both linen and silk  thread. The banksia is in straight stitches and bullion knots. I had intended to leave the black sections un-embroidered, but  after I had put in lines of gimp along the centre of each leaf on the left of the cloak I added some lines of green silk. I also abandoned the Nurge stand in favour of my Lowery - much more stable.              


I cut around the figure, rather than using the whole panel, because I wanted to merge her into the landscape. 

It was only as I began the appliqué that I realised I should have purchased 1.2 metres rather than the 1.0. in order to get a 60cm square. I seem to be making more of these mistakes as I get older. I managed by creating a join and appliquéing the figure along the join, then inserting a zip along the top.  I have three more of these to make - and I have bought 1 metre for each. There are a couple of work-arounds I can try.

I'm quite pleased with the result.  ( I did iron it, but I then transported it, so it needs to be ironed again). This is large - the figure is 40cm high.

I had volunteered to do some further research this year on the history of the Goddess in Embroidery for the World Embroidery Study Group at our Guild. I had scheduled it for July, but the person due to present in March has requested more time so I've brought mine forward. It puts me under a bit of pressure, but I think it will help me in working through this dilemma of cross-cultural imagery. I will keep posting as I work it through.


I've started work on the second panel - this time orange background. 

Sunday, February 6, 2022

Mosaic Bag -trial and mostly error.

 This has been a story of error and misinterpretation. It's also a story about learning -  about how I learn. It began with Marie Wallin's Mosaic Carpet Bag kit which I bought last year and began knitting in January. I now realise that my problem was not understanding that mosaic knitting is a technique, not just, as I assumed, a look achieved by the design.  

I have, in fact, knitted two shawls using the mosaic knitting method but without the 'mosaic' label. So the head-set I brought to the Mosaic Carpet bag meant I did not interpret the pattern correctly. In particular, I took quite literally the instructions "On every square that begins and ends with a black square knit all the black stitches and slip all the white stitches" and "On every square that begins and ends with a white square kit all the white stitches and slip all the black stitches".  On the graph, one colour is designated by an entirely black square and another by an entirely white square. Other colours use symbols in black on a white background.


 In this example, I now realise, the squares should be interpreted as black and white.

I went with the 'entirely' interpretation- only full white or full black. When this became unworkable, I adapted and used the chart to work a conventional Fair Isle in stocking stitch.  The section in red was one of the few bands for which the 'entire' interpretation was possible, but because I was working two colours per row instead of one, it took hours to work, and the effect was minimal. 
I left that band as it was and worked the bands around it in conventional Fair Isle. This worked, but produced a much longer bag, so I worked fewer bands to achieve a result that was of a workable size.


I worked the second size to match, found some lining, blocked the sides and constructed the bag.

It required, I felt, more than the button and loop closure of the original,  Handles were called for. Solid or soft? 

I haven't found hard handles very flexible. I like to slip bags over my shoulder, so softer handles works better. I thought of a felted icord, but then realised I could kill two birds with one stone. In three weeks time I have to give a workshop on Viking embroidery - and I have a lucet to demonstrate. I got out the lucet, four balls of  4 ply cotton in colours in the ballpark, and made two cords. 


I added the button loop and a large red bead. I placed a piece of plastic ( the side of a milk bottle) in the base to keep a bit of shape. The handles hang inside when not needed.


When required the handles come out and hang. It's a useful bag, even if unintended! I can also use it to show a use for lucet braid.

In the meantime, with the help of a friend, I worked out what I should have been doing. There was plenty of yarn left, so I started again, this time using the mosaic technique across the whole chart.

Not only does it work, but it's easy, and fairly quick!

So this is my current progress. It certainly looks something like the kit photo. I think I will finish it within a week or so. I had originally intended to wait until it's finished to complete this post. I think, however, this is quite long enough. I will post an update when it's finished.