For nearly a month I have been knitting a vest for one of my daughters - a birthday present she chose. The pattern is Carbon from Rowan 70, which I bought, along with a yarn pack, from Morris & Sons Online. It is knitted in the round and has the option of a gold thread addition to the borders and red-brown bands, which we went with.
There were a few challenges. First, the delivery of gold thread, DMC Diamont, was delayed, but fortunately not for more than a few days. I couldn't start without it.

I was also frustrated that the chart included in the pattern showed only a section of the pattern repeat and not a whole diagram of decreases and increases. A generic summary of these means the knitter has to literally create her own chart, or set of instructions. You need to be experienced.

And have plenty of time.
Next, it became apparent that the one 50 gram ball of 190 Stone prescribed in the pattern was not going to be enough. The other colours all had 2 balls (3 of Barn Red) and since 11 of the 18 main pattern rows used Stone, it was clear I was going to run out. When I reached this point with a spare ball of Lotus, red-brown and dark brown, but none of Stone, I ordered another ball of the last, contacting Morris & Sons to say there was a probable error in the pattern amounts. They were, as always, responsive and helpful. They sent the extra ball within 24 hours, refunded my postage and asked for detailed information to help others.

Their response enabled me to keep knitting to the next challenge - the steeks. I haven't knitted steeks before. I have knitted gussets in ganseys, but they don't require cutting, as steeks do.

The purpose of steeks, as knitters will be aware, is to enable you to continue knitting in the round, with no side seams, so you insert a gusset, which you later cut in order to create holes for the sleeves and a neck.

Creating the gusset is easy (stitch markers keep track). It certainly makes it easy to keep knitting.When you reach the required length, you cast off and join what will become shoulder seams to form a bag of sorts. You have a few stitch holders to contend with, waiting to be picked up at the base of the steeks.

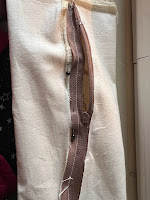
Then it gets scary. You take your 'small. sharp scissors' and cut down the centre of the steek. I took the optional path (for wimps) of stitching a double line on my machine to mark, and secure, the cutting line. While it gave me confidence, the stitches disappeared into the wool and were difficult to follow.

To be fair, the cut threads don't run, because you are cutting through vertical rows. Cutting horizontally would be a different matter. Nevertheless it needs to be done carefully.
I ignored the instruction to cut ALL the steeks at once, and proceeded one at a time. beginning, as instructed with the neck, picking up stitches around the outer edge of the steek, then knitting the neck band.

On the inside, the cut edge needs to be turned under and stitched down. I then repeated the process with each of the sleeve openings.

Here's the (almost) finished piece.
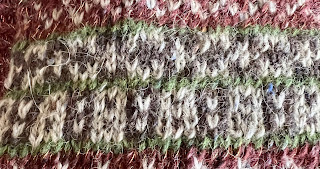
The 'almost' is because I realised I had made a mistake in a small section of the pattern on the back.
You can see, in the lower pattern band, that the patterned rectangles do not have the centre cross they should have. It was a small section that I had not noticed until I was too far ahead to be prepared to undo.
I resorted, therefore, to an embroiderer's solution of a few chain stitches on the surface to rectify (restore, cheat).
Voila!

I'm very pleased with the result, and, more importantly, so is the recipient.
It fits the bill - and that's what it is all about. I'm really glad I made it and tried new things. It is a lovely design, lovely wool, looks good and is fit for purpose.
I am not sold on steeks. It seems to me it would have been much simpler to have divided the stitches at the underarm and knitted the fronts and backs separately, then joined them at the shoulder. If the pattern had provided a full chart, it would have been easy to adapt to this method. As it was, it would require much greater re-calculating. In future I'd consider that.
This is the wool left over. As I suspected, the pattern should have listed one ball of 205 Lotus Leaf and two of 190 Stone. This has been corrected on the Morris & Son's website. I didn't need the third ball of Barn Red, and had 3 spare reels of Diamont, but I can understand why these might have leeway.
I feel happy to have worked my way through this, got a good result and delivered for my daughter.
My thanks to Morris & Son's for their help and customer service - and for family and friends who put up with my steekaphobia along the way!

 Plus I now have another pouch for pearls or other jewellery to either use myself or give to someone else who would use it.


