Search This Blog

Friday, April 27, 2012

BATB - Hussif using linen stitches.

I did two classes at Beating Around the Bush. The first a day class with Alison Snepp to make a hussif, the second a two day class with Betsy Morgan on her Toy Chest Etui. There were another two days of classes that I didn't enrol in, partly because of the cost, partly because I feel overwhelmed if I have so many projects to finish.

On the extra two days that BATB was continuing, I spent a good few hours at home working on the hussif from Alison's class. I wanted to see it finished before I moved on to other things, including the Toy Chest.
Working on a hussif seemed an appropriate thing to be doing at the same time as I was working on my grandfather's World War I experience. "Hussifs" or "housewives" were issued to WWI soldiers (as they were to soldiers in the American Civil War, the Boer War and most conflicts from the 18th to the early 20th century) - little kits in leather or canvas cases to enable them to mend their uniforms - in other words, do the work of housewives.  My grandfather's didn't survive, but I'm sure as a batman to a Captain in the Royal Fusiliers he went through more than one of them.

Ours of course, is much more beautiful.
In class we worked through the basics of the project - layout, counting the threads and each of the stitches involved. By the end of the day we had the framework for the piece and an example of each of the component stitches on our piece. We also went through the construction steps.

Mine looked roughly like this at the end of the day.

I went home really tired. Six hours of sitting in a plastic school chair and focusing on counting threads for much of it left me very stiff and tired. I managed to do a few of my pilates stretches in the breaks, which helped. I am not complaining - I enjoyed every minute,and the school was a good choice of venue. The light in the classrooms was great. My body, however, did protest somewhat!


At home I followed Alison's excellent instructions and diagrams and worked my way from the frame to the detail.

It was when I reached this stage that I realised I had made an error of two threads in counting and did not have the central panel in the centre. I think the thread-counting fairies came along in the night and moved my work, because I had counted and recounted to get it right in class.

I decided that slightly off-centre was going to be a design feature of my version and I would adapt rather than unpick.

This meant I had to do some adjustment of the trailing vine patterns as one side was four threads wider than the other and needed extra vine and flowers to cover. No big drama, but it meant a bit of fiddling to get the shapes to flow.

I was, of course, all the time debating in my head whether I should have unpicked when I discovered the error.

I have not included many photos of the progress of this work in deference to Alison's copyright of this project. I doubt anyone could use my photos to copy a work, but I know that Alison and other teacher/designers are concerned about the sharing of their designs. I respect copyright and hope my blog sends people to classes or publications if they are interested. Alison is giving classes this year at The Crewel Gobelin in Sydney and All Threads Embroidery in Brisbane and no doubt other places.

 The embroidery took me about 40 hours, I think, and the construction about another four. The final task, making the little button closure, was a project for daylight and a comfortable chair.

There is a lot of satisfaction, however, in creating such an appropriate button and loop.
After a lot of thought, I lined the hussif with the same batiked fabric I used for the hardanger button box. Alison's advice was to use a plain linen-coloured fabric to complement, but not take attention away from the embroidery. In the end I decided the colour match was too good to resist and the flannel needle holder covers sufficient to not allow the lining to dominate.


This is the finished product. I am so pleased with it. It feels good, looks good and now holds a little kit to take travelling. At the moment it has folding scissors in it. My thread-cutter would fit if it didn't have a hanger attached - I'm on the lookout for a plain round one.

Saturday, April 21, 2012

Native Colour Embroidery

Having bought the kit for Bev Stayner's "Native Colour" project in Inspirations 73, I have been pushing ahead to finish it before Issue 74 comes out - trying to at least not add to the backlog of projects I have lined up to do. I am very keen on this project, as it has some great techniques for creating Australian native plants, and I'd like to do more projects using them.

The first interesting bit for me was the method used to trace the design. The linen to be embroidered is backed with calico on to which the design has been traced in reverse. Sections are progressively outlined in running stitch on the calico side, then the fabric turned in the hoop and the outlined section worked on the right side.


I have used this technique before on simpler projects with less turning  - but it worked well here.
The first bit of work was on the wattle - stems and leaves in whipped double running stitch and open chain stitch. Then you add ghiordes-knot flowers before moving on to the bottlebrush - also ghiordes knots, but this time not cut.

It is very motivating to see each bit take on dimension and a recognisable texture.


The gum-blossom is a pleasing mixture of straight stitch and a section of cut-but-not-fluffed ghiordes knots. The gum leaves have an inspired red line against the main stem.


The grevillea, however,was the best fun to do, 


The curving stems are topped with olivy-brown French knots and then red  drizzle stitch between them, creating the spidery, somewhat chaotic sense of grevillea opening.


The piece de resistance was the full-blown grevillea created by what is in effect, French knots on stalks.
Mine is denser than it should be - I just got carried away making these ingenious little tendrils.


By then I was hanging out to do the waratah. There was a bit of too-ing and fro-ing to mark in the shape and create the petals before I got to add and stuff  the felt with fibrefill.


Seeing the waratah grow before my eyes as the bullion knots are stitched over the top of the stuffed felt gave me such pleasure. I couldn't stop smiling. I just love waratahs and it is a real joy to be able to create such a three dimensional image of one. I think in this design, it should be larger, even though it isn't in the foreground.

I was using a 20 cm hoop in my seat frame, which was beginning to squash some of the ghiordes knots, so I managed to really fix my 25cm hoop and transfer the work- making the last bits easier.


The last bits are the gum-nuts made by covering beads with thread, and two leaves stitched on stiffened gauze and attached via the main vein to give further dimension. I found these quite hard to cut out. Even with very sharp, small scissors it was really difficult to cut close enough to the stitching to remove all the gauze without also snipping a stitch.

I decided against adding the spider on a thread of web - I wanted the eye to follow the flowers rather than a spider.

Now I have to make up the bag. I think it will look good, but best of all I have learned some great techniques that I hope to use again for creating quite a range of Australian flowers.

I would certainly recommend Inspirations 73 for the range of Australian projects - great designs and great instructions.


I'm now trying to complete enough from my two Beating Around the Bush classes to report on them soon.


Monday, April 16, 2012

A Home for Ulysses Butterfly

My idea for displaying the silk thread Ulysses butterfly worked - even if it cost me more than I had hoped to make something useful. At Australian Needle Arts  I found a box that would, with a little manipulation, take the embroidery under glass. Ironically, Australian Needle Arts had packaged all their display boxes and sent them to Adelaide for the Beating Around the Bush Market Day later in April, but they offered to have their agent find the one I wanted and mail it to me.

It is not their fault that it took 6 working days - 10 calendar days because of Easter - to go from one side of Adelaide to the other with Australia Post!

In any case, I am grateful to have it this week and I have now mounted my piece after signing it (yes, another venture into the silk thread!).

I think the box is just about perfect for the piece. It is a jewellery box with compartments inside, so useful.


I haven't decided yet whether to keep it and bequeath it to someone, or just give it to someone. I don't need another jewellery box - although I have a lot of jewellery and could find things to go into it.

It's a nice piece, a luxury, and I will find it an appropriate home. Many thanks to Wendy Wilson at Australian Needle Arts for accommodating my order at an inconvenient time.

Friday, April 13, 2012

Owl teacosy

I came across some terrific knitting patterns at PeriwinklePark on etsy.com, and bought three of them. I tried out the owl teacosy over the last few days using up bits of left over wool.

It is knitted by combining two dark coloured wools for the body of the owl and two light coloured wools for the breast. I used a wool and mohair mixture for the body and got the back done OK.

The body is a very clever shape, pulled in a bit to form ear shapes.
However, I ran out of the mohair part-way through the front, so had to improvise a bit. I figured it wouldn't matter too much if I made the change around and above the eyes.


The best bit is the eyes. The circles are created by knitting a straight piece and drawing up the stitches - so simple. The beak is simple too. Much of the charm is from the use of combinations of the basic colours to create the features.

I had to dig around a bit to find the eyes I knew I had somewhere. I found them eventually in my new button box created a couple of weeks ago!


The eyes were a lot of fun to create.


The colour change in the wool doesn't look too bad. It took a couple of days of knitting in between making a big batch of quince paste - a really fun, relaxing project.

Sunday, April 8, 2012

Easter Mochi Mochi

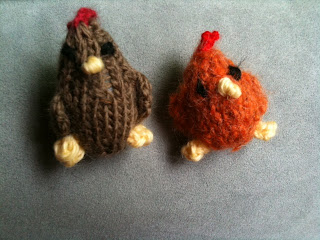
An idea was playing around in my head last week and finally turned into action on Good Friday. I dug out the Mochimochi book I used last year to make elephant and mermaid brooches and checked out patterns for chickens and rabbits.

Armed with my 10cm knitting needles and my basket of oddments of wool, I set about making some little things to add to small presents for Easter Sunday. We were invited to my Adelaide daughter's house. There would be four children and five adults in addition to us. We had modest Easter eggs for the children.


I made chicken necklaces for the girls, which I tied around their Easter eggs and chicken brooches for three of the adults.


The other two adults got a tiny chicken and a tiny fish.


I used safety pins stitched on the back since I didn't have brooch fittings on hand over the long weekend.


I did try an Easter bunny  - but wasn't happy enough with the result to make more of them.  Lucky Mochi Rabbit accompanied my grandson's Easter eggs.


I added jars of my Quince Jelly to the adults' chickens and a few extra bits for the hosts.

Mad? I think maybe.

My favourite; the fish. I should team some up with the mermaid!

Monday, April 2, 2012

Blue Mountains Swallowtail

I was excited by the vibrant Ulysses butterfly project, by Helen M. Stevens, in Inspirations Issue 72 when it came out late last year. Until I was about 7, we spent two weeks each year on family holidays in the Blue Mountains west of Sydney, walking the mountain trails, watching birds, butterflies and collecting 'mountain devils' to turn into little people.  The inclusion of Christmas Bush in the design clinched it for me - Christmas Bush was part of every Christmas in my childhood. It grows on the East coast of Australia, and, after more than 30 Christmases in Adelaide I still miss seeing big bunches of it in shops in December.

So, although I had no time to stitch the butterfly before Christmas, and had no experience at all of using flat filament silks, I bought a kit, which I took out and began working a couple of weeks ago.

I began badly, by unintentionally using an archive pen to trace the design, instead of an air or watersoluble pen, meaning I had to cover all the edge.

Next I discovered just how difficult the filament silk is to work with. I am not an expert satin stitcher, and probably for that reason I don't like doing it very much. I had difficulty getting the coverage I wanted, found the thread caught on my skin and my nails - and anything else that touched it.

I dreaded picking it up and began to think this was a big mistake.


Then I remembered that Mary Corbet had used this kind of silk thread in one of her projects, so I visited her website and read everything she had to say about filament silk.

Thank you Mary! It made the difference between being able to finish the project or abandoning it.


Her first suggestion is to prepare your hands in the hours before you work with the thread. It is really good advice. I trimmed and filed my nails then used hand-cream for a few hours before taking up the work,  washing my hands thoroughly before picking it up.  No more snagging, no oil transfer.


Mary also advocates the use of an awl to control the direction and flatness of the silk. I've never used an awl, but I did have one, so dug it out and tried it. It really does help.


I couldn't take up her advice to use a Japanese embroidery frame rather than a hoop, so I persevered with the hoop. I'm sure her advice is sound - I ended up with some sections that are not completely taut out of the frame. I can get by with it in a project this size but it would be advice I'd heed if I were to try this again.


It took quite a bit of patience to get the coverage, but became manageable with Mary Corbet's advice. 

Gaps show up (upper black wing left) and can be filled with a new thread and an awl (result on right).


Knowing how to improve the result and fix a problem makes all the difference in how I feel about a project. I gradually shifted from hating the project to wanting to work on it in every spare minute - and starting to like the result. It helped that Jim commented on how good it looked!

I began to appreciate the colour effects of the thread. It really does create its own shading, reflecting different shades in different light. It is quite vibrant.


I really enjoyed doing the Christmas Bush, although it was the hardest part in relation to tension, I think because of the shape of the leaves.

The final touch was the gold thread addition to the stamens - a lot of fun and satisfaction at the end. It really adds a realistic dimension.


So I got there in the end and the result is very pleasing. I don't want to mount this, as suggested in the project. I've had an idea that I'm following up.

The account of whether it works (or not) will be another post!