Search This Blog

Wednesday, June 25, 2014

Kwiki slippers

Another pattern I bought online on spec earlier this year was Kwiki Slippers from Patternfish.I have been very grateful for this purchase over the last couple of months. It was a perfect pattern to carry in my bag and pull out in any situation. After the first pair I could knit without referring to the pattern, adjust the size and produce a pair of slippers in a matter of a couple of hours.

The first pair I knitted were to match the cardigan and hat for my Canberra daughter. I didn't manage to photograph those.

I then had a go at knitting an oversized pair in Murano - and felting them. I simple made them enormous, put them through the washing machine three times

with added boiling water - then left them to dry wedged in an upside down pair of my shoes.


As unorthodox as that was, it worked and they were claimed by a good friend.

From there I knitted pairs for the grandchildren. The mohair ones were popular for the look, but not the feel, so I made additional pairs using Murano - the manly brown-black mix for Fionn, a rainbow mix for Brigid and a blue mix for Veronica.


Niamh chose a very soft Moda Vera Flammone, 50% wool, 50% acrylic, from my stash. I only had a single hank - 70 metres, and have been looking for a project to use it. It worked really well  for slippers.


This is a highly successful pattern and one I can see myself using as a standby for a long time to come.




Friday, June 20, 2014

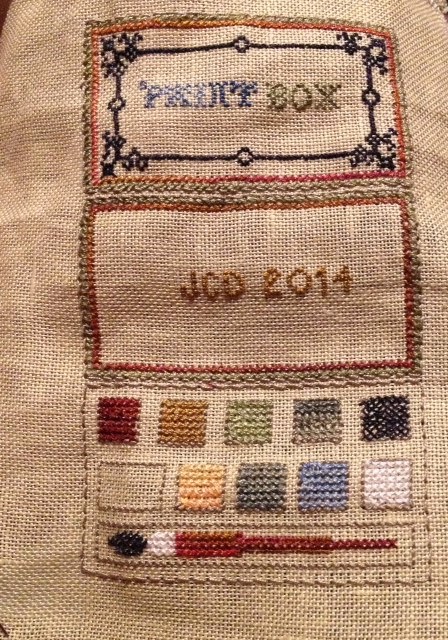
Paintbox construction

The paint box construction was interesting, as it involved creating, from a single piece of linen, a structure  that folded to form a box.

This was achieved by cutting skirtex pieces and lashing them to the individual faces of the paintbox.


The linen was folded around the three pieces of skirtex. The lining is then applied over the whole, and also to create an individual pocket on the back.


The two inner pockets hold packets of needles.

The needle threader is attached to a cord and charm, and slots into the slit on the inside lid of the paintbox (the one I embroidered on the wrong side!)


I like this paintbox quite a lot. It was a neat design and fun to construct. It is flat and compact - sitting easily in the etui.


I also think it will be useful!


Wednesday, June 18, 2014

Fortissima Colori Socka Teacosy

I lost a post on the construction of the paint box for the toy chest. While I restore it, here's one of the knitting projects I've been working on.

I  thought when I first bought Sock Yarn One-Skein Wonders edited by Judith Durant, that I'd like to have a go at some variation on the South West Cactus tea cosy on page 257.

I didn't much go for the dangling cacti - but I thought this would be a good chance to try a wool that is meant to knit up in a way that resembles fairisle - without the need for charts and patterns.

It took me a while to source the wool, which I eventually found at Camilla Valley Farm in Canada. I ordered 9070 Sombrero, and had been waiting the chance to try out a tea cosy.

I should, of course, have measured the base of the teapot and compared it with the finished measurement. Instead, I knitted a couple of inches and decided the base was much too big, so unravelled it and began again with two-thirds of the stitches. Much better


My next mistake was to assume that the 'float stitch' was a means of carrying wool over on the inside - as you would for fairisle. Eventually I realised that the 'floats' were decorations on the outside of the cosy. I decided at that point that I could live without seeing the floats and continued on regardless.


Because I was adapting a much larger tea cosy, the gap for the spout was much larger than needed. I therefore picked up some stitches and knitted a gusset. I could have done tricksy things link the colours, but didn't.


I have had fun playing with this wool and creating the tea cosy. I think it creates interesting patterns and effects. It isn't, in my view, comparable to fair isle. It is fairly limited in its pattern creation.


It looks good on the shelf alongside the owl.

Monday, June 16, 2014

Toy Chest Paint Box embroidery

Although I had a knitting project on the go, I found it very hard to not continue with the two remaining Toy Chest tools. The paintbox needle threader holder beckoned and I went with the call. Unlike the hobbyhorse, which required few stitches and only my normal glasses, the precision and accuracy of the geometric paintbox design meant digging out my magnifying clip-ons. However, once I was set up with light and magnification, the incentive to keep going at every opportunity was very high.

I didn't work this one in a hoop - it was easier on my  hands to keep it in the light without the hoop. Here is the first outline of the paintbox. I love getting the outline in place and a sense of the overall design.


The hardest bit was stitching the design on the first panel - the lid of the paintbox. Single thread cross-stitch on 32 count linen is not what I can do with my mind wandering!


I went with the lettering suggested for the lid - a decision I regret, but I am not unpicking. Both the "A" and the "N" are very hard to read in this lettering, but I figure the context makes it clear.


When it came to the next panel, I embroidered very plain initials, working it out as I went along. Unfortunately, I concentrated so hard on achieving the lettering I forgot to leave the space on the right-hand side to insert the needle-threader - the whole point of the paintbox! I inserted it on the left side, which, as it is only a storage device, should be fine.


The third panel was very straightforward as most of the cross-stitch was over two threads rather than one.


Next post is construction.


Wednesday, June 11, 2014

Hobbyhorse laying tool

I couldn't resist moving quickly on to this additional tool to the Toy Chest Etui. The attraction was partly the shape and colour of the horse and partly the usefulness of a holder for a pointy tool.

The piece of linen supplied was fairly small, so I set it up in a 3 inch hoop and marked the centre. I really enjoyed the way the shape emerged so quickly. In no time at all I had a very recognisable horse.


The basic construction (interfacing, skirtex) was straightforward. The ears and under the jaw needed a little care.


Trickiest was glueing and stitching in the holder for the tool. I have an embroiderer's aversion to glue - but this needs to be really secure.


The ribbon was fiddly, but basic.

Another twisted cord for the reins and voila!

A very pleasing addition to the Toy Chest indeed.


Friday, June 6, 2014

Sadness and a Promise Box

Dear Blogging friends,
My absence from the blog for over two weeks is because my husband Jim was unexpectedly hospitalised and even more unexpectedly died of a heart attack on 28 May. His funeral was on Wednesday 4 June. I am obviously grieving, but have been, and continue to be, well supported by family and friends.

In looking for a way to deal with this and continue my blog, I remembered this post that I had written a couple of months ago, but not yet posted. It seems an appropriate post to link to Jim and to get me going again with my blog. It is about an interest gift and a stitching idea.

One of the gifts Jim gave me for my birthday was a vintage wooden 'promise box'. Neither of us had seen one of these before. The box itself is beautiful. It is made of a light wood (in colour and weight), hinged, with a hand-carved lid in a pattern resembling fanned leaves and branches.


Inside are tiny scrolls, each with a Bible verse. The instructions on the inside lid ask you to 'Take one and replace".


A little bit of research since receiving this, suggests they were used in both homes and churches. In churches parishioners could take a verse as they left, read it and replace it. In homes, these seem to be mostly used around the table.

I have not heard of, or seen these in use in Australia, but others may have. There are contemporary versions available in the USA.

A couple of years ago, my daughter and the children made me a jar of memories that I can dip into when needing some comfort and cheer. I guess the idea is not dissimilar.


I haven't thought it out yet, but there is an idea playing around in my mind about making a small embroidered box with verses, or sayings, or memories It would be a good gift to think about for someone convalescing, or grieving. I haven't worked out if there is a way to embroider the messages, or whether the little paper scrolls would be the thing. I will let the idea simmer away and take any ideas that come along.