Search This Blog

Tuesday, June 28, 2022

Another needlework roll

While looking for fabric for the Boro workshop at the Guild last weekend, I came across another cotton banner that Jim had bought for me while he was on an official visit to Japan around 1996. These are lovely, but I hadn't found a use for them until I thought of using them in embroidery rolls - the device preferred by embroiderers to roll, rather than fold, work-in-progress (another benefit I derived from the Guild's Basics to Beyond Course).  Although having more rolls will only encourage me to have more works-in-progress, I felt that was preferable to the banner going unused in a drawer.

I had the inner cardboard from a roll of hand towel in my store of items-that-might-come-in-handy, so got to work while the mood was on.

The banner had quite a bit of plain green fabric at both ends. One formed wide hem into which the roll was inserted. I cut a strip about 6 cm wide from the other end, and from that cut two circles. Using a row of running stitch around the outside edge of each, 

I gathered them into balls which I filled with wool stuffing and inserted into the ends of the roll once it was inside the hem of the banner.                                .

I then stitched it around the edge of the tube to hold it in place.


The result is another useful roll. The banner will be admired, and the gift appreciated, each time the roll is used. 


Feels like progress to me!

Monday, June 27, 2022

Boro Pocket - Guild Certificate Course

This month's certificate course workshop was taken by Barbara Mullan, focusing on Japanese Boro Embroidery.  It was a lot of fun. 9 of us met with Barbara, all armed with scraps of fabric and some sturdy cotton threads. I had a pair of jeans with me, just in case I was moved to cut them up. They are in good condition, but are now a size too big for me. I've run elastic around the waist so they are wearable. As it happened, Barbara had strips of denim for us, and others had brought along various bits of usable denim. 

It was very much a design-you-own piece workshop although Barbara had included a design for a pocket in the notes. I worked on a pocket to fit my mobile phone using one of Barbara's denim strips and my own patches. Some worked on larger pieces for bags. There was a lot of sharing and ideas flying. I love these workshops.

I was very pleased with mine.
When I got home I tried it on three summer dresses that don't have pockets, which really limits my use of them, since carrying my phone on my person is a high priority for me. I have managed to insert a small pocket into the side seam of the dress on the left, but it won't fit my new phone.  It isn't a bad blend, but I preferred the pocket on the ikat dress on the left - the red in the pocket picked up some colour from the dress. The third dress is black and white so doesn't work at all.
I had originally intended to line the Boro piece with denim, and use the dress fabric as the back of the pocket, but decided the ikat cotton may not be strong enough, so made a pouch from the denim fabric and lined it with some Japanese indigo fabric I had.                                                                                                    This gave me a fully lined pouch that I could attach to the dress along the seamline to give it strength.                               The back is plain   

However, after attaching it by machine, I realised that washing would present a problem. The thickness of the pocket and the dyes of the threads would not work with a dress requiring regular washing.  So I removed it.


I measured the pouch up against the ones I already have for buttoning on to leggings and pants without pockets and added loops in the same place, so I can use it on the same buttons.

As I was adding this after I'd lined the bag, I covered the loop ends with a bit more fabric.This is now the completed pocket.


It's not quite the end of the story. Since I had begun and failed to add a pocket to the dress ( and the dress fabric is not strong enough to take the button solution), I went hunting for any left-over fabric from when I had made it. I didn't find any of the ikat, but I did find the plain maroon. So I now have a pocket on the dress ready for summer!

I've also found just enough fabric to add one to the black and white dress I have without pockets. The third dress was bought, so I don't have that fabric. I'm sure, however, I can find something suitable. One day.

This is quite enough from one Boro workshop!

Sunday, June 19, 2022

More Pretty Little Horses

I have progressed the horses since my last post. As you can see, I have reverted to using the Sulki outlines. Having placed them around the blanket, I thought I'd try stitching through them once again, and found it worked without any trouble getting my needle through. Maybe my needle is sharper!
I've also varied my stitches. Herringbone is emerging as my favourite. It gives a good fill as well as texture. With a variegated thread it is especially effective.

Chain stitch is also proving interesting and pleasant to do. 
                               My favourite effect is two colour chain stitch. It's more difficult to execute (especially in wool, because this stitch is hard on the thread) but a great rendition of 'dapples' I think.

I've moved to Mogear threads.They have some lovely pastel colours. I tried using them for two colour chain but soon gave up. They catch and tangle. Instead I am using two colours together, not as spectacular but an even better dapple!


By far the easiest and fastest fill is herringbone. 

I now have 38 horses on the blanket. I may yet add more if I decide they are needed for the overall effect.


I cut 38 shapes out of pink blanketing to match those already embroidered and have begun to appliqué, each of them to the back of the blanket to cover the back of each horse.  


The first eight are in place. I'm quite pleased with this as a solution for covering the back. I don't want to back the blanket with a lining. I love the feel of the blanketing. Even if I backed it with blanketing, I'd have to quilt it to hold it in place and I don't want to do that. This method covers the stitching on the back, so it won't catch, but retains the feel of the blanket.
Once I've appliquéd all the pink horses, all I have to do is dissolve any remaining Sulky and blanket stitch the edge (!). That'll be another post!

Tuesday, June 14, 2022

Another phone pouch

This week I bought a new phone. I've kept my old one for over 5 years and it had begun to disconnect while charging. Over the long weekend, when it hadn't charged overnight, I decided I had to bite the bullet and replace it. I rely on my phone as an emergency connection to the world - as well as a regular connection and carry it at all times.  I've been contemplating it for some time. I am a heavy user of the camera on my phone, and have had my eye on the latest with a 4x zoom. I don't need all the other features, so it's an extravagance and I've been considering that. I could get a phone for half the price that would do everything I want, except the zoom. 

I bought the phone. 
It is only marginally larger than my old phone - maybe 5mm each way, but the tabbed pouch I made in 2016 to attach my phone to trousers without pockets  was a tight fit for my old phone, and won't fit the new. 

So today I made a new one.


I used wadding, and another square of the same fabric bundle I had used for the old one - from the Aboriginal Fabric Gallery. I needed a longer zip but otherwise it was a pretty much the same as the old.


I lined it with another square from the bundle.


The tabs need to go on the outside, so, as before, I tidied them up with a small patch of left over fabric - none at all left over now!

Finally, I quilted the fabric, wadding and lining together by hand with some running stitch around some of the pattern. It is hard to see on the pattern - but that's what I was aiming for!

These days I don't buy trousers, or even leggings (thanks to Ink and Spindle!) without pockets, but I can now be sure of having my phone on me while wearing any of the backlog of pocketless pants in my wardrobe!


Monday, June 6, 2022

Crewel Battlement Couching Certificate Course Workshop

On the last Saturday in May I went to the Guild's Certificate Course Workshop given by Di Kirshner on  battlement couching. Di provided some basic template shapes for us to  work with, but encouraged us to innovate. I took the circle shape and tried to create a tri-moon design. 

I worked the left hand crescent in 5 gradients of blue, beginning with the darkest on the bottom. On Di's suggestion I worked the right hand crescent with the same colours in the opposite direction. That worked well too, but my first attempt to fill the centre in a single middle colour was a disaster - and I took it out.

The less-ambitious replacement with 5 mid-colour layers and alternating dark and light French knots was much more successful.

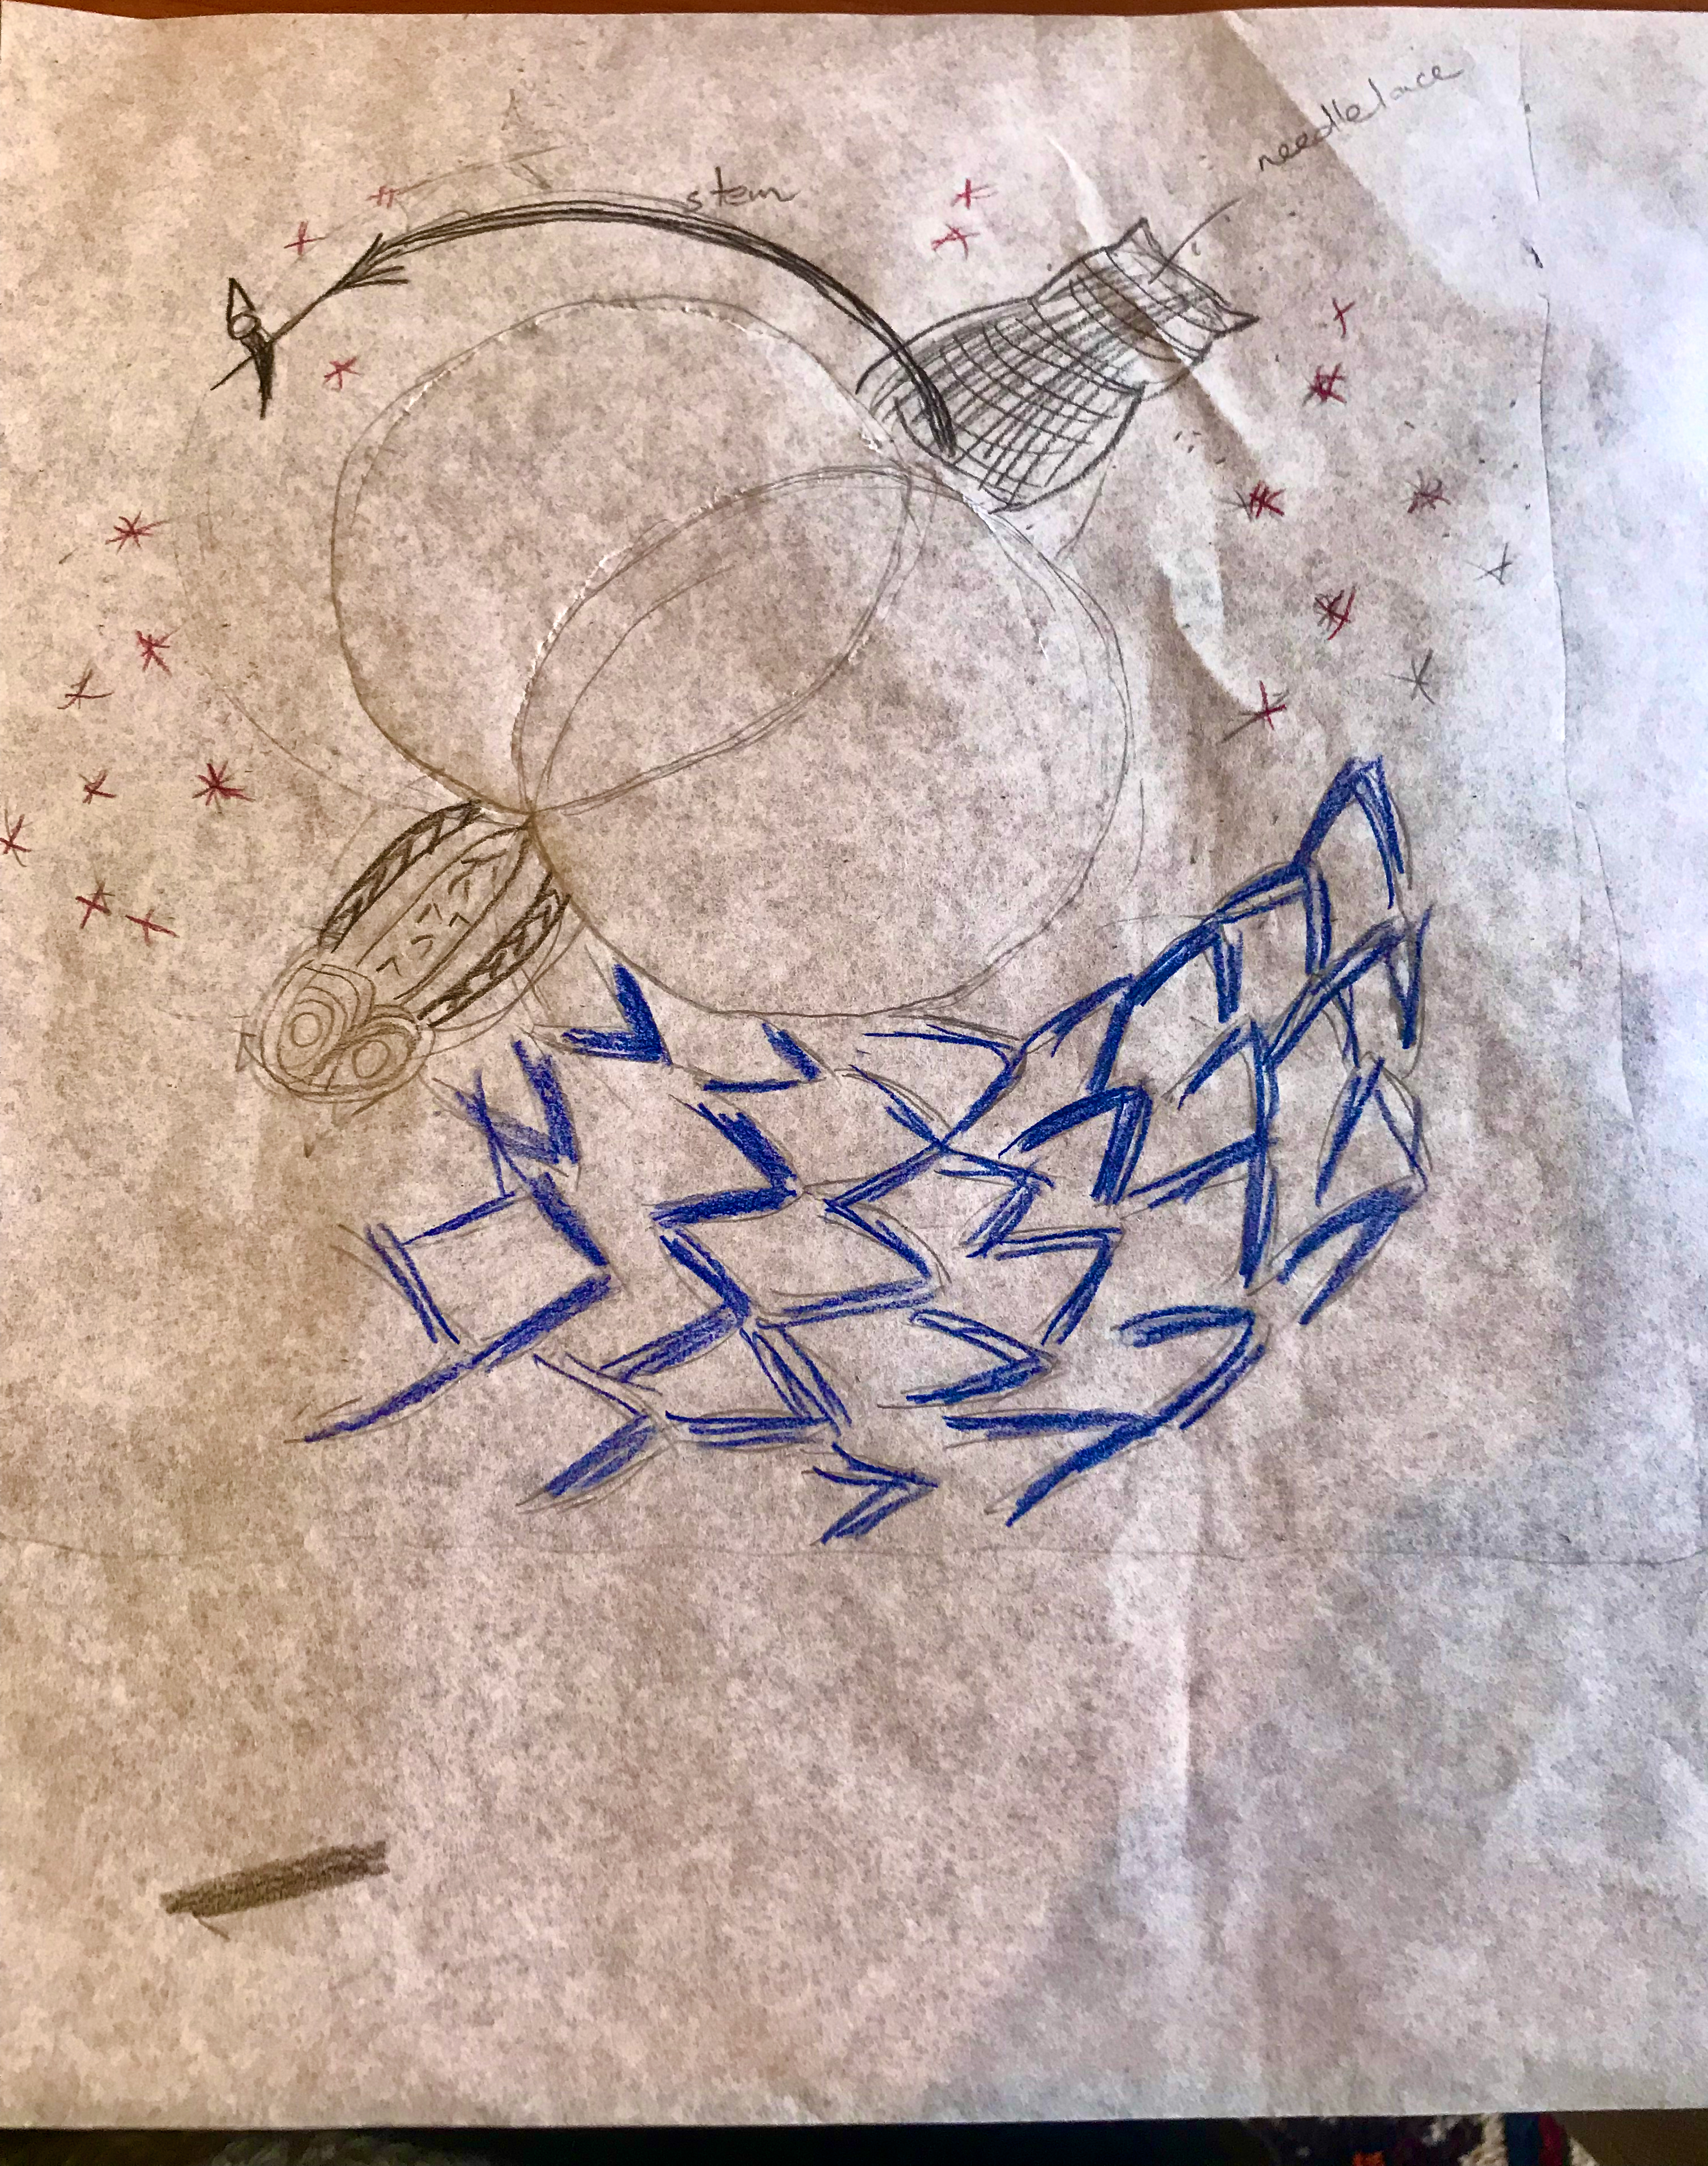
At this point I began playing with a contextualising design. I was trying to keep within the stylised Jacobean crewel  and the moon goddess traditions. It took a few days and rejected drawings before I came up with one I liked.

I came up with the shapes of an owl, the back of a cat, a flight of birds and the tail of the cat morphing into a broomstick. Plus stars. I'm hoping I can embroider these in a recognisably crewel style. It's an eclectic mix - birds from northern goddess traditions and the cat from Egypt and Greece.
The owl was easy. I've done it before. The stitches chose themselves. Tatiana Popova has one in her Crewel Embroidery  book against which I could test my choices. The cat silhouette I thought I'd do in needlelace. I spent an evening on it but couldn't get it even (left). I think the area to be covered is too large. I tried, but cut it all out once I got everything else done.

I replaced it with a layer of closely couched black thread held in place by a grid, also in black. Much better.  

It is not really stylised enough for traditional crewel work but it might, as my mother used to say, pass with a push. I rather like the flock of birds and the stars, and it does have the witchy feeling I was after, and a bit of a tilt to goddess embroidery.
I've had fun with it, but fear it's a bit indulgent. Nevertheless, it has been shaped by Barbara's Design Online course and I like the result. I went through my stash looking for suitable fabrics to help turn it into something useful. 

After a few tries I settled on what was sold as a Christmas fabric, blue stars, silver moons with a bit of sparkle. 
I planned a pouch with a zip closure - until I figured this one really would be better displayed at eye level and dug out a large hoop I had bought from the Guild trading table to use for displaying something. I needed to join the fabric but the join is under the applique - and it worked a treat.
I gathered the fabric over the hoop, and backed it with calico.  I have left the rectangular background fabric  underneath in case I decide I've had enough display in which case I can remake it as a pouch!


I considered cutting the embroidery to a circle, but I think the points fit quite well with the stars.

I don't have a lot of display space left in my apartment. I tried it in a couple of places. There's a spot in the kitchen that would work. 

For the moment I've hung it on the door into my apartment, underneath the Alison Cole stumpwork piece 


I hesitated to hang it here. It seems a provocative thing to do, hanging a moon goddess image with witch associations on a front door would once have led to persecution and death. The stigma and fear lingers. 

Which, of course, is a reason to hang it there. I offer it as a tribute to those women who served - and serve - their communities as healers and interpreters, against the odds. It's also a tribute to the confidence I acquired to trust my judgement through Barbara Mullan's Design Online Course through the Guild.


Friday, June 3, 2022

All the pretty little horses


Some 15 years ago I had an idea to embroider a blanket for Brigid using a drawing she had done of horses. I sent for some cashmere blanketing from the Geelong Blanket Company and it has sat in my stash ever since. 

I've never quite given up the project. When I mentioned this a few weeks ago Brigid said she could use a blanket to wrap around her - so I dug it out and got to work.The concept was to use the words of the lullaby around the edge of the blanket - When you wake, you shall have, all the pretty little horses, dapples and greys, pintos and bays, all the pretty little horses - then to embroider the horses fanning out across the blanket, beginning with somewhat realistic colours, then moving into 'prettier' colours.

I managed to get the wording around the edge using a water-soluble pen and a ruler. The wool isn't great for taking pen.

I made the words a bit larger than I had first envisaged in order to keep them clear - but also to space them right around the blanket . 

(These photos were taken in poor light with limited angles. Apologies for poor quality.)
I began with the intention of using wool thread in shades of blue - even went to Create in Stitch and bought 13 skeins of Cascade House threads in blue through to teal. It was only when I had worked the first side in Quaker stitch during our election weekend that I realised I had picked the colours of a political party and a very successful group of independent candidates. 
This didn't seem appropriate in the heat of an election, so I modified my plan, working the full the next side into greens, then yellows and finally reds. 
In retrospect the colour change seems unnecessary - but it's a better result. While the Quaker stitch does show through on the other side, it was easy to stitch only part-way through the wool using a hoop, not leaving threads on the back.


Unfortunately, this hasn't been possible with the horses.
I figured printable Solvi was the easiest method of transferring the patterns since pen doesn't work so well on the wool. I got two sets of Brigid's drawings on each sheet, and printed 6 sheets. I began with 'dapples and greys' The photograph doesn't show the dapple very well, but it is there.

The Solvi proved a bit tough to stitch through. I also don't like having a barrier between my hands and the fabric. After I'd stitched half a dozen horses I figured I was familiar enough with the shape to try another method.

I glued a paper printout of each horse on to a piece of plastic cut from a milk bottle, then cut each one out.


This gave me three firm templates to trace around. It also means I can reverse the direction of the horse.
While the water-soluble pen doesn't give a fine line on the wool, it is enough for me to follow with the help of the firm template.


This has proved much quicker, easier and more flexible to work with.

The 36 drawings printed on the Solvi sheets have not been wasted. After the initial 9 horses were in place I needed to layout the rest across the blanket and have used the Solvi horses to achieve this.

I could cut them out with the backing on and move them around until I had what I wanted then remove the backing and stick them down. This allows me to remove them one at a time, replace with a drawing and embroider.  I think the adhesive will hold. If not, safety pins.
I'm still contemplating how to treat the back. I will need to cover the back of the embroidered horses. If I back the blanket with fabric I will need to quilt it down. I could do that by hand-stitching around each horse outline. An alternative I am considering is appliqueing a wool-felt piece over the back of each horse.  There's plenty of time to figure this out - I have 26 horses to embroider!