Search This Blog

Showing posts with label huckaback. Show all posts

Thursday, February 20, 2025

Huckaback on Aida Centre finished for now.

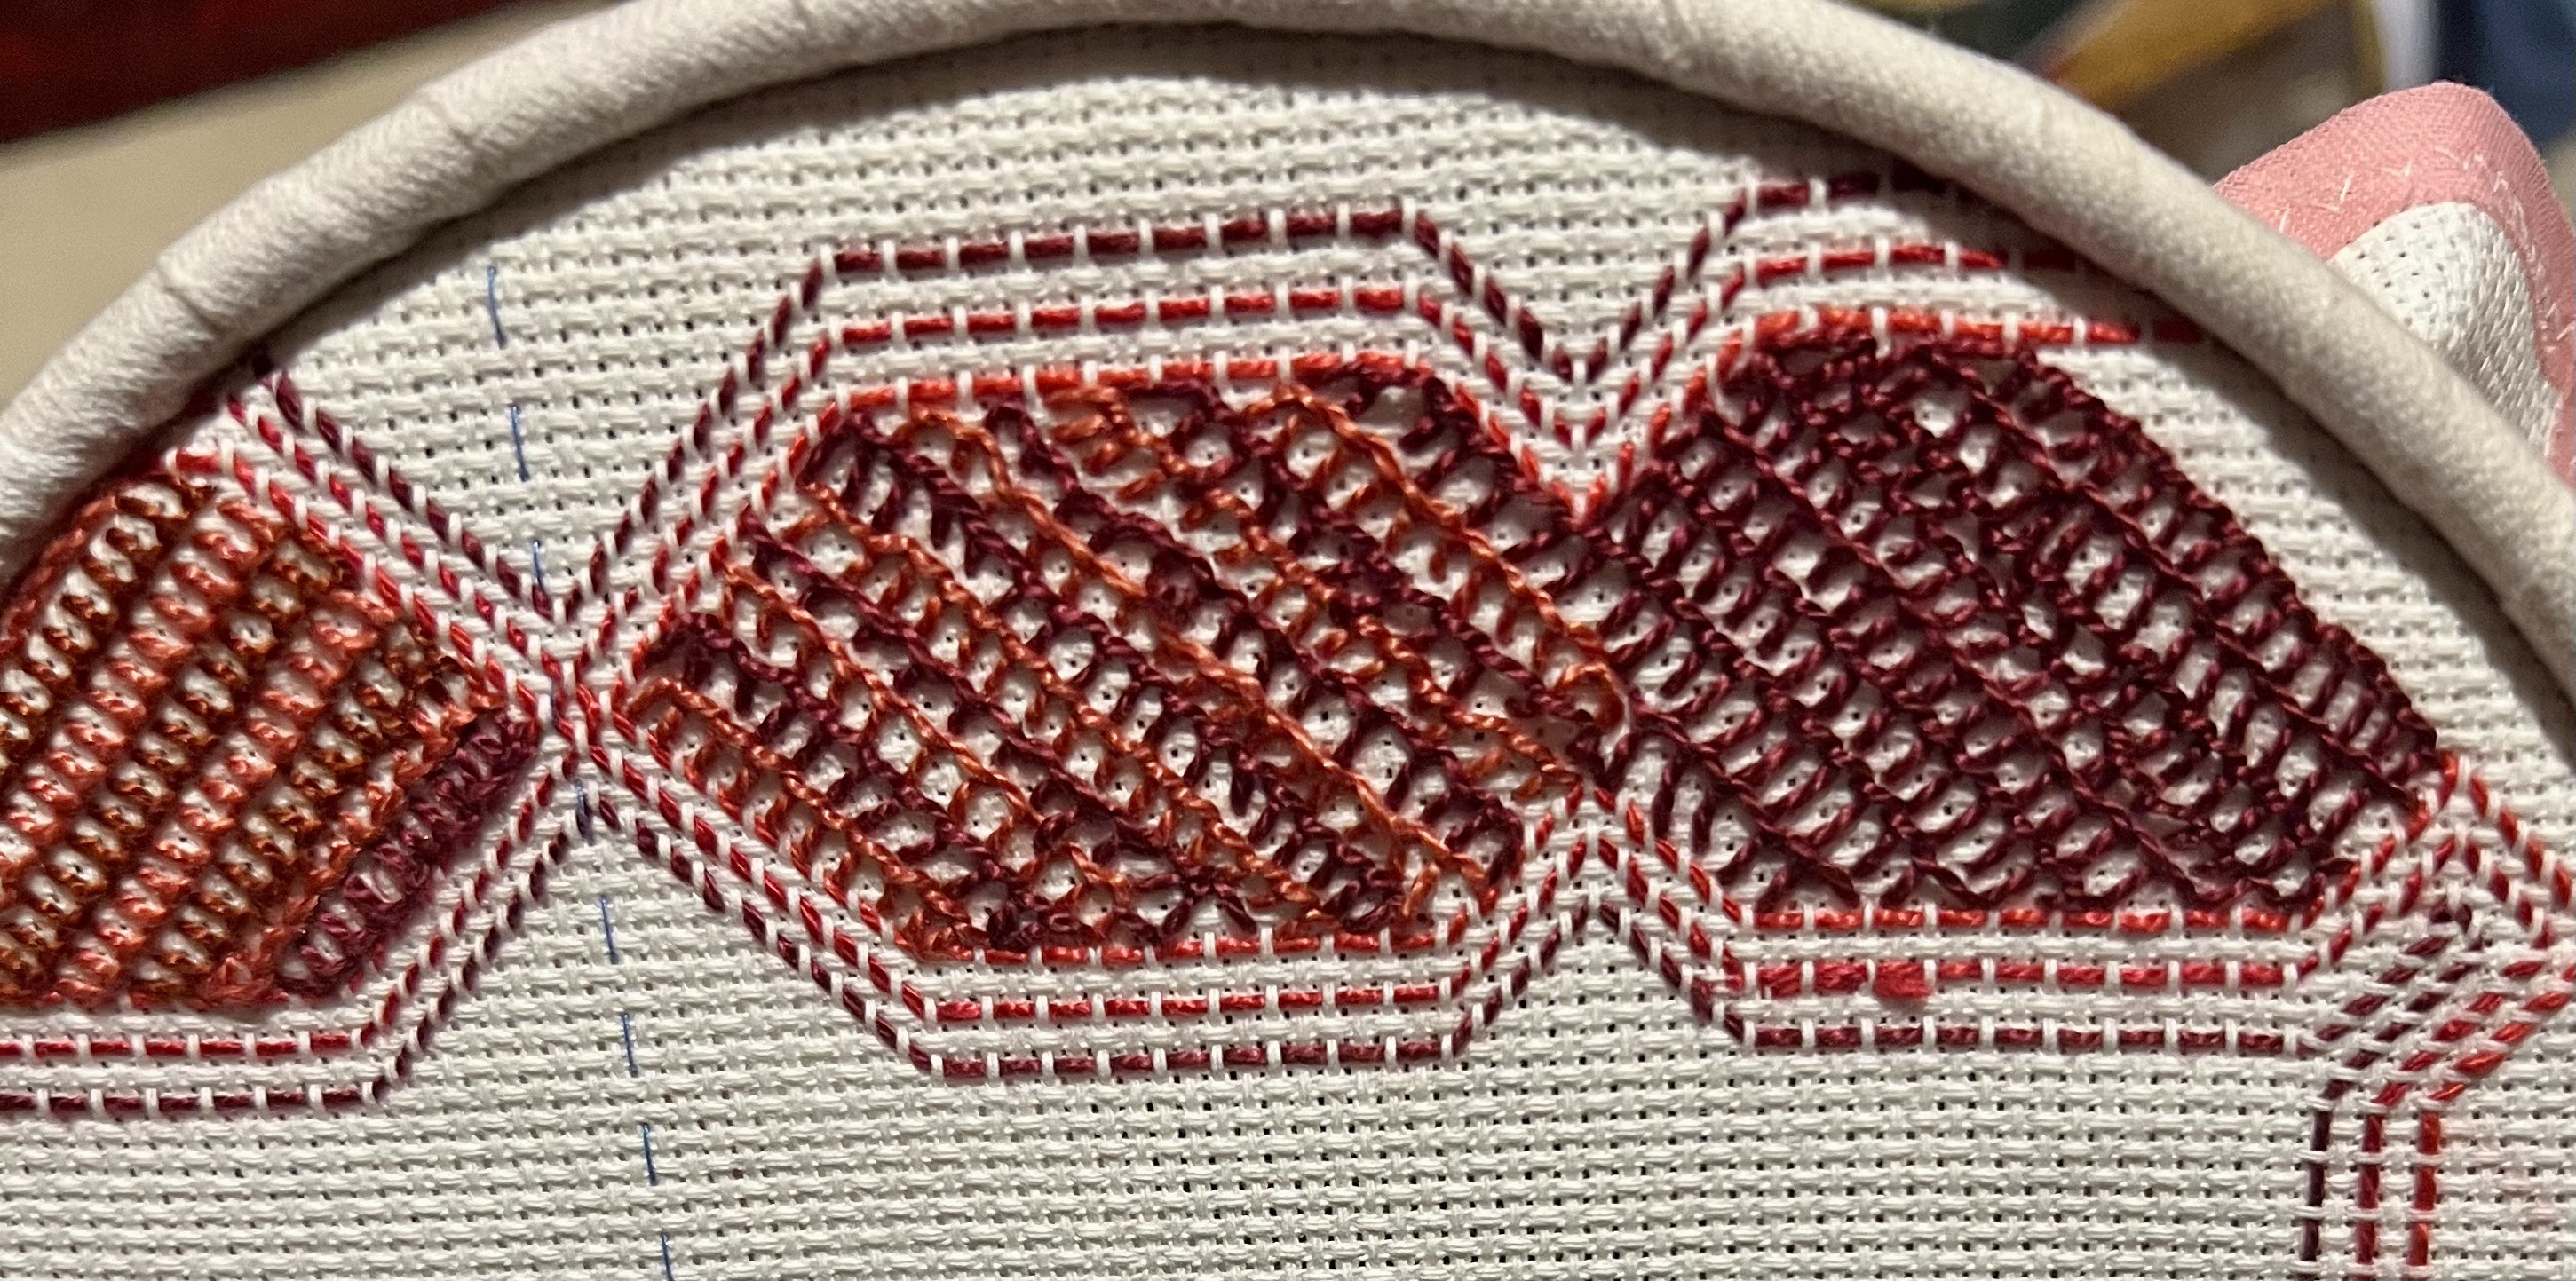
Returning to the Huckaback on Aida border I created as a result of the Embroiderers’ Guild Certificate Course Workshop in January, I decided to add to the centre. I had purchased a pattern for a Hamsa from Etsy for the talk I’m giving later in the year on the Evil Eye in Embroidery. As I had no plan for it beyond working it as a sample, it seemed this was an opportunity. The pattern came with instruction for working it in 22 shades of blue cotton. Hamsas, however, are worked in red in a number of cultures. If anything, red amplifies the protection - and fits my colour scheme!

I therefore gathered all the Perle 5 threads I had in shades of red and set to work. I didn’t try to follow the shading on the pattern, rather began with what I had and made it up as I went along. I reverted to perle 5 because this was a cross stitch pattern over one square of Aida and perle 3 would be too bulky.

In fact tent stitch was more than adequate with perle 5. I worked the basic outline using about 6 shades of red.

I didn’t want so much white space, so added extra flames in shades of orange. 

At the workshop it was suggested that I put this in the Guild Exhibition, so I had a deadline. 


While I’m happy with the remaining white background , it should be filled with white, or ecru, stitches rather than left, as it is, with the Aida as background. I simply ran out of time.

As it was, I took it out of the hoop at midnight last night and dropped it at the Guild today. I haven’t decided yet whether to use it as a sample, a cushion or a bag. Probably the last. I will decide after the WES talk in May. 

For now I’m happy with the result of the experiment of Huckaback on Aida resulting from the workshop. It’s been a lot of fun and learning, the way I like it: flying by the seat of my pants! 

I didn’t have time to block it, but steam-pressed it this morning. I can still see a faint hoop mark, a sign of a woman who is no domestic goddess, but tried. 🤷🏻‍♀️


Friday, February 14, 2025

Certificate Course Workshop: Designing with Huckaback on Aida

 The first Guild Certificate Course Workshop for this year was Designing with Huckaback on Aida, taken by Carol Mullan. It was an intriguing topic. I have done quite a bit of Huckaback over the last 15 years, either on Huckaback  fabric or monks' cloth. Using Aida opens up possibilities of combining the Huckaback technique with other counted techniques.

I didn't have much Aida in my stash, but found a piece I had bought from the Guild trading table. It was 35cmx42cm and had been edged with bias binding and tacked along the centre lines.  It would do, I thought, for the requested A4 working fabric.

However, once I read Carol's notes and assimilated the ideas she presented, I got inspired to design and work it as a whole piece. So, while the rest of the group was playing with manageable samples, I launch into A Project!

I had taken the requested selection of threads, but, with the whole-piece design in mind, I selected a group of perle 5 threads from the trading table in a colour way inspired by the pink border.
 I selected a standard Huckaback border pattern and worked it in three shaded rows, dark to lighter, all the way around, making a few adjustments in count along the way to fit the piece, which, I am sure, was not originally intended to accommodate the floats in the fabric as well as the spaces between them. 

Back at home, I spend a bit of time going through books, looking for ideas for filling. I favoured Kogin, a Japanese straight, two-colour, counted stitch with many possible patterns, but when I tried it, I realised the width of the Aida squares meant that even using a Perle 5 thread, I would not get coverage of the fabric.

So I began to experiment with stitches. Rows of chain stitch gave good coverage, weaving a web with an uneven number of spokes gave decent coverage. Because I was working in an elongated shape it didn’t fill the space, but I like the look. My straight stitches on the corner (left above) didn’t work well, even after I couched them down.
It finally occurred to me that a perle 3 might be better. I only had two perle 3 threads in the red-orange- pink palette, but they made an immediate improvement in coverage (left). The contrast isn't great, but better than the photo suggests.


The next section began as feather stitch. The diagonal rows looked so good I continued, making it more like an open buttonhole stitch. As I only had two colours to work with, I improvised stripes.

I experimented a bit, working the rows from left to right only, then working a return row from right to left. The latter didn't work as well. 

Opposite, I worked a similar pattern in two shades of perle 5 to contrast coverage. Niamh adviced on the contrast colour - and she was right, it harmonises!
By now a hoop was needed. While Huckaback needs to be worked in the hand,  filling is much better (especially with my right index finger out of action  from surgery!) in a hoop. It was close to the hoop edge, but just enough to hold.
That left one side, on which I experimented with Bargello. This was almost back to the original Huckaback design concept, using the whole fabric thickness rather than the floats. 

I dashed off to Create in Stitch to buy more perle 3. The colour choice is limited , but good enough to for a decent Bargello coverage.

So here is the finished piece, straight off the hoop ( as you can see!).

I have a plan for the centre, which I will attempt in time for the upcoming Guild Exhibition (submit next week!). Hopefully I will have a result to post by then. In the meantime I’ve had fun with this and learned a heap. 
One of the best workshops ever.


Wednesday, February 6, 2013

Swedish weaving throw finish


I made fairly good progress on the second half of the Swedish weaving. In spite of the safety pins, I clearly can't count, as I ended up with about 5cm more at one end between the hem and the end border. I decided it didn't matter on the bed, which is a king single.


I tried it on the bed to decide how to finish the edges. My original intention was to blanket stitch around the whole throw. But when I looked at the sides and the ends on the bed, I decided that the blanket stitching the sides would clash with the pattern.


I think, in retrospect, that a crocheted edge all around would have worked, but not blanket stitch.I also decided that the ends did need blanket stitching, but a closed, rather than open blanket stitch to reflect the points of the main design.


Having decided that, I set about finishing off the back. Although the aim in Swedish weaving is to use a thread long enough to go from one side to the other of the blanket (so some thread is 3.5 times the width of the throw!), there were a number of occasions where this didn't work out, and I was not flush with thread, so figured I could join threads using a technique I learned in a Naversom class late last year (still haven't finished my blog on that - but will get to it).


You leave two tails on the back, then stitch them together with  machine thread of a similar colour,   gently securing the joined threads to the back of the fabric. On such loose weave fabric it does need to be secured, or it will catch, but the technique seems to have worked fine. I finished the sides with a machine hem 4 threads wide.
For those interested, monks cloth is woven with 8 floats to the inch. Each 'float' has four threads and they are very loose, unlike huckaback, which is tight and has two threads to the float.

This photo, by the way, is taken using the clip-on attachment to my iPhone that Jim bought me for my birthday. It is an amazing micro lens, and also has a wide-angle and a fish-eye lens. Really simple to use and great quality.


I dug out my huck handtowel - made as my first school sewing project when I was 7 or 8 years old to compare. It was much used in my home when I was a child, so has quite a few stains.


The finished throw is now on the bed. I may one day decide to crochet around the whole edge, but for now it serves well as is.

Friday, February 1, 2013

Swedish Weaving Throw: getting underway

After my last attempts at Huck or Swedish weaving, I bought a couple of books on making Afghans, or, as I would be more inclined to say, throws, with Swedish Weaving. I also bought a good length of monks cloth to experiment with. I promised myself I would have a go at this early in the New Year, so I dug out the monks cloth after Christmas and began preparing the project, using a pattern from the Diamond Afghan book.

It is a sizeable project, for me, both in physical length and the stitching.


The instructions said monks cloth shinks considerably, so should be washed first and dried in a dryer to maximise shrinkage. As it was 37C the day I washed it, I couldn't bring myself to put it in the dryer so hoped the summer sun in Adelaide has a similar effect!

In my zeal to get the project ready I made the mistake of washing the monk's cloth piece BEFORE overstitching the edge.  The result was a lot of fraying and bits of loose fluff. It took me a while to trim the sides, overstitch and then hem the ends.

The fabric is very loosely woven and beautifully soft.

Although the book indicates you can make a throw of any size, it assumes you are making a cot cover, and the selviges are the sides, not the ends. This means I may end up having to redo the hems at the finish, since the ends are used to adjust the fit of the final pattern.


The pattern is worked from the centre out, so you begin by counting the number of blocks of thread, marking it out with safety pins.


You mark the centre and working the base line from there, in my case, across the width of the throw.


It is easy stitching - or weaving, since the needle goes under and over the  'floats', not through the fabric.

I had chosen four colours in the pinky-red range in DMC perle 3. I can no longer remember how or why I chose these colours when I bought the fabric. They are not as the pattern suggests and I like the overall effect, but can no longer remember how I chose them.

I won't have enough thread to finish and eventually found a supplier of perle 3 in Victoria.
The pattern is worked in three distinct parts: the centre, the end border, and a set of diamonds connecting the two. You work from the centre to one end, then mirror from the centre to the other end. You adjust the end border placement by the number of diamonds in between the denser stitching - using the safety pins to calculate.


The diamonds cover quite a bit of ground, so there is a good sense of progress.


This is the centre pattern, with the connecting diamonds and half the end border.It starts to get quite a nice effect as you near the edge.


Once you start to mirror the end border, you get a shimmering effect along the centre line - created by the palest colour repeated in largely straight threads along the centre line.


The pattern finished the end with a straight line, truncating the last component of the pattern into a straight line. I decided to finish the pattern and end with peaks. It took the pattern closer to the end and looked more satisfying to me.


I am now mirroring this whole half at the other end.


Thursday, November 10, 2011

Huck Bag

Way back in May I posted a blog about Huckaback, or Swedish embroidery, triggered by a pattern in the Spring issue of the Canadian magazine, A Needle Pulling Thread  for a placemat and napkin set called Oh Caroline by Christine Allan of Lancaster, Ontario. Ever since I have been thinking about how to use the pattern for a bag. 


I managed to find some coloured huckaback at Willow Fabrics in the UK and bought some in navy, light blue and gold. Last week I cut enough of the gold to make a round bag and chose some rich reddy-brown perle threads from my stash - only to discover I needed, of course, really long threads to run the whole length of the bag fabric, and my threads were all cut to 18 inch lengths. So, not to be defeated, I slipped up to Hetty's Patch to see what perle they had.

It wasn't a lot, and none of them were deep colours as I had envisaged - but there were some that blended with the gold. They were all variegated, so a bit of an adventure. 


On the advice of the team at Hetty's Patch, I went for one almost white, to provide a bit of contrast. It was good advice.


It is a very elegant pattern. It flows along, once you get the hang of it, curving and moving at a great pace. It takes a bit of concentration - but not so much it needs all your attention.


I decided to use some Japanese obi cotton that I have in quantity to line it. The colours blend quite well even though it has a striking dark grey in the pattern.


I used some of the obi figures to form ends for the ties.


All in all, a useful experiment. I'd like to try a shopping bag now, with the pattern all over one side, perhaps in darker thread.

Saturday, May 28, 2011

Huck, huckaback or Swedish embroidery

One project in the Spring issue of the Canadian A Needle Pulling Thread Magazine was a placemat and napkin set called Oh Caroline by Christine Allan of Lancaster, Ontario.


Christine Allan describes the style as Huck embroidery and says it is also known as Swedish embroidery. Other references also call it 'darning embroidery'. It is characterised by picking up the 'floats' - a layer of thread on the surface of the fabric.

I had no idea what this form of embroidery was called, but my very first school sewing project, at the age of eight, (before I progressed to the desk cover and pinwheel) was a simple handtowel in this style, on white huckaback fabric. It got a lot of use and shows it!


I had even forgotten the name 'huckaback'. A bit of web searching turned up many references to huckaback embroidery.


Although A Needle Pulling Thread says this embroidery was popular in the late 20s to early 60s, it was also popular in the 1890s using silk thread. It received a boost in 1904 when mercerised cotton became available and the huckaback fabric could also be woven or dyed to produce colours other than white or cream.  (This didn't seem to have arrived at my primary school in 1955!).

I really enjoyed making my little towel. I remember the magic of creating the coloured lines so simply. I tried a version of it on one of my bags before Christmas, using fabric left over from another project.


Although not huckaback, the fabric had the surface thread quality that allows you to embroider without piercing the fabric.


I love Christine Allan's design and, although I am not into placemats, I might find a way to use it on a bag.