Search This Blog

Friday, February 28, 2025

Evil Eye Mandala no. 4

There are 5 designs in this series. I thought three of them would be sufficient to demonstrate when I talk to WES Group about The Evil Eye in Embroidery, but after stitching those three, I ordered, so I thought, kits for the other two. When they arrived, I discovered I had made a mistake, and ordered one I already had. I have hopefully rectified my mistake, and in the meantime stitched the fourth design.

I began, as always, with the central black iris and worked it in satin stitch arcs that overlap to give a slightly raised effect. I used long and short stitch for the light blue oval rather than the recommended satin stitch, and, once again, I worked the section of long straight stitches (this time dark blue) in buttonhole stitch.

The white ring between the two blue colours is not embroidered. I was hesitant about this, but it does create a difference in texture, a dimension. 

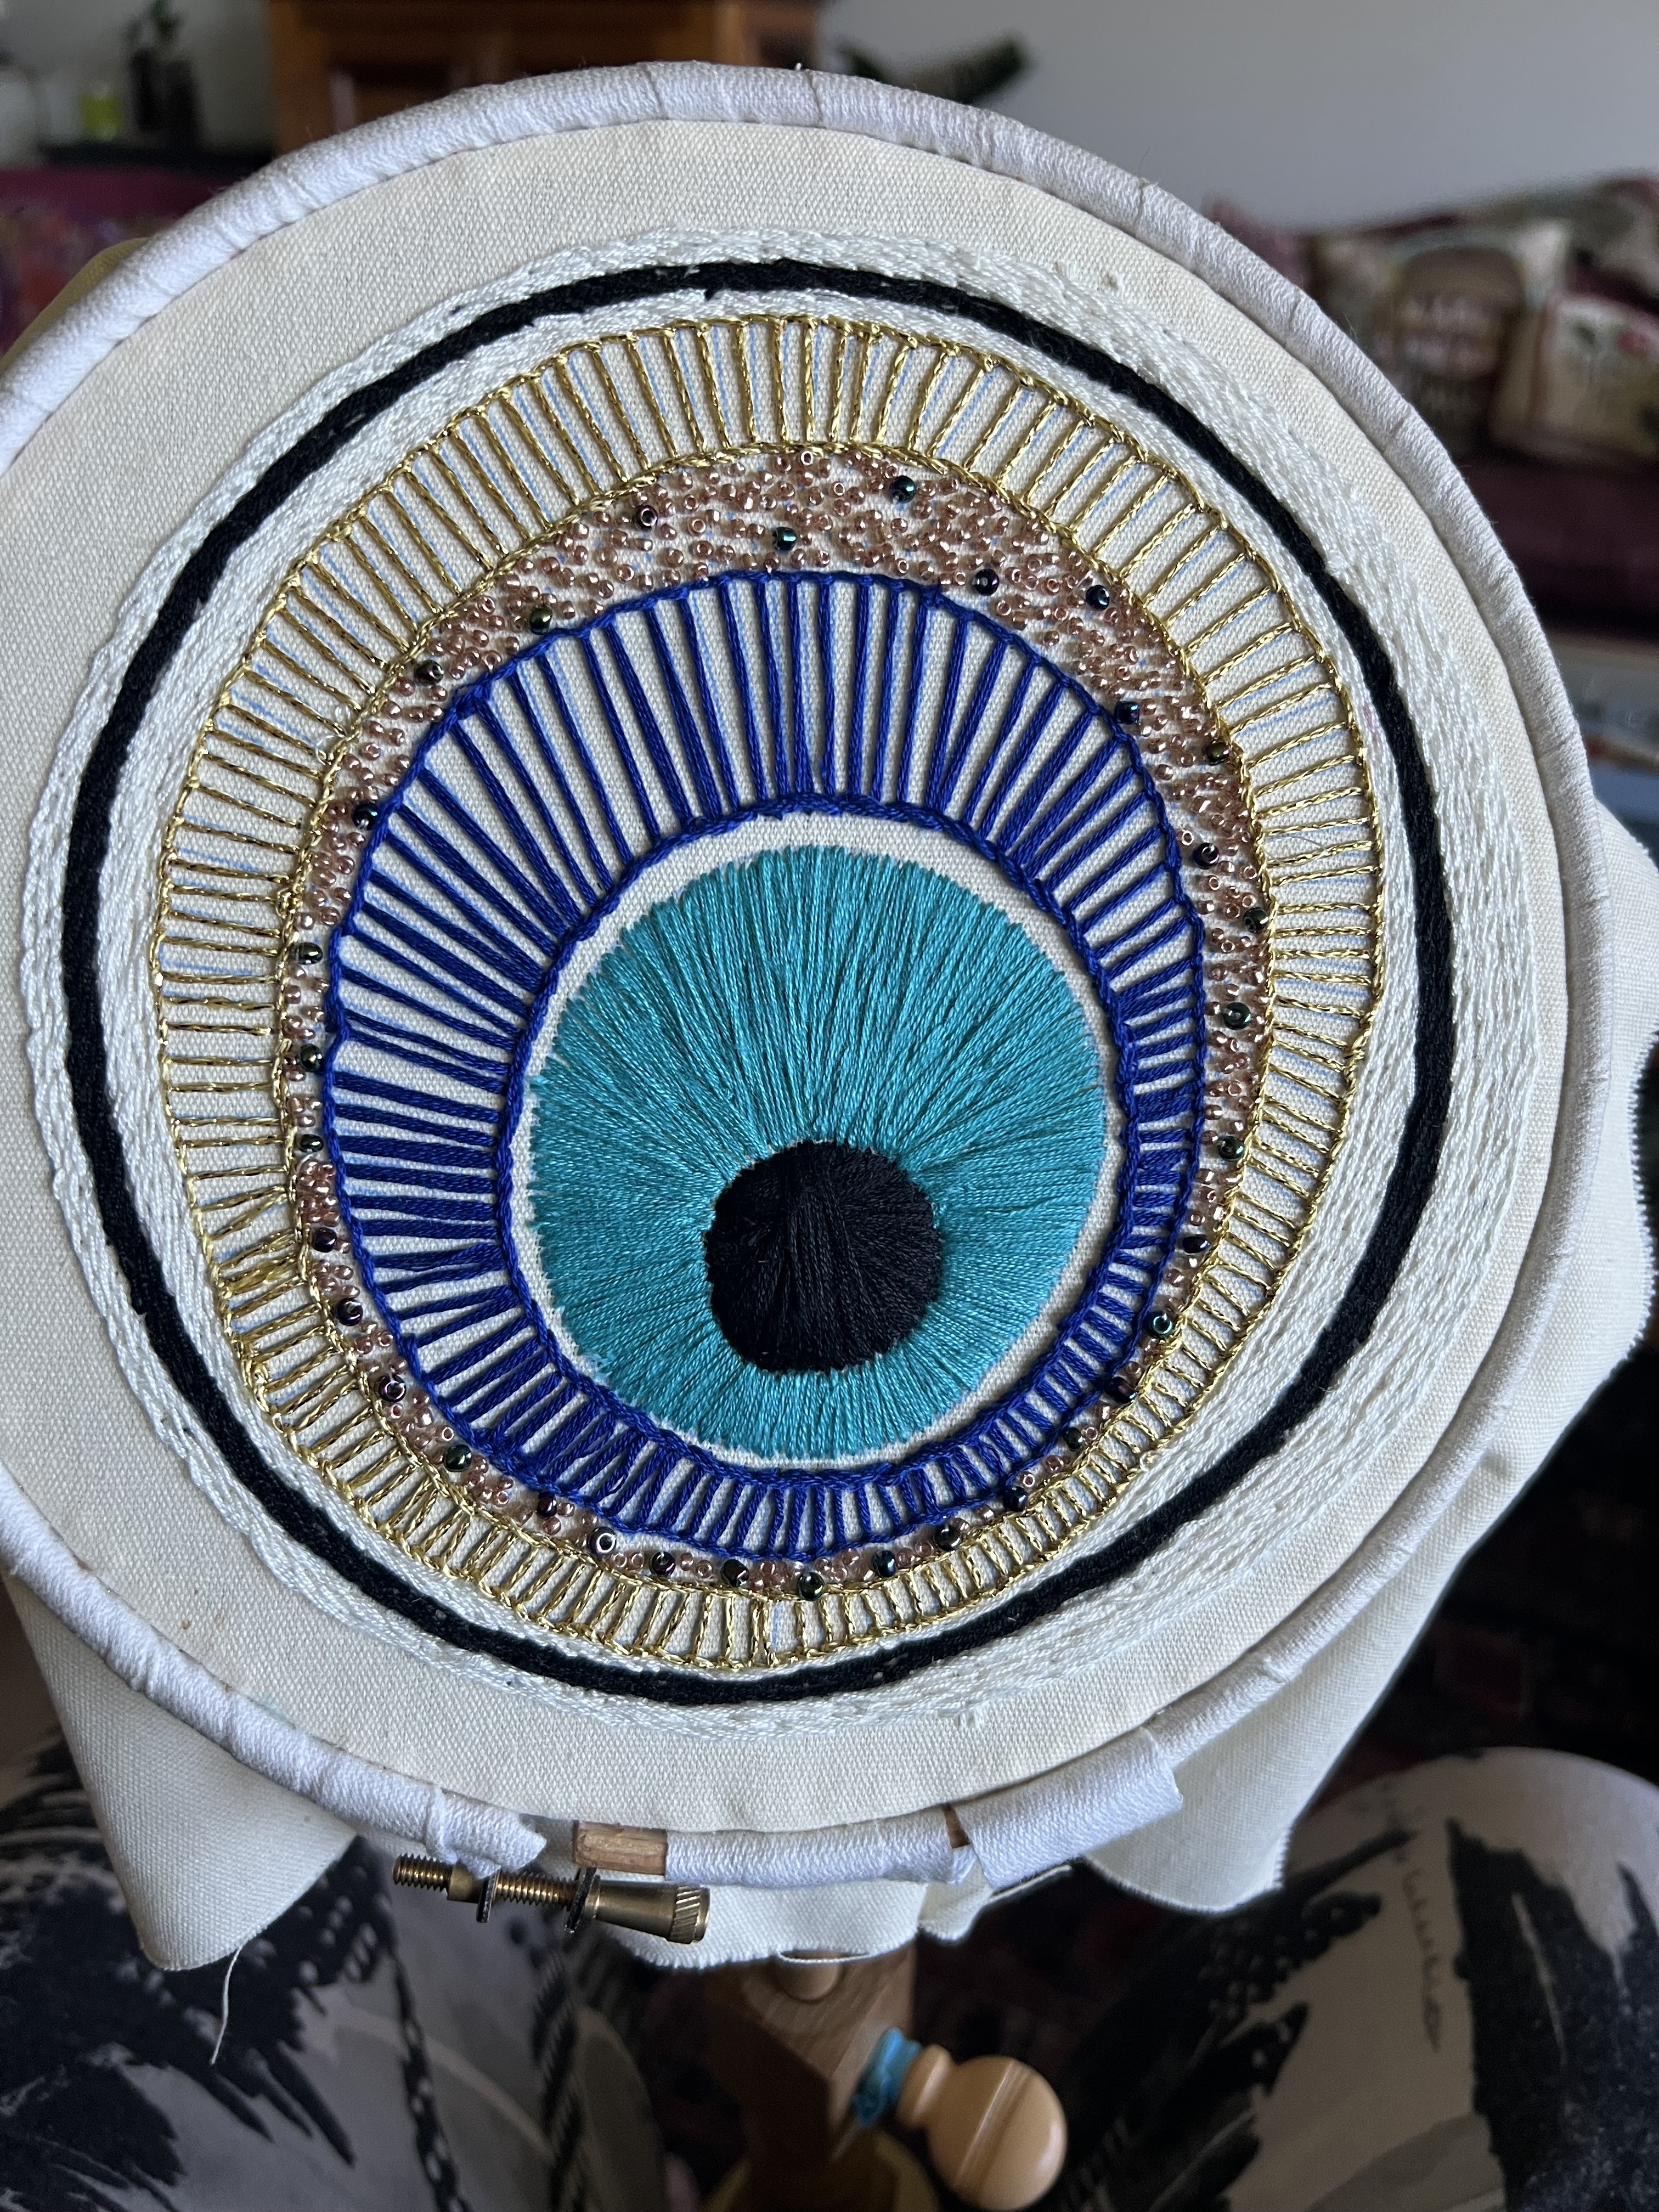
This time the beads are mostly tiny opaque rose gold, with a smattering of the usual larger coloured ones. There is some unexplained thread of a similar goldy-brown colour, which I’m assuming was provided to attach the beads, but I wasn’t tempted. As before, I used my own nylon beading thread.
Also once again, I used an alternative to the metallic provided, this time a roll of gold I had come across on the Guild trading table, a softer thread with a fine cotton core.

This design  has an outer border of white. As before, thread for the predominant colour, in this case white, was almost exactly enough, while all other colours had excess. 


I mounted it in the display frame using the same fabric on the back as last time.


Again, I enjoyed stitching it. 


I don’t think the predominant white border works as well as black, but it provides an interesting, discussable contrast.


Thursday, February 20, 2025

Huckaback on Aida Centre finished for now.

Returning to the Huckaback on Aida border I created as a result of the Embroiderers’ Guild Certificate Course Workshop in January, I decided to add to the centre. I had purchased a pattern for a Hamsa from Etsy for the talk I’m giving later in the year on the Evil Eye in Embroidery. As I had no plan for it beyond working it as a sample, it seemed this was an opportunity. The pattern came with instruction for working it in 22 shades of blue cotton. Hamsas, however, are worked in red in a number of cultures. If anything, red amplifies the protection - and fits my colour scheme!

I therefore gathered all the Perle 5 threads I had in shades of red and set to work. I didn’t try to follow the shading on the pattern, rather began with what I had and made it up as I went along. I reverted to perle 5 because this was a cross stitch pattern over one square of Aida and perle 3 would be too bulky.

In fact tent stitch was more than adequate with perle 5. I worked the basic outline using about 6 shades of red.

I didn’t want so much white space, so added extra flames in shades of orange. 

At the workshop it was suggested that I put this in the Guild Exhibition, so I had a deadline. 


While I’m happy with the remaining white background , it should be filled with white, or ecru, stitches rather than left, as it is, with the Aida as background. I simply ran out of time.

As it was, I took it out of the hoop at midnight last night and dropped it at the Guild today. I haven’t decided yet whether to use it as a sample, a cushion or a bag. Probably the last. I will decide after the WES talk in May. 

For now I’m happy with the result of the experiment of Huckaback on Aida resulting from the workshop. It’s been a lot of fun and learning, the way I like it: flying by the seat of my pants! 

I didn’t have time to block it, but steam-pressed it this morning. I can still see a faint hoop mark, a sign of a woman who is no domestic goddess, but tried. 🤷🏻‍♀️


Friday, February 14, 2025

Certificate Course Workshop: Designing with Huckaback on Aida

 The first Guild Certificate Course Workshop for this year was Designing with Huckaback on Aida, taken by Carol Mullan. It was an intriguing topic. I have done quite a bit of Huckaback over the last 15 years, either on Huckaback  fabric or monks' cloth. Using Aida opens up possibilities of combining the Huckaback technique with other counted techniques.

I didn't have much Aida in my stash, but found a piece I had bought from the Guild trading table. It was 35cmx42cm and had been edged with bias binding and tacked along the centre lines.  It would do, I thought, for the requested A4 working fabric.

However, once I read Carol's notes and assimilated the ideas she presented, I got inspired to design and work it as a whole piece. So, while the rest of the group was playing with manageable samples, I launch into A Project!

I had taken the requested selection of threads, but, with the whole-piece design in mind, I selected a group of perle 5 threads from the trading table in a colour way inspired by the pink border.
 I selected a standard Huckaback border pattern and worked it in three shaded rows, dark to lighter, all the way around, making a few adjustments in count along the way to fit the piece, which, I am sure, was not originally intended to accommodate the floats in the fabric as well as the spaces between them. 

Back at home, I spend a bit of time going through books, looking for ideas for filling. I favoured Kogin, a Japanese straight, two-colour, counted stitch with many possible patterns, but when I tried it, I realised the width of the Aida squares meant that even using a Perle 5 thread, I would not get coverage of the fabric.

So I began to experiment with stitches. Rows of chain stitch gave good coverage, weaving a web with an uneven number of spokes gave decent coverage. Because I was working in an elongated shape it didn’t fill the space, but I like the look. My straight stitches on the corner (left above) didn’t work well, even after I couched them down.
It finally occurred to me that a perle 3 might be better. I only had two perle 3 threads in the red-orange- pink palette, but they made an immediate improvement in coverage (left). The contrast isn't great, but better than the photo suggests.


The next section began as feather stitch. The diagonal rows looked so good I continued, making it more like an open buttonhole stitch. As I only had two colours to work with, I improvised stripes.

I experimented a bit, working the rows from left to right only, then working a return row from right to left. The latter didn't work as well. 

Opposite, I worked a similar pattern in two shades of perle 5 to contrast coverage. Niamh adviced on the contrast colour - and she was right, it harmonises!
By now a hoop was needed. While Huckaback needs to be worked in the hand,  filling is much better (especially with my right index finger out of action  from surgery!) in a hoop. It was close to the hoop edge, but just enough to hold.
That left one side, on which I experimented with Bargello. This was almost back to the original Huckaback design concept, using the whole fabric thickness rather than the floats. 

I dashed off to Create in Stitch to buy more perle 3. The colour choice is limited , but good enough to for a decent Bargello coverage.

So here is the finished piece, straight off the hoop ( as you can see!).

I have a plan for the centre, which I will attempt in time for the upcoming Guild Exhibition (submit next week!). Hopefully I will have a result to post by then. In the meantime I’ve had fun with this and learned a heap. 
One of the best workshops ever.


Thursday, February 6, 2025

Aquile finished with tassels

I've been slowly working on tassels for the Aquile mat, using an adapted version of one by Rita Maria Faleri in Inspirations 103.

The body of the tassel consists of 20 strands knotted at each end with 3 bundles of 4 knots, so 12 knots per strand and 240 knots per tassel.

I decided to make the head of the knot from a bundle of left-over linen covered in needlelace. I considered a bead, but decided to stay with the softness of the linen and cotton.

These are not difficult to make, but require fine motor skills.
The initial one was good enough for me to keep going.

After two I had to stop for a while, due to an operation on my right index finger to remove a myxoid cyst. For about ten days, while I could manage some tasks, and some stitching, using my thumb and middle finger, knots proved too difficult. I have recovered enough in the last two days to tie the requisite 480 knots,  216 while on desk duty at the Guild, and 264 at home. Not that I was counting!


I’m not sorry to have finished, and I won’t be making any more for a while!

I also made the two extra needle lace heads, and attached them 


so the cushion front is now fully converted.


It joins the earlier two mats, or, more likely, throw-overs to cover food.


.
I have fabric left for another two, but won't be working them any time soon. These three will now go into the upcoming Guild 60th Anniversary Exhibition. 

While I like them, their use is limited, and I'm into useful!

Tuesday, February 4, 2025

3rd Evil Eye kit


Yes, I’m addicted - or, if you prefer, on a roll. I bought these as a bundle of three kits on Etsy. There were 5 designs to choose from, the three I chose were the default. I have since ordered the other two, but they are coming from the UK and seem to be printed on demand, so this will be the last for at least a few weeks. 

I was wary of this one because of the number of close lines in stem stitch, but got into the swing with the central circle in black satin stitch. As before, I worked this in a revolving arch, continuing until all areas were covered. This creates a raised texture, more effective, I think, than side to side satin stitch.

As with the last one, I used Madeira metallic rather than the metallic supplied.

I began the blue rays with 2 rather than 3 strands of cotton. The lines are very close together and two worked well. After a few rows, however, I switched to split stitch. This gave me greater control over the line and a straighter look.

I love the way this works, intensifying the colour as the density of stitches get closer together. A design technique I would not have thought of for myself


Stem stitch is better on the border, where you want a solid block rather than a fine line. The additional black border makes it pop.

I had a bit of trouble with the beads.  The bead border on one side was slightly wider at one end although the photo of the finished work showed only 2 beads all the way. The gap at some places required 3 beads to fill the space. I filled the space rather than following the picture, using up all the beads provided, but it looked uneven.


I went ahead with the next section, but when that was done, raided the earlier kits for spare beads and brought all rows on that side to 3 beads. Much better.

Finally, the outer ring.


This time I found a piece of Japanese fabric in colours that worked for the backing, pinned and stitched it tight.


I was unsure of this one when it arrived, but I really like the finished product.


The three hang well together. The Guild Exhibition is coming up and I plan to join these three together and display them.