Search This Blog

Showing posts with label bullion. Show all posts

Saturday, February 9, 2019

Zenbroidery 3.1


I last posted an update on my latest zenbroidery project in September 2018. This is a grab-and-go project that has not seen much activity in the light of the other things I've had on the go.


I have worked some of the larger, more solid flowers in a version of Portuguese knot stitch and lots of the leaves in a variety of filling stitches - trying things out.

I've tried to flow the colours across the piece, shifting from red-yellows into blue-purples.


I just love working these pieces. It is freeing, experimental work and the results make useful bags (always an incentive!).


I've played with bullion knots  needle-weaving and stars.


I still have a bit to finish, but  probably not enough to take it with me when I travel in March. It is a good grab-and-go project, but only has a few hours left in it, so it is in my sights to finish before the end of the month.

Let's see how I go!


Wednesday, May 25, 2016

Fisherton-de-la-mere

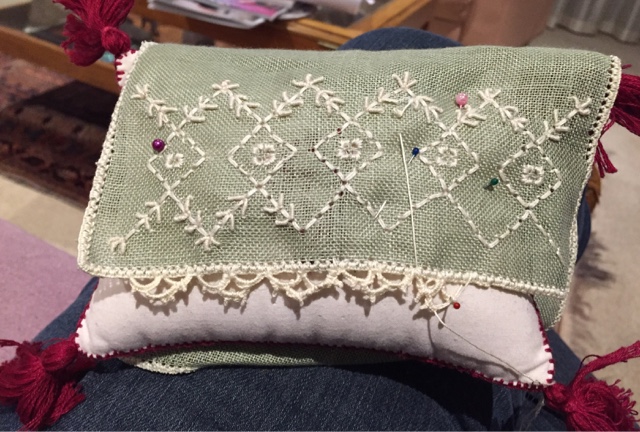
On the last weekend in April, I did a two-day course in Fisherton-de-la-Mere embroidery with Christine Bishop at the Embroiderers' Guild of SA. It was terrific.                                                   I used a piece of Permin linen that I had bought as a remnant at the end of 2014 at The Crewel Gobelin while on a visit to Sydney. It proved to be a great buy.
The main embroidery was done using ecru cotton a broder. I lost count of threads in the centre of the pattern. As I only realised this after completing the basic squares and beginning the bullions, I stuck with the error and adapted the rest of the design.
As always with Christine's classes, this was a well-designed project. The number of stitches, the size of the piece and the challenge fitted the two-day class. The stitches included pulled stitch, wrapped bullions, a pulled edge, buttonhole and needle lace.


The stitches new to me were the wrapped bullions and the picots on the needlelace edge. The wrapped bullions were terrific - a real advance for me over the usual needle wrapped version.

The challenge was the picots on the needlelace. I am comfortable with needlelace per se, but the picots challenged me. I undid quite a few before getting some I was prepared to live with. I achieved them - but crudely. I need to keep working on them.


I used a large, fat pincushion to support the needlelace.


We had the option of making our piece into a mat or a pouch. I chose the pouch and decided to line it with a piece of raw silk left from a past dressmaking project.
I really like the way this turned out. There are errors - which act as a prompt to check and double check my thread counting - but it is harmonious and elegant.


Many thanks to Christine and my fellow students for a really pleasant day, some new skills and a most pleasing little pouch.

Saturday, April 9, 2016

Brazilian Dimensional Embroidery

This is a piece I began in a class last year. I came across it while organising my storage cupboard recently. It took me a while to remember any details of the class until I realised it was the class I did the day before I went to the UK last year. I had done a few leaves and stems in class then turned my head to packing and departing. No wonder I couldn't remember much!
The class was for the Embroiderers' Guild Certificate Course and taken by Eleni Dickson. She provided a kit and excellent notes - so I soon refreshed my memory and got stitching. I have been hoping to use Brazilian embroidery to work some Australian native plants. I had, however, never learned to use the Edmar threads.


Eleni's hints and instructions were very helpful and I was able to manage the synthetic thread - something I haven't done before.


The piece, though small, used a good, manageable range of stitches, including needle lace, bullion knots, leaf stitch, stacked stem stitch and colonial knots.


I liked the couched and beaded spray.

I have a number of these small Brazilian designs printed on to trigger cloth. I enjoyed doing this one so much I'm tempted to make up the eight or so that I have and put them together on a bag. This one was not on trigger cloth, so may not fit into such a scheme.
Discovering this unfinished piece led to a very enjoyable day finishing it off. It also gave me confidence  to revive my plan to work some Australian designs using Brazilian techniques.


Monday, March 24, 2014

Patchwork progress

The last time I posted progress on my patchwork quilt, I thought I had eight rows of hexagons to add to get the required size (25 rows).

Since then I have worked steadily and have added four of the eight rows.

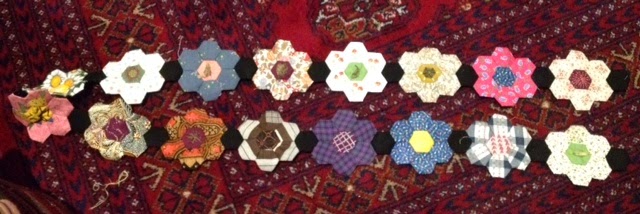
I am still working to a routine of constructing the hexies two rows at a time - black hexagons first, then coloured, join each into a row, then embroider the centres of the coloured rows, then join the two row together and add them to the quilt.

I enjoy each bit of the process but the treat is the embroidery of the centres.


I've experimented with a few on the rows just finished, including some bullion buds, a circle and a satin stitch flower.


Of course, there have been quite a few old favourites.


When I tried the now 21-row quilt on our bed I decided that I only need two, not four more rows. With the edging, this will easily be as high as I want the quilt to come on the bed. In fact, I am wondering if I could/should make the top border on the quilt narrower than on the other three sides. I don't want a black border to overwhelm the look of the quilt and I don't want to have a double layer of quilt around our heads. I will think about this as I add the last two rows of hexagons.

Thursday, February 6, 2014

Further hexagon centre embellishments

I haven't embroidered all the hexagon centres with a specific motif. For some I have made up the embellishment as I went along.

This one, for example, is a buttonhole flower using variegated thread in shades similar to the surrounding fabric.

This one is a whipped chain stitch circle.

Mostly the embroidery is flat, but I did succomb to small bullion buds for one.


I managed a whipped chain stitch wheel with button hole spokes on the fabric left  from Fionn's snack bag.

In some, I just continued the lines of the fabric.

Some are more successful than others, but it is a lot of fun just playing around with such small motifs and breaks the long sessions of stitching he hexagons together.


Friday, April 19, 2013

Woolly Teddy

I don't make a lot from Creative Embroidery and Cross Stitch magazine, although I subscribe and like to browse it and check out suppliers and ideas. However, late last year, an issue entitled Inspiring Embroidery and Cross Stitch Vol 20 No 4 had two projects that really appealed. One was a DMC Bargello phone cover that I'd like to adapt to something else one day and the other was Wooly Teddy, designed by Ruth Marshall, on page 36. The magazine has not yet been listed on the publisher's site but I have found a link to it at Erica's.

I had a remnant of wool blanketing that has been just waiting for this project, and while I was gathering my wits and the threads (Mogear 2 ply Mohair - not easy to come by)  friends of our family announced they were expecting their first baby in May of this year.

I made a few changes to the project. First, I decided to trace the pattern outline directly on to the wool blanketing. Working the project, as recommended, through water-soluble Vilene did not appeal. I stitched the outlines first to stay ahead of the fading of the outline and filled in from the picture and diagram.

I had trouble getting all the Mogear threads, so substituted a Gumnut Tulips thread for the hard-to-get dark pink . I also substituted a Madiera gold silk for the Rajmahal.

The Mogear colours I did manage to get came out darker - particularly tea tree, the pale pink - than the magazine photos. That's a plus as far as I am concerned.

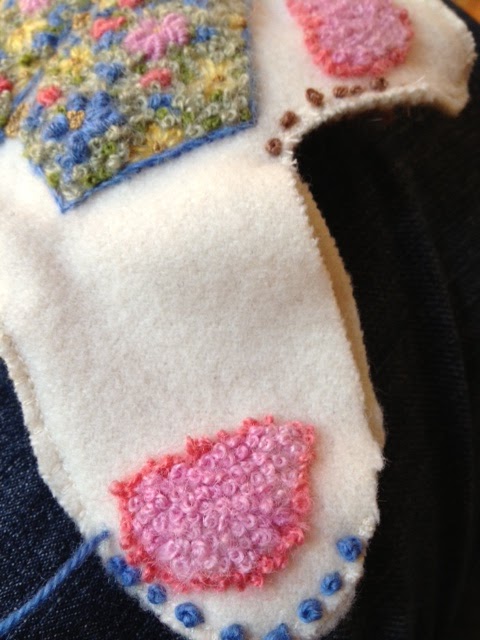
The dominant stitch is the colonial knot, which is used to fill in the spaces in the vest, as well as the paw and ear pads. The vest has some bullion knot flowers and yellow lazy daisies that go in first, and the knots go around them. It's very effective and provides quite a bit of freedom to improvise, which was useful because I ran out of both blue and the recommended olive green thread on the vest back.


Rather than chase more of the Mogear blue and green and wait for it to arrive, I raided my wool stash and found a darker green in the olive range in a Bendigo Woollen Mills 2 ply. I liked the effect of the darker green so much I decided to add some of it into the front as well.


The front and back are machine stitched together then over-stitched with colonial knots all around the edge. The pattern uses pale pink, but I thought it was a bit wishy-washy in the photo, and a bit too overall pink on my bear. I tried the cinnamon colour of the face, and also tried blue - very close to the Mogear blue, but a Bendigo Woollen Mills 4 ply in my stash.

I settled on the blue - thought it was bright and sat well with the vest. Because this is for a baby, I also rejected the tiny buttons down the front in favour of stitched buttons in the gold silk thread, and the ribbon around the neck in favour of a dark pink couched bow tie.
When I reached this point, I decided to go around the edge once more with colonial knots, filling in the spaces between so the edge looks solid rather that dotty.


I'm fairly pleased with the result. I'd maybe position the face a little higher next time, and make a few adjustments to vest armholes, but it is a nice little bear.

This project has given me an idea for the woollen blanket I have been thinking about for a couple of years.  I think the flowers and colonial knots technique might adapt to what I have in mind.


Edmund Brien Deveney was born early, on 17 April. I do hope he has much pleasure from Woolly Teddy!