Search This Blog

Friday, April 19, 2013

Woolly Teddy

I don't make a lot from Creative Embroidery and Cross Stitch magazine, although I subscribe and like to browse it and check out suppliers and ideas. However, late last year, an issue entitled Inspiring Embroidery and Cross Stitch Vol 20 No 4 had two projects that really appealed. One was a DMC Bargello phone cover that I'd like to adapt to something else one day and the other was Wooly Teddy, designed by Ruth Marshall, on page 36. The magazine has not yet been listed on the publisher's site but I have found a link to it at Erica's.

I had a remnant of wool blanketing that has been just waiting for this project, and while I was gathering my wits and the threads (Mogear 2 ply Mohair - not easy to come by)  friends of our family announced they were expecting their first baby in May of this year.

I made a few changes to the project. First, I decided to trace the pattern outline directly on to the wool blanketing. Working the project, as recommended, through water-soluble Vilene did not appeal. I stitched the outlines first to stay ahead of the fading of the outline and filled in from the picture and diagram.

I had trouble getting all the Mogear threads, so substituted a Gumnut Tulips thread for the hard-to-get dark pink . I also substituted a Madiera gold silk for the Rajmahal.

The Mogear colours I did manage to get came out darker - particularly tea tree, the pale pink - than the magazine photos. That's a plus as far as I am concerned.

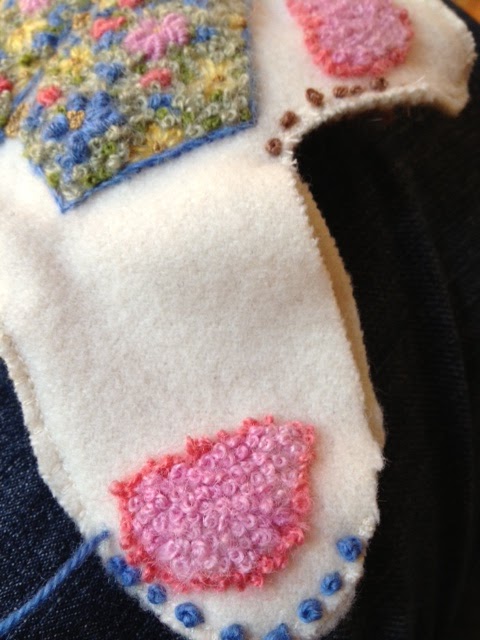
The dominant stitch is the colonial knot, which is used to fill in the spaces in the vest, as well as the paw and ear pads. The vest has some bullion knot flowers and yellow lazy daisies that go in first, and the knots go around them. It's very effective and provides quite a bit of freedom to improvise, which was useful because I ran out of both blue and the recommended olive green thread on the vest back.


Rather than chase more of the Mogear blue and green and wait for it to arrive, I raided my wool stash and found a darker green in the olive range in a Bendigo Woollen Mills 2 ply. I liked the effect of the darker green so much I decided to add some of it into the front as well.


The front and back are machine stitched together then over-stitched with colonial knots all around the edge. The pattern uses pale pink, but I thought it was a bit wishy-washy in the photo, and a bit too overall pink on my bear. I tried the cinnamon colour of the face, and also tried blue - very close to the Mogear blue, but a Bendigo Woollen Mills 4 ply in my stash.

I settled on the blue - thought it was bright and sat well with the vest. Because this is for a baby, I also rejected the tiny buttons down the front in favour of stitched buttons in the gold silk thread, and the ribbon around the neck in favour of a dark pink couched bow tie.
When I reached this point, I decided to go around the edge once more with colonial knots, filling in the spaces between so the edge looks solid rather that dotty.


I'm fairly pleased with the result. I'd maybe position the face a little higher next time, and make a few adjustments to vest armholes, but it is a nice little bear.

This project has given me an idea for the woollen blanket I have been thinking about for a couple of years.  I think the flowers and colonial knots technique might adapt to what I have in mind.


Edmund Brien Deveney was born early, on 17 April. I do hope he has much pleasure from Woolly Teddy!


Saturday, April 13, 2013

Winter birds progress

I have now finished one side of the Winter Birds table topper. The pattern is repeated on all four sides.
I settled on satin stitch for the big leaves and couched straight stitch for the pine-needles, but wasn't happy with either the satin stitch or the lattice I had experimented with for the snow.

My next step was to try split back stitch. I was much happier with this than with the satin stitch.

Although I left my earlier experiments with the leaves and with the snow lattice in place, like a sampler, I thought the satin stitch snow so horrible I pulled it out.

I replaced it with split back stitch going horizontally, rather than vertically - and liked that one best of all.

I am going to leave the lattice example and the vertical one in - treat it as a sampler. I might try a double layer of satin stitch in the next quarter - horizontal over vertical perhaps.


I also worked the breasts of the birds in split back stitch, but the wings in satin stitch.


I have a few more variations in mind to try on the other three sides!


Tuesday, April 9, 2013

Winter Birds Table Topper Start

After the Samurai, I wanted a project that had large components, a bit free-flowing and involved no counting,  preparation or construction. I settled on a kit for a table topper, bought, of course, on sale.

I bought this because it is so cheerful. I like the colours, and the style reminds me a bit of Hungarian embroidery, which I admire. I also like to have some projects on hand that require no finishing once I've finished stitching and I rather liked the edging on this one.


The thread is 5 Perle - solid and fast, and the instructions consist of a large diagram and a sheet of stitches. Basic.

I began on the red berries and really enjoyed the freedom after the cross-stitch effort of the last weeks.

I moved on to the pine needles, and decided to couch them rather than have long loose stitches as in the diagram. That seemed to work well.


I then decided to experiment a little on some of the larger leaves, trying some of the lattice techniques that Mary Corbet has been writing about in her blog.
I needed the filling fairly dense, so used two shades of green with the framework lines fairly close together. It was possible to get the lines intersecting so the colour is all light at the tip and all darker at the base and a mixture in between. It gives a textured effect that I quite like.


It doesn't look so good, however, with the gold veins in place.


Next I played around with the cream-coloured blobs that I take to be snow. Not having a lot of experience of snow, I don't know whether birds actually choose snow rather than exposed branches to sit on, and I would have expected the thread to be white, not cream - but I am out of my knowledge base and may be too literal.

Rather than large blobs of satin stitch, I tried layers of couched lattice - a layer on the straight and couched down overlayed by another set at a 45 degree angle. It would work well for a nest, but probably isn't the best effect for snow.

The photo also shows how the gold veins for the satin-stitched leaves sink into the work, while those on the latticed leaves stay on the surface. Looks like satin stitch wins for the leaves.  I want to try something else for the snow (assuming that's what it is!). It's good to be working on something I can easily play around with.


Saturday, April 6, 2013

Samurai Treasure Box


While I was putting the last finishing touches (gold metallic thread is not my favourite!) on the embroidery of the Samurai, I took breaks to work out how to make the box.

I worked out the measurements on paper.

 I then cut the cardboard for the sides and lid. I used mounting card from our local framer, but should have chosen a piece without a paper covering on it. The paper made cutting a bit harder and edges rougher.


I had intended to use some dark red silk I bought at a sale last week, but discovered the last of the Japanese  temple brocades I bought some time ago, and thought it would be really appropriate. It was exactly the right size for the bottom of the box and I had some matching gold silk that would work for the lid.
When I made the box for my hardanger square, I forgot to line the fabric with tissue. This time I remembered. I found the tissue superfluous on the brocade, which is quite heavy, and not thick enough on the silk, which wrinkled a lot.


I was, of course, doing this under pressure of time - not to be recommended when glue is involved - so may get better results with more care.

The box and embroidery were finished in time to lace, position and glue the embroidery before I went to bed the night before the gift was needed, leaving the Shorter Oxford to do it's job overnight.


In the morning I mounted a few shells to cover a couple of places where the craft glue did NOT dry clear.


We added a few warrior treasures to the box - an arrow brooch, a sword brooch, a robot on a chain.

A happy ending!

Friday, April 5, 2013

Made It!

The Samurai piece is finished and mounted on the box! This is a quick post on the embroidery finish - I will post the box-making component tomorrow.

Although the birthday was yesterday, we have a family dinner tonight when we will celebrate, so the extra day got me over the line.

It has been a bit of a marathon.


I finished cross-stitching the bottom of the kimono, then took the piece out of the hoop to do the backstitch - quite a lot of it - around the edges, the face, then the gold highlights and additions. It was easier to move around the whole piece out of the hoop.


This is the finished piece. I will post the box-making and finish over the weekend.


Monday, April 1, 2013

Samurai progress

Here's how the samurai is shaping up.  I have finished his right shoulder and face. I haven't as yet done any of the facial features or backstitch outlines.

From there I moved to the trees behind him - I wanted to finish as much of the top part of the work before shifting the fabric down in the hoop.

I found the trees really hard on my eyes - counting from the chart back to the aida was giving me serious focusing problem.


I resolved this by putting in the backstitch outline of the tree branches. Then I could see where I needed to go and just work the three brown threads where needed to give the required shading effect. Much better on my eyes and much faster.


I have added some of the background texturing - and noticed that a bit I did on the lower part will need to come out as I made an error with colour.

Still, it is shaping up - and even though I have the bottom of his kimono, the backstitch outline and some lower foliage  to go, I am hopeful of finishing in time for the birthday.