Search This Blog

Saturday, July 28, 2018

More Pearl Cases

All images in this post are copyright. The design is the property of Christine Bishop and cannot be copied without her express permission.

At the end of the last post, I was working on two smaller Pearl Cases on my spare piece of 28 count linen, using two components of Christine Bishop's larger pouch for an Embroiderers' Guild Class .


I couldn't easily source the tiny seed beads that Christine used, so I compromised with slightly larger ones.


I was happy with the result. By now I had the hang of the counting and really enjoyed the stitching. I enjoyed the four-sided stitch so much that I used it to mark off the folds as well as the edge.


Construction was the same as for the original project, using some pink silk from my stash.


I deliberately made them slightly different sizes - to see how useful each proved to be.


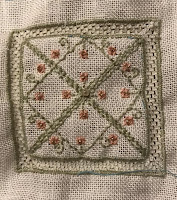
I think these pouches do need a fastener, since I am planning to keep  jewellery in them. I made a twisted cord from the perle threads I had used for the embroidery. I couldn't bear to discard any of the cord, so made one fastening very long.


I then tried out the pouches.


I'm delighted with this result. I have friends expressing interest in storing their pearls in this manner - so I am looking forward to making many more variations!


Saturday, July 21, 2018

Counted Apple Blossom Pearls case: Class with Christine Bishop

On the first weekend of this month I had the privilege and pleasure of attending a two day class with Christine Bishop at the Embroiderers' Guild of SA.  The project was a brilliant one - a pouch for storing and carrying pearls.

This is such a good idea. Christine's design is lovely and immediately drew my attention. It is counted thread work on linen, lined with silk to preserve and enhance the lustre of the pearls. I have several sets of pearls and have never thought of keeping them in silk lined bags. It is one of the great embroidery ideas.


There were about a dozen of us in the class which was set up at one end of the Guild's Gallery space, because for part of Saturday we were sharing the Gallery with JEMS - our Junior Embroiderers' Group. The set-up proved to be fortuitous. The light was great and we were compact enough as a group to be able to talk without being short of individual space. It resulted in a lot of sharing and discussion.


I was so absorbed in stitching and listening to the discussion that I forgot to take photos of the group.

As a result, there are only photos of my own progress on the project.  I have watermarked these photos to protect Christine's design.


For the same reason, I am not including any discussion of the stitches.


I got quite a lot done in the two days of the class and was really enjoying stitching it. I worked on little else for the rest of the week in order to finish it.


Rather than iron it, I blocked the finished piece before lining it with silk and stitching it into a pouch.


I managed to find a pearl from an odd ear-ring to form a catch.


The result is wonderfully fit for purpose.


I was so entranced by this design and project that I have been experimenting with variations. I had tried to gather together the threads and linen listed for this project before attending the class. I had prepared some linen but had trouble sourcing some of the threads. Christine had, however, prepared kits - as usual generously tacked, edged and comprehensive.

While I used her kit for the project, I still had the linen I had prepared, so decided to adapt it to a couple of subsidiary projects.

I adjusted the tacking to create two smaller pouches, which I am working with components of Christine's design.


It's proving to be interesting - aa well as good (and much needed) practice for my counted thread work. I think I'm addicted.

I'll post the items when finished.


It was a great weekend of stitching. I enjoyed the company, learned a lot, liked sharing space with our Junior Embroiderers and got some inspiration and ideas. Can't ask for much more than that!


Saturday, July 14, 2018

Cat’s paw prayer shawl

A month or so ago I set about knitting a shawl for a friend who is recovering from serious illness. I like the concept of prayer shawls and have knitted a number. I have several books of patterns, but for this one I sought a pattern elsewhere.

My friend loves cats. I looked therefore, for a pattern that involved cats in some way. After quite a bit of searching I found a cat's paw pattern through Ravelry. It was in a book of patterns for use with North Ronaldsay yarn. North Ronaldsay is the most northerly of the Orkney Islands. This book, by Elizabeth Lovick,  took me on another journey of discovery. I didn't have North Ronaldsay yarn but  I had some three-ply yarn I thought would work.

I ordered an e-copy of the book as I wanted to knit the shawl  immediately. The patterns were so beautiful I ordered  Elizabeth Lovick's other books!


This shawl knits from the point, from few to many stitches. The edging is added at the end. I like adding the edging - it is somehow satisfying to work it in stages.

It knitted up quite quickly and looked, as usual, pretty raggy.


It did, nevertheless, pass the wedding ring test!


I then blocked it on a towel on the carpet.


I love the way the pattern and gossamer effect emerges from the raggyness.


It is lovely and soft,  my friend liked it and I really enjoyed making it. In fact, it has got me going - I'm now on a bit of a shawl knitting binge!

Thursday, July 5, 2018

Wordsworth Sampler Finish

My Nicola Jarvis-designed Wordsworth sampler, begun in March at the Crewel Work Company retreat arrived in the mail on 18 May. Along with the work of other students, it had been on display at the Wordsworth Museum.

It went straight into my Lowery stand. I've been working on it every chance I get. It is not very portable, and needs good light, so not great for working at night.


I had completed most of the right hand bird and just enough of other elements to get the hang of the stitches, so set about completing the remaining elements of the bird - the tail feathers, eye and white wing,


before setting to work on leaves.

It comes to life with texture.


Next step was the cottage. I completed the walls, then the roof, the windows and the outline. This was wonderfully satisfying to stitch - texture really giving it life.


The passion flower was a bit of a challenge.  The flower part was OK, but the stamens and seed pods were not like any passion flower I have seen and I struggled to make them recognisable in the variegated thread.


Although the many daisies are a little tedious to stitch, I love the effect. The stitching blends perfectly with the fabric and lifts it ever so subtly.


Having worked my way around the sampler from right to left, I then stitched the left-hand bird. This time I worked the red breast in the intended more open lattice rather than the finer one I had worked on the right. Variation should be my middle name!


I'm not sure what it is about this design, but I loved doing it. Some embroidery is worth doing to learn new skill. This was just pleasure all the way!

I had been itching to try the lettering. I decided to go the whole hog and fill it in with split stitch rather than sticking to the outline. I thought this did justice to the heavy downstrokes and light upstrokes so beloved of cursive as I learned it.

While doing it, I contemplated how to deal with the background which I did not want to leave untouched.


I settled for lines of running stitch in the variegated blue thread of the bird's head - a bit of a Kantha technique to indicate sky.


I had considered a number of options for display. In the end, I went with my first instinct of a tray. I ordered a large memory tray from Australian Needle Arts. These are manufactured in the USA by Sudberry House and I have used one before - also for a Nicola Jarvis project!


I spent a bit of time thinking about how to mount it in the tray. I lashed the fabric over the mounting board and tried it for size.


I then settled for a mount of striped blue silk from my stash.

I cut strips along the stripes and attached them using double-sided tape, mitring the corners.


I was delighted with the result.


The tray has a backing that adheres.

It isn't easy to photograph it with the glass. No matter where I put it, it reflects. The stitching and texture, however, it quite visible.


I have devised a way for the tray to hang on the side of a marble-topped wash-stand in my living room. It is visible as soon as I open the front door. It hangs on an S hook that sits under the marble and hangs down the side. The tray is easily removed for use and replaced for display.

I'm very, very happy with this - it has been a joy from beginning to end. Thanks a million Nicola and my fellow retreaters!