Search This Blog

Showing posts with label stem stitch. Show all posts

Tuesday, February 4, 2025

3rd Evil Eye kit


Yes, I’m addicted - or, if you prefer, on a roll. I bought these as a bundle of three kits on Etsy. There were 5 designs to choose from, the three I chose were the default. I have since ordered the other two, but they are coming from the UK and seem to be printed on demand, so this will be the last for at least a few weeks. 

I was wary of this one because of the number of close lines in stem stitch, but got into the swing with the central circle in black satin stitch. As before, I worked this in a revolving arch, continuing until all areas were covered. This creates a raised texture, more effective, I think, than side to side satin stitch.

As with the last one, I used Madeira metallic rather than the metallic supplied.

I began the blue rays with 2 rather than 3 strands of cotton. The lines are very close together and two worked well. After a few rows, however, I switched to split stitch. This gave me greater control over the line and a straighter look.

I love the way this works, intensifying the colour as the density of stitches get closer together. A design technique I would not have thought of for myself


Stem stitch is better on the border, where you want a solid block rather than a fine line. The additional black border makes it pop.

I had a bit of trouble with the beads.  The bead border on one side was slightly wider at one end although the photo of the finished work showed only 2 beads all the way. The gap at some places required 3 beads to fill the space. I filled the space rather than following the picture, using up all the beads provided, but it looked uneven.


I went ahead with the next section, but when that was done, raided the earlier kits for spare beads and brought all rows on that side to 3 beads. Much better.

Finally, the outer ring.


This time I found a piece of Japanese fabric in colours that worked for the backing, pinned and stitched it tight.


I was unsure of this one when it arrived, but I really like the finished product.


The three hang well together. The Guild Exhibition is coming up and I plan to join these three together and display them.

Tuesday, May 24, 2022

Arabian Bag

One of my daughters bought me this kit several years ago. I had thought of finishing it while attending the Guild's Crewel Group but that group recessed throughout Covid and is only just recovering. Now I've finished my Crewel chair, I thought I'd work some stored kits. This one was next on my list.

The linen is printed with a line of buildings, arranged in 5 groups. 


There's a card with 5 corresponding groups of thread as well as some envelopes of embellishments. 

This is what it looks like at the finish. I found it difficult, at times, to recognise the intended thread from the names given. While their Appleton's numbers were also given in the instructions, I don't have an Appleton's colour chart to recognise them. 

I didn't let this bother me too much. I used the recommended colours where I could and used my judgement when I couldn't. 

The figures are very small - 1-3 cm high and arranged in five groups. 


Most are worked in long and short, stem or satin stitch. 


The construction was interesting.  The embroidery forms a pocket around the outside of a lined drawstring bag which is embellished with beads around the peaked top. Tassels hold the pocket at key points. 


Of greatest interest to me was the method of constructing the base - an insert constructed from two rectangles and containing a firm pellon. Very clever method.

Beads on the top peaks, tassels to hold the outside pocket firm, and a series of small wooden rings stitched to the outside to take a cord, finished off the construction. The tassels and rings are reinforced on the inside with small buttons - a thoughtful, if slowing, touch.

As well as adding a couple of skills to my repertoire, it's a satisfying and useful object to have made. 

Thursday, September 16, 2021

Viking Samples


I've been doing quite a lot of research this year around Viking Embroidery. This is partly a result of the folding of the British Embroidery Study Group of the SA Embroiderers' Guild a couple of years ago. I promised the last couple of members of the British Group that the World Embroidery Study Group would incorporate British topics into our program.  My own particular interest, which goes back to my university undergraduate days, is with early English history, literature and language, so I have been scouting around Viking and Anglo-Saxon embroidery. I have a presentation on Viking Embroidery ready for the World Embroidery Study Group in October and have been asked to repeat it for a Certificate Course workshop in February 2022.  The latter means having a project for the group to work on.

Our knowledge of this era is largely built on the work of Margarethe Hald, textile historian and curator of the National Museum of Denmark whose definitive work was published by the Museum in 1980. Margarethe Hald died in 1982.

Subsequent books in the field acknowledge and draw on this work, which is, of course, out of print. When I looked, several months ago, there was only one copy on offer for sale in the world. There are four copies in Australian libraries, one here in South Australia at Flinders University. A Guild friend and alumna of Flinders, generously applied for an alumna borrowing card and borrowed the book for me. We are immensely privileged to have access to it.
Fortunately for us, there are numerous relevant excavated burial sites in Scandinavia and a couple in England, many containing textiles. In the acid soil of Scandinavian burial sites, animal fibre survives while plant fibre deteriorates faster, We know that Vikings were weavers and stitchers, who constructed clothes, mainly from wool but also skin and fur. The pieces were shaped and joined using running or back stitch, and the seams reinforced, either inside or outside the garment with a range of stitches. They also valued textiles and those wealthy enough imported silk, linens and embroidery from their trade routes to Baghdad, Constantinople and England.
For the workshop I procured just over a metre of dark brown woollen twill from the Historic Fabric Store in Sweden. The popularity of Viking re-enactments in many countries provides a supply of products attempting to replicate or imitate. It is not always easy to tell the difference. 

My plan is to provide students with a roughly A4 piece and the pattern, on printed solvi, for a reconstructed design from the Mammen Cloak, one of the few surviving  embroideries agreed to be Viking, along with some Appleton's wool in the colour range thought to have been used. It is believed the cloak was originally covered with embroidery, mostly in linen, which has not survived in the acid soil of the Swedish burial. The embroidered fragments that survived were all embroidered in wool. All are stem  stitch. 

I've worked my sample as a pouch. I used the Viking method of running stitch seams, reinforced on the outside by the stitch believed to have been used on the Mammen cloak.  

This is what it looks like inside - not very tidy, but it does hold the seam folds down, out of the way.

On the back of the pouch I decided to applique a sample of this design from a 10th century embroidery of spun silver on red silk in the Valsgarde burial. It isn't clear to me whether this part of the design was worked in couching or stem stitch. From illustrations it looks like stem. 

I located some red silk scraps in my stash. I chose one that was russet and stitched it on to some cotton fabric so it would fit in a 6" hoop. I then created a cardboard template of the design. I thought it might be easier to trace around a template than use other methods of transfer on the coloured silk.  It worked.
I've sourced some silver French gimp bullon perle wire that I thought might work for couching. It is not, however, even remotely close to spun silver in look or function - a much later thread design. In the end I settled for a silver metallic thread.


Initially I tried a softer, darker metallic, to outline the design in stem stitch. It was hard going and not the right colour or look. I  tried the silver metalic couched, then unpicked the dark outline.


The result isn't brilliant, but passable, I think, to give the idea of the original, which is thought to be the decoration on another cloak, probably imported to Scandinavia from Byzantium - either whole, or as pieces that were appliqued on locally.                
It seemed appropriate to appllique it to the back of the pouch. It's a bit wonky, but then, so was the original. I'm thinking that the woollen embroidery and the seam join will be the basis of the workshop. These are both directly attributable to Viking workmanship (or perhaps workwomanship). I will prepare some silk strips on calico backing that students can take home and work if they wish to try the example of silk work valued and imported by Vikings.
 I will eventually line the pouch and add a (very non-Viking) zip, but I will leave it unfinished for the workshop, so students can inspect the inside to see the seam neatening.

I have also purchased a set of Naalbinding needles and briefly tried them out, along with a lucet (which at the moment I have mislaid). Naalbinding, practiced by Vikings, predates both knitting and crochet and uses a needle to create fabric.  Certificate Group students may like to try these out and incorporate them in some way.  As I have indicated, my presentation to the World Embroidery Study Group does not include a project, but it will be useful to get their feedback on what I have planned.  There may be a later post around braiding, Naalbinding and weaving.

A friend from my university class in Early English Literature and Language commented that our studies were entirely based on the history of largely male activities - mainly fighting and writing - and that knowledge of textiles may go someway to redress the balance. We do know that there were Viking women warriors. There does seem to be agreement that the work of gathering, preparing, weaving and constructing garments, sails and furnishings from wool was executed by Viking women, perhaps not exclusively, but there's a way to go before we have a thorough knowledge of Viking women's lives. Someone, somewhere, I'm sure, is working on it.

In the meantime,  I can return to my knitting!

Tuesday, May 1, 2018

Wattle scarf


I have. over the last seven years since doing an Ottoman Scarf class with Alison Snepp, embroidered a number of scarves. Most of these were Raffal scarves, purchased as a follow-up to Alison's class. They are woven in India from Australian wool. The Raffal story is worth reading, a successful business established by one woman using the expertise she gained from working for the Australian Wool Board, utilising Australia's fine merino and the expertise of Indian weavers.

I am not sure if Raffal are still making perfectly plain scarves, but I had a couple left from my earlier purchase, and wanted to embroider one of them as a gift for a cousin who had kindly invited me to stay during my recent trip to England. I purchased scarves in colours that reflected the Australian bush, so chose a green one, sketched out some wattle branches and got to work.


It is a little tricky embroidering on these soft, open weave scarves. They resemble original Turkish bath towels - which is why Alison Snepp chose them for her original Ottoman scarf design. This means, however, you need to take great care in stitching, not to separate the fibres.

Back


front

You also need to take care that the back is fairly neat - as scarves don't sit obligingly on one side. These considerations limit the stitches you can use.


I limited myself to French knots, stem stitch and fly stitch.


Rather than adding larger tassels to those already there, as I had done in the past, I added gold beads that sparkle. It's not too over-the-top but adds little glints as the scarf moves.


It worked - and is something that will get some use in England!


Monday, April 9, 2018

More zenbroidery

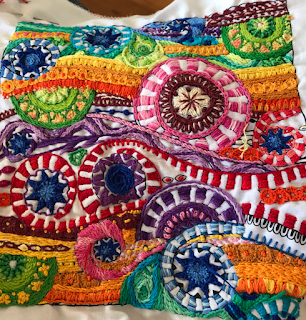
The zenbroidery piece I have been working on while travelling is the third piece I have worked. The first was a mandala. The second is the one below.

When I finished my Christmas cushions, I wanted a no-pressure project that I could pick up and put down over the Christmas period. I reached for another of the zenbroidery pieces in my stash - along with one of the cotton thread packs I had originally purchased from Herrschners ( more recently I have bought them in Australia through the Fox Collection).

This design presented more dilemmas than my previous mandala because there was potentially more white space. As the mandala was in quite narrow rings, there were fewer choices of whether to fill or not to fill.

I began roughly in the centre with some of the spirals, and left quite a lot of space.


These designs are  great for experimenting with stitches. The spirals lent themselves to running stitch in the Kantha style. I used star stitch on many of the centres and quite a bit of stem stitch.


I worked out colour as I went, once again, grading through the rainbow from the centre out. As I went, I experimented with leaving white and filling it in. By the end I had pretty much filled it all.


I find these great fun to stitch. I love making it up as I go along, trying things out, adjusting, adapting. It really IS colouring with thread - with the extra pleasure of playing with stitches.


Because I worked this on holidays over Christmas, mostly in my hand, with only the occasional use of a hoop for tricky stitches, it needed blocking. My intention was to turn it into a bag. I tried therefore to square it up by blocking.


This worked well, so I found a lining fabric and zip. I really like the look of this. The thread is from China and I enjoyed working with it. It is perle, soft and pleasant to work with- very little tangling, no shredding and wonderful colours.


I folded it in half, sewed up the sides and added a zip. It makes a lovely gift. I'm glad I filled in
most of the white background with colour and texture. The resulting pouch  is a useful size for a pencil case or small tools.


I have given it as a gift to a cousin. It's handy and not readily lost.

I've been working another, slightly larger, while travelling.


I like the thread, the colours, the patterns - and the leeway to make your own emphasis and colourways.


I can see myself making more of these.