Search This Blog

Wednesday, March 28, 2012

Preparation for Beating Around the Bush.

I am booked into two classes for the Embroidery Convention, Beating Around the Bush, in Adelaide this April, a one day class with Alison Snepp to make a needle roll, and a two day class with Betsy Morgan to make a Toy Chest Etui.


The latter is very ambitious. I've wanted to make a chest of this kind since I first saw one at the Adelaide Craft Fair about four years ago. I decided that, because it is expensive and lengthy to make no matter how I do it, I might as well do it in a class and give myself the best chance of success. There were quite a few classes I would have liked to go to, but I took the plunge with Betsy.

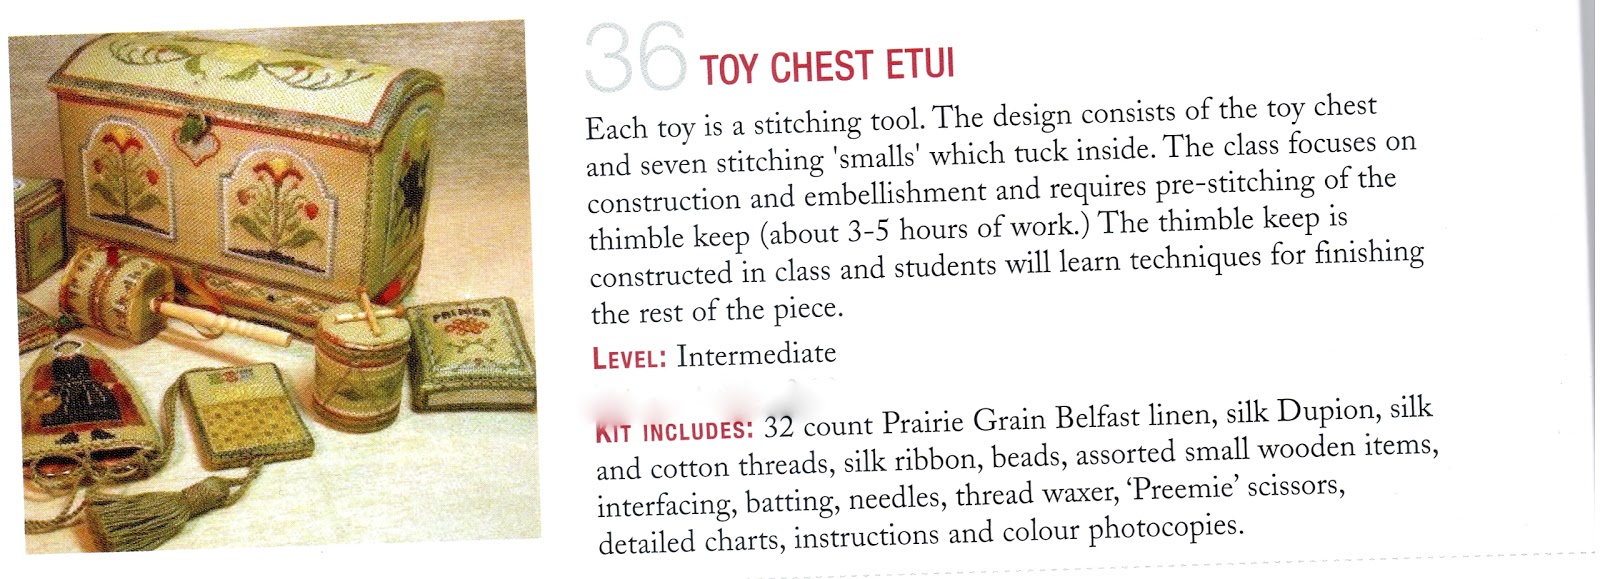
Last week the pre-class kit arrived - a chart, threads and linen for the thimble keep component of the project, to be embroidered before the class so the class can focus on construction.

I decided the best way to manage the four different variegated Gloriana threads in such a small space was to keep four needles going.

It proved an exercise in care and patience.  Eventually I settled on working with two or three threads, then coming back and filling in the others.


It became easier once I got to the middle section that has a full row of cross-stitch with the same thread forming a base-line for the multi-thread rows either side.


Once I was in the swing of it, it became manageable and enjoyable.


Notwithstanding, I did a fair amount of unpicking to get it right. There are still two errors in the piece which I have, I hope, accommodated so they won't effect the making.


While the look of the back isn't on my priority list, I did pay it some attention in order to manage the threads without tangles.


It has been a good exercise to orient myself to the class. I have a feel for the threads and this form of counted thread work. When I don't work in this medium all the time I have to get my head right for it.

As a finishaholic, I am a little daunted by the time it is likely to take me to embroider and construct the whole project, but  I'm going to think of it as a series of small pieces and perhaps allow myself some other projects in between .

Saturday, March 24, 2012

Treasure Chest for Hardanger Panel

I had a piece of cotton batik in my stash, bought in Indonesia, that went well with the hardanger panel.

I set aside a day to make the box. I had read all the instructions through when the kit arrived and realised there were a lot of steps that needed concentration and time. I have Meg Evans' inspiring book Hand-Stitched Boxes that I have yet to use to make anything, so I thought this treasure box with very clear instructions, might be the kick-start I need.

I visited my local framer who kindly gave me a large off-cut of mount board. He has been terrific with such off-cuts in the past.
I got my metal rule, several sharp pencils, the fabric I was going to use and even put a new blade in my Stanley knife.


I measured and re-measured before cutting - and it made a box! No doubt about it!

Then I made my mistake.
Having read the instructions and noted with interest  that the fabric was lined with applique paper and tissue to make book cloth, I completely lost this step.


I continued to cut out the fabric carefully, measuring angles and checking each measurement.

I applied craft glue and rolled the fabric on to the box, checking every step. It was as I applied the fabric to the lid, carefully folding the tricky corners, that I remembered the book-cloth bit. 


Go back, or go on? I couldn't see myself removing the cloth. I could go on, start again or cut more cloth and apply over the top. I decided to go on and see how it looked when finished. I figured I might as well make a whole new box as try to alter this one.

It was very wet with glue and I couldn't tell how it would look, so I left it to dry while I laced the lid.


Several hours later the box was dry and looked good enough for me to use. I figured I could proceed with the lid, and still redo the bottom later if I had to.


So I left it overnight, cursing myself for simply forgetting that step. Age and enthusiasm - a bad combination!

Here's the result.


I'm using it for all my loose buttons. My button tin now has only packets or sets of buttons.
No more removing all the packets and cards before I can find the interesting  loose ones underneath.


So far it is strong and smooth. If it shows signs of wear I will redo the bottom - with book paper. I will also make another box soon so I can get it right. 

In the meantime, I really love this box.
Thanks Yvette and Janie.


Wednesday, March 21, 2012

Hardanger Treasure Chest Lid Panel

I was mightily attracted to the little treasure box with a hardanger lid in Inspirations 73 and sent for the kit for the hardanger panel.

I have never tried hardanger although I have, a long time in the past, done a bit of drawn thread work.

Yvette Stanton designed the hardanger, and Janie Hubble the box.

It was a great project for a someone new to the technique. I took my time and worked it 'in the moment', relaxing into each stage.
The instructions were clear and logical. I really like the way the pattern emerged, each bit adding a new dimension, like an unfolding story rather than a jigsaw puzzle.


The main thread, a variegated Cottage Garden Threads stranded cotton in Raisin is lovely to look at and lovely to the touch.

I like the notion of kloster blocks - the basic "bricks" of five satin stitches over four threads - as a way of defining the work, like the foundations of a building.


The instructions didn't mention a hoop, so I didn't use one. This was OK for the kloster blocks, but when it came to the next step - cable stitches - I decided a hoop would help keep the tension.

I have fixed my seat frame with an extra screw, but its hoop is too large so I used a hand hoop and wrist brace.


Cables completed

I am surprised at the level of calm satisfaction this is providing as I add layer on layer to a small piece of linen!

with little eyelet stars


I had a few moments hesitation over the four sided stitches on the border - to complete each one or work cross-bars then sides? I nearly sent Yvette Stanton a message through Stitchaholics to ask - but decided not to be wuss. I went with the crossbars first.


The final step was the beading - so satisfying to put them in as a finishing touch. I have so enjoyed this project - lovely little steps that yield a big result and fantastic colours.


I have found some fabric for the box. That will be a bit of a challenge for me, as it requires really accurate measuring and cutting. I hope,  to do justice to this piece, I can make a box I am happy to use.

Wednesday, March 14, 2012

Perfect Petals

A second project I tried from Issue 75 of Stitch magazine, was one called Perfect Petals, a very clever crewel sampler by Tracy A. Franklin using the shape of a 12-petalled flower. I remembered that amongst the spare Raffal scarves I bought last year was one in a green wool that was not going to lend itself to the Australian flora theme for which they were intended, so I dug it out.

At the Embroiderer's Guild I heard the sad news that Christina's on Prospect Road was closing its doors at the end of February, so I paid  Monika, Rosemarie and Gunter  a visit to wish them well in their move to online only, and to find some thread for this project. As always, they were very helpful and I do hope their business adjusts.

I came away with silk, rather than wool thread - Gumnut stars in light and dark purple and Gumnut buds in light and dark pink.

I transferred the design to one end of the scarf using a sepia pen then raced against the time to get the petals outlined in stem stitch before the pen faded.

Unfortunately, the screws holding the hoop to my seat frame have come adrift and I am struggling to repair it, so I used a hand-held hoop - not good on my wrist.


The stitches, however, are terrific.

Each petal has a different stitch. Most are simple - stem stitch, chain stitch, double chain, seed stitch, closed herringbone. A few, however, are new to me.

I struggled a bit with a stem stitch made  up of bullions - but the effect is still quite good.


There is room to improvise and create your own textures.


I had a plane trip while working on this and it was a good one for taking with me. Once you have the idea and the sequence you don't need to be watching the pattern, but can work within the framework.

It really is a lot of fun. There are endless possibilities using different colours and threads.


This is the first flower finished and I was happy to press on with another on the other end. I'm beginning to think about tassels - will I have the patience to make them for this scarf?

The other end was easier still because I was carrying the pattern on the finished end! I made a few changes, like running the couched lines along rather than across the leaf, and the colour sequences are different.


After talking to a friend in Melbourne, I decided to try a little bit of beading on the tied-off fringe, rather than tassels.


I used 3-4 seed beads on each fringe tie, in the colour range of the embroidery plus green. I like the result. It gives a little flash of colour without taking the eye from the  embroidery.


I think the sampler pattern worked well on this scarf, but it would have plenty of other applications. I might use it again some day.

Friday, March 9, 2012

Sport and Bluebirds: Cross-stitched pillowcases.

I decided to post this very simple project today, following Mary Corbett's blog about a very splendid  bluebird in silk.

When I sourced my additional Bucilla Ballet Bears kits at Herrschners, I signed up for their newsletter and got sucked in badly by some of their stamped cross-stitch pillow cases. Over the Christmas period they had sales and I bought some pillow slips to embroider for the children. Each pair of pillow cases (49% cotton, 51% poly) with thread kit averaged $10 Australian.


I chose bluebirds for Brigid.


and sport for Fionn.

Although the colour variation requires a chart, it is pretty simple, so I did do some of it on a plane and while staying in a hotel over the holiday period.


My mother used to sing The Bluebird of Happiness while working around the house (my grandparents may have had it on a pianola roll, I think) and the song is stored away in my brain.

While stitching the bluebird, I did a bit of research and discovered the film, starring Shirley Temple, and the play on which it was based. The film was overshadowed by the Wizard of Oz.


I liked the words on the sports pillowcase and, on Jim's suggestion, added "mark" below the lower ball, for good measure. I also changed USA on the basketball to AUS (barely discernable in red).


I then got carried way, and added some words of the song to the bluebird pillowcases.


The only downside to these is that they have no closure mechanism - the edges are simply overlocked and their isn't room to create a turn. I considering adding  velcro dots but decided they were so large it might not be necessary. It may be an oddity that I have never come across a pillowcase with no closure mechanism! I now think this might be an old technical difference between a pillowcase and a pillowslip (not to be confused with a pillowsham!). I can always retro-fit.

I have a couple of crinoline ones to stitch for the younger girls later in the year. In the meantime, I had more fun with these than I had anticipated.

Sunday, March 4, 2012

Stitch magazine Tribal Cloth Panel

My daughter gave me a subscription to Stitch, the magazine of the UK Embroiderers' Guild, for Christmas. Issue 75 of has some terrific projects that I couldn't wait to make. The first of these was a small sampler piece on black felt, called 'Tribal Cloth'.

I loved the look of it and the variety of work involved - beading, needle felting, machine stitching with metallics and some simple embroidery. There was a kit available from the UK designer, Chris Gray. The cost of the kit and the postage was very reasonable, and the effort of gathering the necessary array of bits and pieces was off-putting, so I sent for one.

When it arrived, the first task was to cut and stitch the stamped fabric to the felt using a metallic thread. I am not experienced in using metallics but have been wanting to try. This was suitably simple and worked well enough to give me confidence.

The design was very simple - vertical rows separated by a line of running stitches using a variety of Anchor Marlitt (stranded rayon) threads and embellished in different ways. It would be easy to replace the stamped design with embroidery.


The next step was needle-felting five pieces of hand-dyed wool. I dug out the needle felter I had bought for the Kokeshi spectacle case last October - much satisfaction in using it again. I love the sensation of plunging the needles into the fabric and I like to see the soft fluffy bits emerge like a shadow on the other side.
Once in place, and couched,  the wool acts as a guide for the rows of embellishment.

I also like the variety and timeliness of the rows - enough to get a bit of practice and get the hang of it, without being overly repetitious.


The kits were available in three tones, pink-red, purple or green-gold. I had chosen the green-gold after a lot of prevaricating. I had no regrets. I really liked the colours of the beads - the fabulous mix of seed beads in particular.

The little squares are card and in the kit come pre-coated with acrylic paint and 'cosmic shimmer mist'.


The circles are washers, buttonholed using variegated silk thread. The centres are sequins, giving a mirrored effect.

The top and bottom edges are machine stitched using variegated quilting cotton - another first for me and a lot of fun.


The corners are tied off with beads and tassels.


I am considering mounting the finished piece on a bag, but for the moment it is pinned on the noticeboard beside my computer where I am getting  pleasure from it - and a lot of ideas about possibilities for these techniques.