Search This Blog

Tuesday, December 31, 2013

Veronica's Smocked Skirt

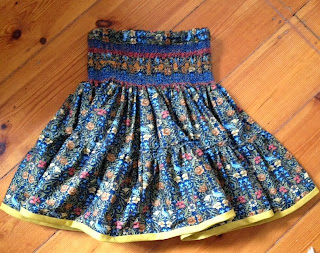
Here is the second of my Morris Meadows smocked skirts, this one for Veronica.

Once again, I chose the thread, then followed the prompt of the gathered fabric to design the smocking. For this one I stuck to two colours - the blue and the pink, and worked zig-zags, blue at top and bottom, two sets of pink in the centre.

This one was very simple - but quite effective I think. The density of the smocking off-sets the predominance of green in the fabric.


As always, the tricky bit is gathering and attaching the frill, but it caused no great dramas.


I hemmed this one with a small turn-over - didn't need to bind the edge.

As these two girls get older, I shall miss the gratification of gift recipients stripping off their clothes to immediately put on an outfit I have made!


Sunday, December 29, 2013

Niamh's Smocked Skirt

I can post this (and a few more too!) now that Christmas is over , but I did the work in late November The fabric is Morris Meadows that I bought from Country Bumpkin when it was on special. I bought two different colours - Veronica's will be posted in a day or two.
I used my old favourite pattern from AS&E 71 but joined the skirt back and front into one piece to pleat. I would rather smock the whole than join two smocked pieces.

I also wanted to work out a smocking design to fit the fabric, so chose my thread colours then worked it out as I went along.


The only tricky bit was achieving some filled diamonds in gold in the centre of the panel.

It is much less work to smock lines from one side to the other!

I was pleased with the result, however.


I wanted to maximise the length for this one, as Niamh is tallish, so bound the hem with some gold bias binding that Helen at Hetty's Patch helped me find.


A blue Tshirt completed the outfit.


This was a hit on Christmas Day as you can see from the photos, however blurry!


Wednesday, December 25, 2013

Heart Ornaments

My final Christmas ornament project was worked on felt heart shapes that were part of the Raggetty Ann kit. I didn't much like the " I love you" message on the hearts - seemed a bit disembodied. I used the heart shapes and made my own versions.


I spent a bit of time researching Corinthians 13:13 in different versions and settled for the English translation of the Aramaic which uses 'endure'. I stitched it freehand - a mistake!

However, I got better as I went along. I stitched them two-sided, more interesting I think than single-sided. I also reversed the colours of the sequins - putting white sequins on the red felt and vice-versa.


For the second one I summarised .I also added a bell and star to this one.


I'm pleased with them as they hang on the tree. They constitute my third, and last, set of Christmas wishes.


Tuesday, December 24, 2013

Christmas Raggetty Anns

In the lead up to this Christmas I have also been stitching another of the Bucilla Christmas ornament kits I have accumulated. This one is Raggetty Ann.

The kit comes with two each of Raggetty Ann, her bear, a heart and a gift box. I am decided not to make the gift box at all and to change the hearts to something else.

For the moment I focused on the Raggetty Anns and bears.


I found these a lot of fun to make.  I love seeing the figure emerge from the bits of felt.

I found this particular kit not as clear in its instructions as other Bucilla kits I have made - but I have made enough to get by!

The pink sequins on her skirt should be embroidery. I fixed this on the second one and the sequins are a Christmas treat!


The bear is a nice touch and quick to make. Because one Raggetty Ann is a gift and has to travel to Canberra, I attached the bear lightly to her hands. The one for our tree balances between her hands.


Here they are, just finished. One is now in Canberra and the other hanging on our Christmas Tree.

Happy Christmas Number Two!


Monday, December 23, 2013

Beaded Balthasar

Last year I managed Melchior, the first of three Mill Hill kits of the Magi in time for Christmas. I am pleased to say I have added Balthasar in time for this Christmas. Casper just might have to wait another year!


For this one, I worked a few of the beads, then did most of the un-beaded cross-stitch, partly because I did it while away with our eldest two grandchildren for a few days last week, and I am concerned about spilling the beads while working in a motel.

Once again, I found this work very hard on my wrist, and did most of the work with my wrist-brace on.


The trick with this work, as for most cross-stitch, is to get the sense of the pattern and follow that, checking back with the chart, rather than having to follow the chart for every stitch. Even so, I found this took me quite a lot of hours to complete.

I backed him in purple felt.


Our Christmas Tree this year is a plum tree growing in a pot.  It looks really splendid. Our grandchildren also decorated the frangipani, cherry and bay trees growing outside the window, so we have a Christmas Environment!


Balthasar has joined Melchior inside on the Plum Christmas Tree.

I am hoping to make at least one more post before Christmas Day - and a host of posts after, of the Christmas presents I have been stitching, but can't make public!

This is Happy Christmas Number One.


Wednesday, December 11, 2013

Christmas Bunting

I have never made bunting but always liked the look of it, so a several of months ago I bought a couple of panels of Christmas bunting and set about making a set for our place and one for my local daughter's place as well.


The kids wanted them long, so I bought some cheap, plain red fabric to back the panel pieces.
I must say nothing could be simpler than following instructions that are printed on the panel of fabric!

I didn't use interfacing, but joined each piece to a backing piece and turned the seam to the inside.

I used a roll of red bias binding that I bought at a craft fair to join them together.


They looked really jolly spread all over the floor of the sewing room.

I figured my Canberra daughter might like some too, so nipped out and bought another panel.

I put ours up this week. Understated but festive, I think!


Sunday, December 1, 2013

Mostly red and black gift bags


One of my favourite of the bags I made from the kimono fabric was this one from a long piece of synthetic brocade, shaped with a curve at the top. It lent itself to a long, lined bag that folds up like a pouch.


This piece of red figured silk had a mitred corner and two self-covered buttons. I fastened the piece with velcro, rather than ribbon to form another pouch.


The remainder are mostly conventional drawstrings, some lined, some not and finished off with buttons to stop the drawstring disappearing into the casing.


The $32 kimono fabric pack made 45 bags. I won't use them all at Christmas (or any time soon, given my existing bag stash!).

Wednesday, November 27, 2013

Gift Bags

When I was working full time, I periodically took a leave day for 'bag therapy' - a day of making drawstring bags from left-over fabric, or from sari scraps or kimono fabric to use in place of gift wrapping. I find it really relaxing, and love having a supply of bags in which to put gifts. In semi-retirement, I no longer need bag therapy days, however, when recently in Melbourne I bought a bag of vintage kimono fabric from the Made in Japan Shop in Australia on Collins.


As I am trying not to keep adding to my stash, and Christmas is coming, I have spent quite a few days playing with the fabric and turning it into bags.

Apart from the fabric itself, I get pleasure from finding the hand-stitching of the original kimono-maker, and evidence of painstaking techniques like reinforced seams, folded linings and mitred corners.
 Wherever possible, I try to keep original shapes and linings. This sleeve piece, for example, could be make into a bag as is, leaving the curve on one corner.

I divided the fabric into three piles based on colour - light, dark and red. This enabled me to use a basic thread for each pile, rather than matching thread to each bag.


Cords are mostly ribbon, but in  a couple of cases I recycled elastic cord with a stopper


 or in one case, the cord I had removed from a blouse I bought.

The photos don't give a sense of size, but the bags vary from roughly 15 inches to a couple of inches.


I'm not sure it is sane to spend days unpicking kimono fabric and remaking it into bags

- it certainly isn't an economic proposition by any conventional standard, but so satisfying.

The bags in this post are the light ones. I will post photos of some of the black and red batches later.