Search This Blog

Tuesday, April 11, 2023

A start on St Brigid.

Last year I indulged in Alice Starmore's book Aran Knits  and enough of her wool to make the St Brigid's jumper for my eldest granddaughter.  When the wool arrived I bought a swift to wind the 19 skeins into balls. 

In the last fortnight, armed with my tin of stitch markers,  I have begun knitting it. I needed to clear the decks of other projects because I figured this would take all my time once started. I was right.

The pattern is worked from 5 charts.  On the back and front, every row uses all 5 charts, one repeated once, another twice, making 7 chart references in each row. Three charts cover 24 rows, the others less - so are repeated more.

After working through the charts once from the book, I decided to create a single chart. This helped. I may yet create a full 169 stitch x 24 row chart if the going gets tough

It was still slow going. The cables vary, and the symbols are not, to my mind, intuitive. It is difficult to keep track of where I am up to from memory alone, which is how I mostly work, choosing logical places to stop at the end of a session. The cables here are too complex for that, and 24 rows too long for one, or even two, long knitting sessions. Fortunately I had a line marker in my toolkit - bought at some stage just in case. In case is now.

I also dug out a row counter, again, something I have not needed to use before. It too has proved its worth. 
With the help of these tools, I have worked my way through 40 rows. It will, I know, become easier as I progress.

I was concerned that I would not have enough wool, and calculated that if I could get 40 rows out of one ball, I would be safe.  I got two thirds of the way through row 40, so think I should be OK. I will keep monitoring. The colour is still available, but I will hold my nerve a bit longer. 

For now, I'll stick to my knitting.

Sunday, April 2, 2023

Glazig Embroidery: Yar Zour

For the last couple of weeks I have been working on Yar Zhou,  a design from the studio of Pascal Jaouen, in the Quimper region of Brittany. Jaouen has developed a modern design and haute-couture style from historical embroidery of the region - in particular, Glazig (or 'little blue") embroidery popular on men's vests in the 18th century.  

The vests were woollen, or linen lined with wool, and embroidered in silk. Jaouen'skits are likewise worked on linen backed with wool and use au ver a soie twisted silk thread.

My kit was a gift from my Belgian friend Genevieve, who visited Quimper a couple of years ago. I hope I've done justice to her generosity.

 Yar Zour means Beautiful Chicken in Breton. 

The kit has linen printed with the design, the wool backing, the silk threads and a set of cards with the individual stitch instructions in French. There wasn't a stitch diagram but I was able to work that out from the photograph on the website.

The silk is lovely, a strong, twisted yarn in vibrant colours. Like all silk it catches on any roughness on hands or nails and the end will unravel and create a knot if you are not careful. Short lengths help. 

I worked in a hoop although chain stitch, very much in evidence on Yar Zour, might be faster if the fabric was held in the hand. My arthritis won't allow me to hold fabric for any length of time and ergonomically it is better to work in a hands-free frame.  The thickness of the wool backing would make a scooping action quite difficult so a stabbing action with two hands and a hoop is called for.

The first challenge was laying the twisted silk thread smoothly in the buttonhole stitch sections. When the thread untwisted, as it sometimes did, the result was smoother. The challenge was not so much laying the thread, as getting the stitches close enough to each other. It was like doing satin stitch with a perle cotton, as opposed to stranded cotton:the threads don't spread or bond. Nevertheless, the effect is there. 

The second, and much greater challenge came with the stitch Galon d'Elliant. I struggled to find an English translation or equivalent for this. The English translation on the website is 'Elliant Stripe'. The diagram provided on the stitch card looks more like a needlelace stitch, but it is, I think, intended as a knot stitch. 

My attempts were so terrible that I substituted a woven stitch in a couple of places. This gave me the effect the design is after.

I found a stitch in Jacqueline Enthoven's book, The Stitches of Creative Embroidery, that might have been close (Knotted Cable Chain, p160), and Braid, or Gordian Knot Stitch, on the RSN Stitch Bank seems a very likely candidate.
I did try Galon d'Elliant in a couple of places, but the result (bright blue left, apricot right)was not encouraging. Fortunately these are tiny parts of the whole. I have left them, as I am after exemplar and learning, rather than perfection. I will be interested to discuss this stitch at the Guild. The Gordian Knot on the RSN Stitch Bank makes sense to me. I have also since found a useful description of crested chain stitch as used in Glazig embroidery, which seems similar. It's an interesting challenge.
One of the joys of this kit is the variation of stitches in such a small space. Every tiny section adds a challenge and interest. I particularly liked the Kamm stitch - the red woven section on the leg and the green/blue oval at the bottom. I can see myself using these again.

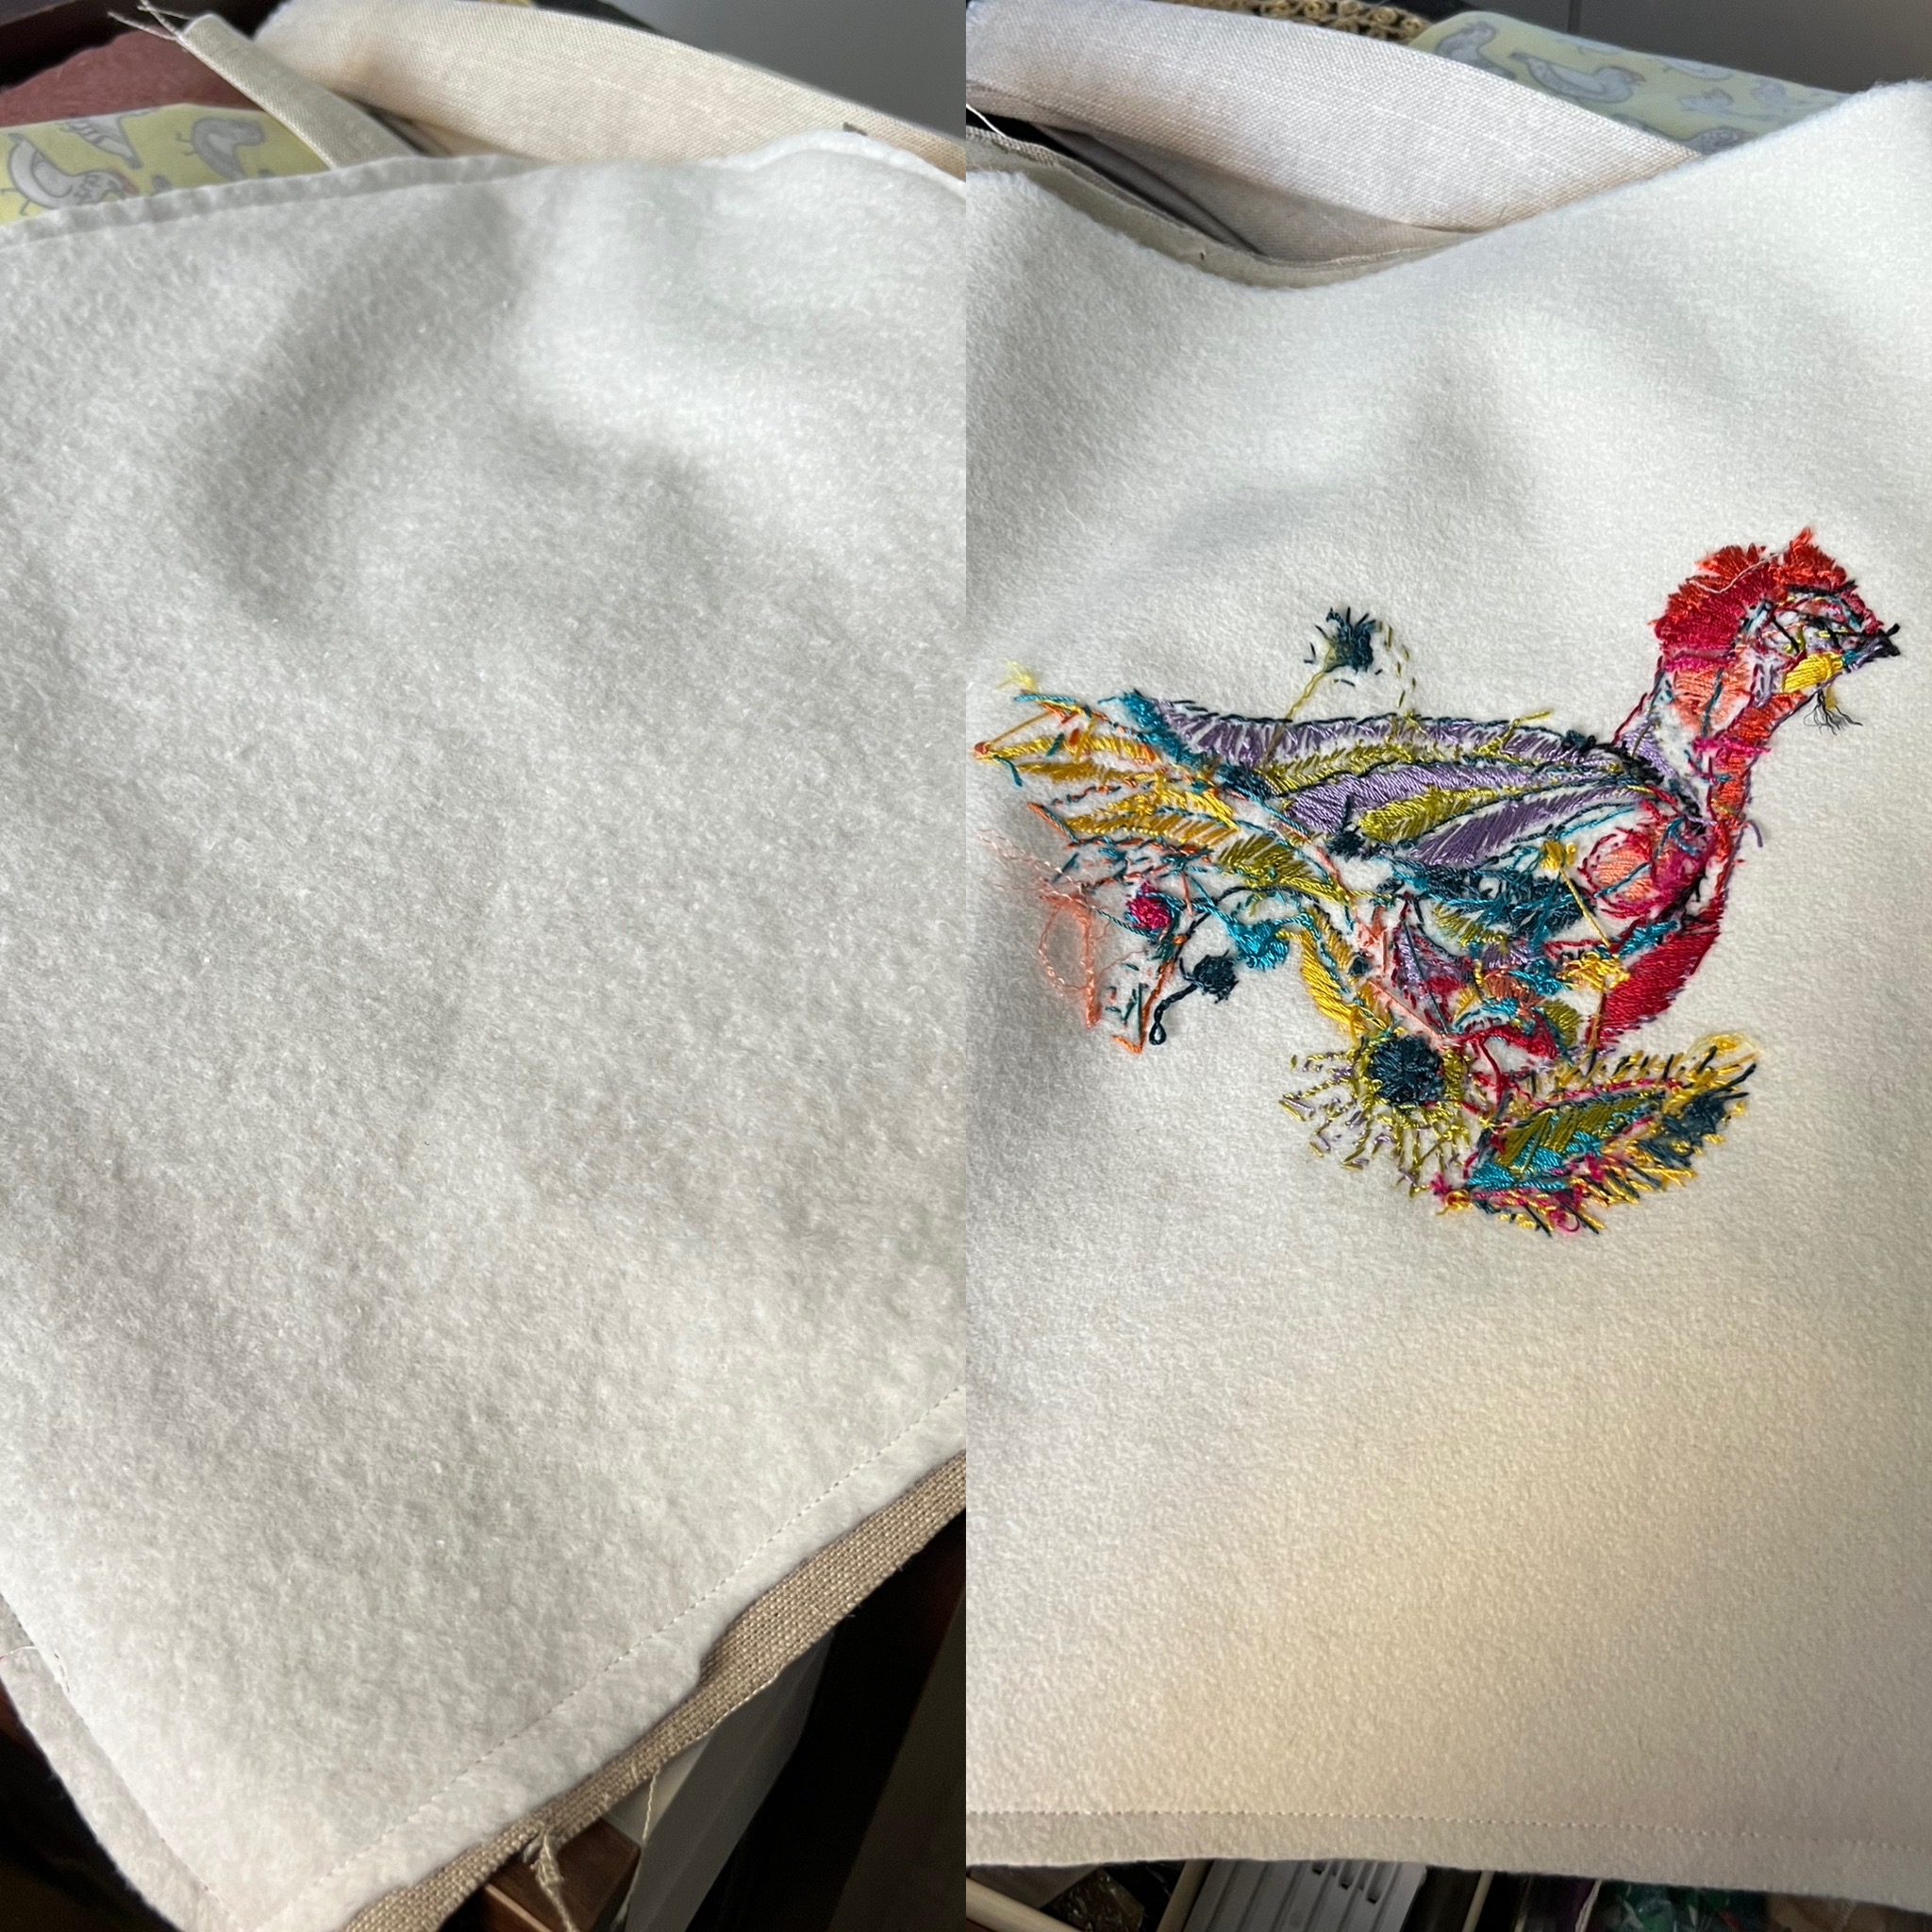
So here is the finished figure - a blaze of colour and fitted shapes. 


Although my hoop was well bound, it did leave a mark on the linen.  When I couldn't steam it out with my iron this morning, I blocked it, avoiding wetting the embroidered section. I wasn't too keen on soaking the silk. It dried well and fairly smooth. 

Given the size of the linen piece, I inevitably decided to turn it into a bag. I found some linen and wool backing for the back of the bag

and some appropriate cotton for the lining. This is a limited run design from Missy Rose. Fortunately I grabbed it when it was advertised, knowing it would come in handy.

I had cut out the fabric with a small tote in mind. I cut a long shoulder strap and two short handles, planning to add both. As I constructed it, I thought it might be better sealed with a zip. I had a length of red zip and a red zip-pull that I thought might work.

It did.

The tricky bit was ensuring the pull couldn't slip off the end. I solved it by inserting a small button at the open end of the zip.

I set out to finish this kit as a sample for my presentation in May on Glazig Embroidery to the Guild's World Embroidery Study Group. I now have a quite delightful bag and a lot of learning to show for my efforts.

That's the joy of experimenting with embroidery - and of a network of friends who share the madness. Thank you so much, Genevieve for the gift of a kit, your friendship - and a whole new rabbit-hole to explore. 
Merci mille fois, mon amie.

Tuesday, March 28, 2023

Hap Stretcher - Part 1.

I have long coveted a hap stretcher - a device used for over a hundred years in Shetland for blocking shawls. Although Kate Davies has information on her website about making one, my efforts to find a local maker amounted to nothing and, after helping a friend block several shawls on her wall, I decided to take the plunge and buy one from Shetland while the exchange rate was reasonable. My decision was helped by Paparwark, the company that makes them, changing their design to enable packaging in 1, rather than 2 metre lengths.

It took about 3 weeks to arrive, economically, safely, conveniently packaged. 


It emerged from the box a compact, smooth and elegant piece, taking up much less room than I had anticipated. It included one sheet of instruction.

Part of my reasoning in investing in this (at a time when I do NOT have a shawl to stretch!) was that it could be borrowed, and used by friends and acquaintances in their own homes at their leisure, rather than requiring a specially designed wall, or, in my case, crawling around on a carpet.
I soon realised that the box it came in was much larger than the compacted pieces and, dare I say it, a bag was called for!

I searched online for padded cotton quilting in Adelaide. There wasn't much available. Two Spotlight stores had it in black only, so I drew up a diagram, measured what I would need, and took myself off to one of them and bought what I thought was a generous 1.5 metres. There was only 2 metres on the roll, but the sales assistant didn't try to strike a deal on the remainder, just cutting what I asked for.

When I got home and laid it out, I realised it would need to be lined. The polyester padding on the back would tear in constant contact with the wood. It would have been simpler to cut 2 and back it with the same - which I could have done if I'd bought the 2 metres! C'est la vie. Instead I used the error margin I had built in to line the centre panel where the wood will mostly touch, and lined the rest with black linen. I added a pocket to hold the instructions.

I began with the intention of using large buttons to secure the bag. As I progressed, I decided these may pop open from the weight, and ties would be better. I had plenty of ribbon but thought woven strapping would be stronger, so, after more measurements, drawings and another online search, set off for a (different) Spotlight store for 25mm woven braid, to create 4 or 5 ties over the width of the bag. Buttons could hold the end flaps down.

I was hoping for red braid. The only red they had was 38mm, a bit harder to tie, but not impossible, so 4 metres came home with me. As I was driving home, mulling it over in my mind, I realised buckles would be better than ties. The only buckles I had were a couple of old shoe buckles - so more online searching at home. I soon realised I was well out of date.  The buckle search brought up clip fastenings for seat belts and backpacks - of course! I prepared to head off to a hardware store - until I discovered they supply either 25mm or 50mm buckles. No 38mm! I found what I needed at CamCords in Victoria, ordered them and received in today's mail.
So I have spent the afternoon wrapping and unwrapping the hap stretcher, testing lengths and placement - working it out as I go. A lot of trial, and not too much error. I broke one needle but didn't have to undo anything (so far so good!). My little Janome worked hard. I haven't stitched anything quite like this before, but it seems to have worked.
It fits over my shoulder and is comfortable to carry.  A few friends have asked what the hap stretcher looks like assembled, and I have to admit, I haven't as yet put it together. I got carried away with storage and carrying!  I admit it's a bit odd, but I can't face wielding lengths of wood to construct a 2 square metre frame in my apartment, on my own, and then taking it apart again.  With a bit of luck, however, a friend and I will assemble it later this week. 

I promise to take a photo!  One day Hap Stretcher Part 2 will no doubt include a shawl!

Monday, March 20, 2023

Odd Bunch Pouch

In a hunt through my wool stash last week I came across a collection of gauge samples I have worked over the years, more in the past than recently as I now work much smaller, less complex samples, and often undo them once they've served their purpose.

As I was in the process of using things up, I put them aside to see what I could do with them. This is the result.

The first sample  was for a cardigan I made myself in the 1990s (and still wear).

The pink to the right was a jumper for my own daughters when they were children.
I don't remember the pink and green to the left. The multicolour one below was a jumper for Jim.
In addition there were three plain samples for which I have no memory.

I pieced these together by hand into a misshapen pouch, found a piece of jolly chicken fabric with which to line it and added a zip.
I'm not sure what I'll use the pouch for, but I'll find something for it one day. It isn't the sort of thing I could give as a gift to anyone! It reminds me of the vegetable Odd Bunches now available in supermarkets - a great idea.
In my view, perfection is over-rated.

Makes this madwoman happy!

Tuesday, March 14, 2023

Baby Blanket 1

 Before Christmas, the Guild put out a request for some knitted baby cardigans for the Guild shop, preferably in white. Over the Christmas break I used some of the white cotton I had been using for the Shetland Wool Week hats to knit a baby cardigan, using a pattern I had from Bendigo Woollen Mills. The pattern had 7 sizes, so I picked the middle one. It turned out to be what consensus at the Guild said was for a two-year-old!

I didn't have enough white yarn for another, but made a couple in the smallest size in cream and ecru. 

It turns out that what the Guild shop is doing, is putting together Baby Welcome packs.They have a couple of knitted blankets which they are pairing with some basic clothes.  
Once I understood the goal, I got more targeted. I'm currently working on an aqua cardigan to accompany a green-blue knitted blanket they have in stock


I also dug out the squares I was crocheting towards the end of 2020- with a view to using up the same 4 ply cotton.  I had 53 completed squares - and another 45 of the centre circles. I had planned to keep going with the squares until I had used up all the yarn, but now decided to create a baby blanket  for the Guild  with what I had.

I tried joining the squares using some of the cream cotton (left). It looked, I thought, OK.  


However, I also found some rolls of white/blue/pink variegated knitting cotton which had, I think, belonged to my mother. 
That, I thought, looked really good. So this week I have been busy crocheting around the squares, and creating a baby blanket from 56 squares, laying it out on the floor as I went to get the best combination I can.  

I didn't undo the ones with ecru borders. I will make a second blanket using the centres I have left.  The variegated pastel works really well, but so will other things.                                 

It took quite a bit of time to do the individual, then the total border - most of the Adelaide Cup weekend. The result pleases me.

I worked a border around the whole thing in the variegated cotton. It is about 110cmx91cm.
I decided against stretching it much  by blocking, given it will need to be washed many times in its life and no mother has time for blocking. Instead, I washed it and spread it to dry flat on my table.

After 24 hours I moved it to a drying rack to get airflow underneath. 


I have a cone of 3 ply wool/acrylic mixture which I'm hoping might knit into a cardigan to go with this blanket, and an idea about a bag to contain them. 
Hopefully I will report on progress soon!