Search This Blog

Monday, January 28, 2013

The last of the Christmas projects

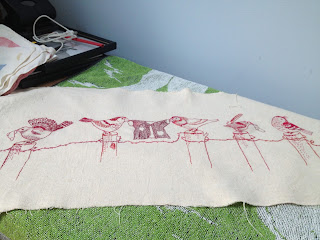
When I made the Jenny MacWhinney peg bag back in September, we had limited laundry use and difficulty getting to the clothes line. I thought of giving the peg bag away, but decided to keep it for a future in which washing and hanging out was easier - as it now is.

However, one of my daughters really loved the bag and said her family would really like one - so another Christmas present solved. I had enough linen and threads to manage.


This time I managed to transfer the whole design to my fabric - last time I missed two birds the first time! The Doodler lap frame works really well for this project.

I was also able to work quite a bit from memory - and improvise here and there.


Even the second time around, I love the variety of stitches and stances and the keen observation of bird behaviour evident in this design.


I had enough fabric for the bag and enough webbing. I had to send away however, for the clip to hang it. At this point, I decided to make a third bag, for my other daughter and her partner, who would not be with us on Christmas Day, but with whom we would exchange presents in mid-January. So I ordered two clips - and more webbing.

I had enough fabric for the third bag, but the linen piece was slightly darker than the linen I used for the first two - no bad thing.

In the pre-Christmas stitching effort and building activity, I missed taking any construction photos, so focused on those for bag 3.


By now I could stitch the scallops pretty quickly.


Once again, I used stitching plastic in the base to allow water to drain out if the bags get wet.


 I ran out of suitable fusible interface on the third bag, so quilted the interfacing I had into the lining.
The base insertion has also become a fairly easy exercise on the third time around!

 I filled the bags with UV-resistant pegs that I found in a catalogue. Time will tell if they are last longer than other pegs.

Everyone is happy with their pegbags.

I am doubly happy, because I responded to a Country Bumpkin Facebook request for information about what followers were stitching for Christmas, and won an Inspirations kit!

No, not a kit for the pegbag - for the Fallahi pincushion in Issue 72, something I had thought of making but I resisted the call of the kit!


Friday, January 25, 2013

Siennese Illuminated Treasure Box

I had a couple of small wooden boxes in my stash which I thought might be about the right size for the Siennese Illuminated Treasure piece I have just finished. They proved, however, to be too small. That is probably just as well, as I had bought them with a purpose in mind!


I also had a much larger dark oak box that I had purchased using a discount voucher that needed to be used by a particular date. After a bit of testing and debate I decided to use the oak box. The alternative was to make a box - a possibility that is still open if I decide I don't really like this piece on the oak box, since I didn't need to cut the fabric to mount it.

It took a bit of manoevring to get it satisfactorily centred, particularly since one of my edges wasn't quite straight.


I also discovered that the hoop had left a mark - I hadn't removed it each night since I was working on it pretty constantly.


I wasn't prepared to try laundring the silk, so embroidered my initials and date over the marks.

I'm not sure what I will use the box for, but I will find a place and use for it in the sewing room which is slowly coming back together. In the meantime, the photo on the kitchen table gives a sense of size and shape of the box.


Wednesday, January 23, 2013

Siennese Illuminated Treasure Stumpwork


I've been working on the stumpwork component of the Alison Cole Siennese Illuminated Treasure over the last week.

The individual petals are traced onto muslin, then worked over wire in  a hoop. We began the green leaf arrangement in class as it is the most complicated.


It becomes a bit of a challenge to stitch as the number of wires in the hoop increase.

I made an error on the last leaf motif, which should have been in the pink/purple colours. I made it green without thinking, and decided to leave it rather than redo.

Once finished, the leaves are cut out, trimmed and added to the goldwork.


This is the finished product. It's not bad for a first effort. There are a couple of tiny spots where the white cover of the wire shows through the stitching on the leaves. I can probably add a couple of stitches to cover if I am careful.


Now to find a way of displaying it.

Friday, January 18, 2013

Embroiderers' Guild Summer School

Last week I attended a two-day class at the South Australian Embroiderers' Guild Summer School. This time I decided to take a step outside my usual Alison Snepp class, and enrol in something completely new. I went for Alison Cole's class on goldwork and stumpwork, Siennese Illuminated Treasure.


The classes are held at Hosanna Heights, in the Eastern suburbs of Adelaide, a property that was once a monastery and now houses international students. It has lovely grounds and buildings.

Some students and teachers live in for the Summer School, but I just attended during the day.


There were fourteen of us in the class. I was too focused on learning to work with such small scale items to take photos during the classes. I was also a bit preoccupied with a plumbing crisis we were having at home, and in the end left the class at midday on the second day. Alison was very understanding, and her instructions were pretty clear, so I didn't have too much difficulty figuring out what to do.


This is the first photo I took, a day after the class. The yellow is felt - padding for the leaves and flowers to come. The fawn is gold kid. The red berries are needle-lace over padding and kid.

We had a choice of working on black delustred satin or parchment-coloured dupion. As you can see, I chose the latter.


One reason I only do one class at Summer School (it is possible to do two) is that I hate to end up with two demanding projects to finish at the very beginning of the year - and classes are rarely set up to finish a project. I have been working on this project as much as I can in the week since the class.


This is where I am now. I have found it challenging, especially couching all the tambour thread. Laying tambour thread around each sequin is an exercise in concentration and accuracy.


I am now working on the detached petals to add in the circles. I think that deserves a post all of its own.

I am pleased to have chosen this and given it my best shot. I don't think I am going to become a goldwork/stumpwork convert, but I have a lot of respect for those who do!


Sunday, January 6, 2013

Warrior shorts

I found a book of Scottish stories of the feats of Finn MacCoull for my grandson Fionn for Christmas. It has wonderful pen sketch illustrations, including one of the warrior Fionn MacCoull standing on the sea-shore defying a monster. As soon as I saw it I thought it would make a great embroidery on a pair of jeans or shorts.

I photocopied, enlarged, traced and simplified the illustration, then transferred the result to a water soluble stabiliser. As much as I prefer to work directly on the fabric, the dark, heavy denim makes that very difficult.


 I worked the basic outline using the stabiliser, then removed it and improvised the rest.

The illustration has a great sense of storm, wind, defiance and power that I wanted to capture in the stitching.

The hard thing was knowing when to stop - to leave it as a sketch, rather than fill in every part and risk losing the sense of movement.

Fionn recognised it immediately as a warrior (phew!).

I like embroidering denim in this way and it makes a good boy present.