Search This Blog

Showing posts with label Evil Eye. Show all posts

Tuesday, March 18, 2025

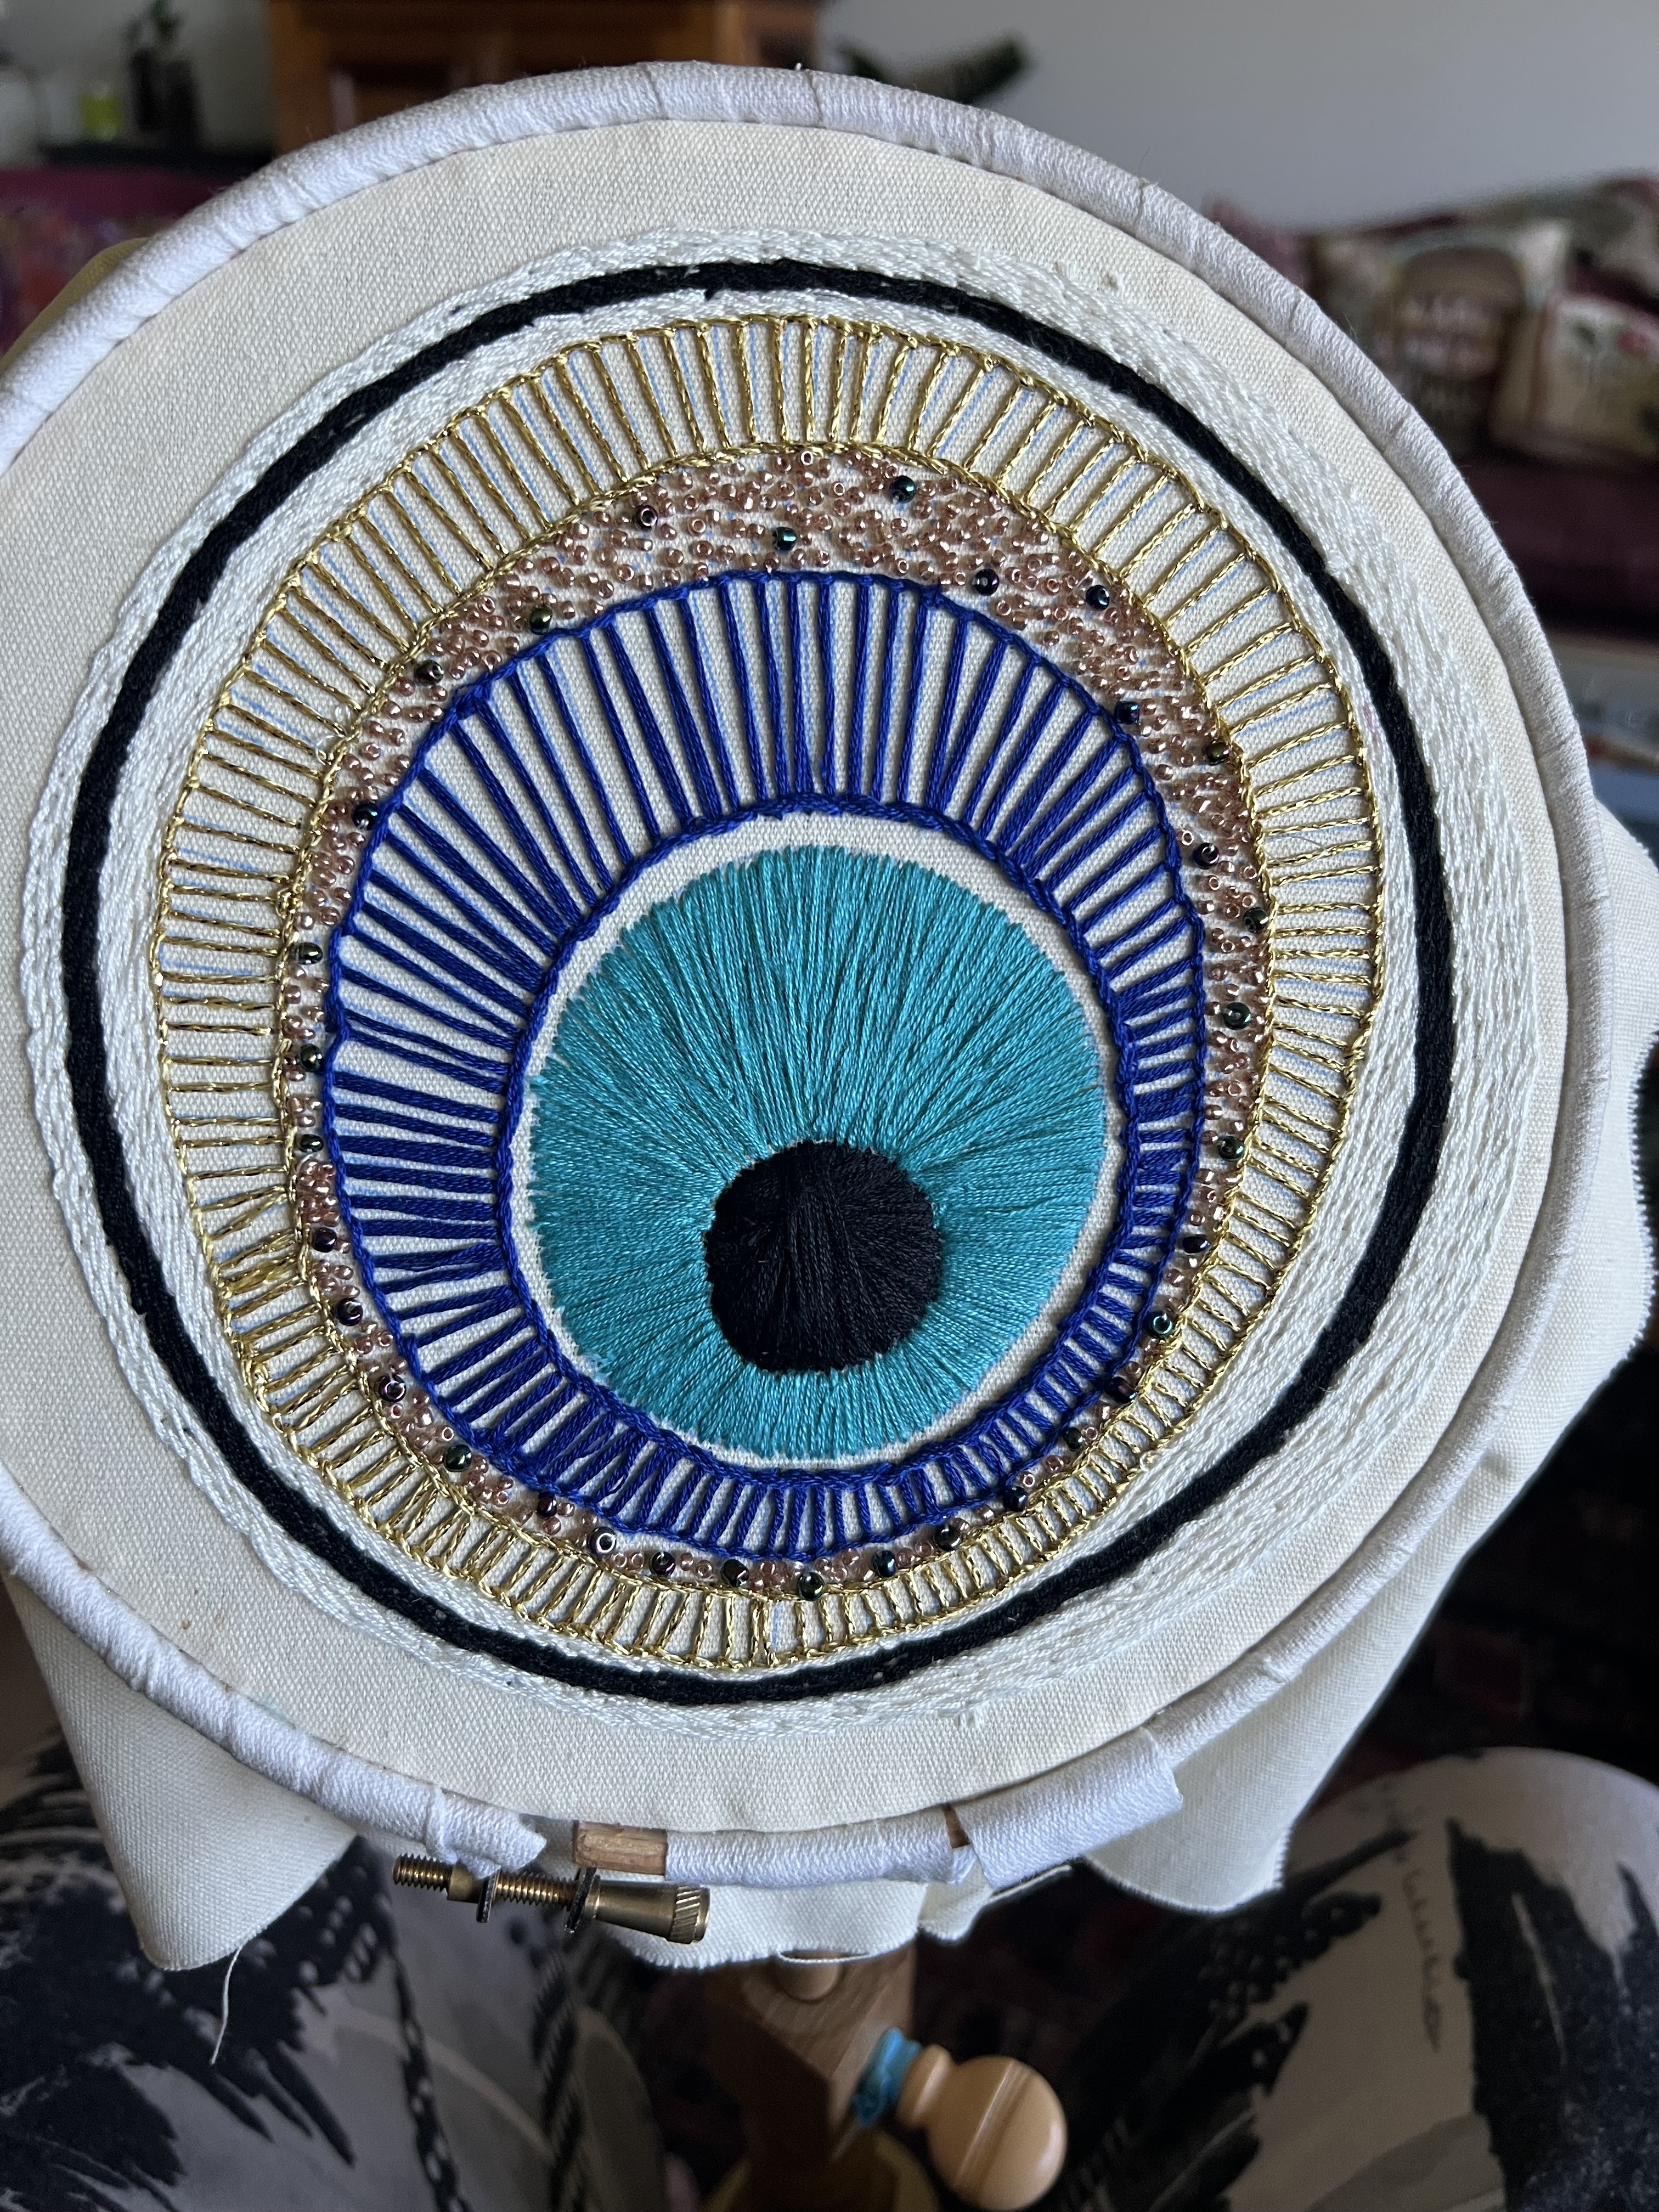
Evil Eye Mandala 5


Yesterday I finished the fifth, and last, of the Evil Eye mandalas I bought through Etsy. I have really enjoyed stitching them. 


The centre of this one, where I began, gave me a bit more trouble than the others. I worked again in a spiral arc of satin stitch, but made the arc a bit small so had trouble getting coverage. I ended up using most of the thread and only just had enough to finish the other area.
I’m not sure if the oval shape surrounded by the first layer of beads is intentionally wonky, but it seems to add interest - perhaps another devise to divert the Evil Eye from its target!

I love the way each round of embroidery is not only different in stitching, but in colour, and transforms the look.

Beading is not my favourite technique, mainly because of the care required to keep the hoop perfectly horizontal so the beads don’t spill and the tedium of spearing and securing them one at a time. In this case, with two colours and shapes of beads, I did two rounds. The placement was marked, so few decisions required.
Once again, on the outer layer, I used buttonhole stitch rather than a stem stitch edge with straight stitch. I think a perle thread might have been better than stranded but I went with the kit provision.

There was enough of the Japanese fabric I used last  time within reach, so I took the easy backing option.


This is, at the moment, my favourite of the five, but perhaps I tend towards the most recent! 

These were stitched to illustrate a talk I am scheduled to give in May on The Evil Eye in Embroidery. It will be interesting to hear what the group has to say about them.

Friday, February 28, 2025

Evil Eye Mandala no. 4

There are 5 designs in this series. I thought three of them would be sufficient to demonstrate when I talk to WES Group about The Evil Eye in Embroidery, but after stitching those three, I ordered, so I thought, kits for the other two. When they arrived, I discovered I had made a mistake, and ordered one I already had. I have hopefully rectified my mistake, and in the meantime stitched the fourth design.

I began, as always, with the central black iris and worked it in satin stitch arcs that overlap to give a slightly raised effect. I used long and short stitch for the light blue oval rather than the recommended satin stitch, and, once again, I worked the section of long straight stitches (this time dark blue) in buttonhole stitch.

The white ring between the two blue colours is not embroidered. I was hesitant about this, but it does create a difference in texture, a dimension. 

This time the beads are mostly tiny opaque rose gold, with a smattering of the usual larger coloured ones. There is some unexplained thread of a similar goldy-brown colour, which I’m assuming was provided to attach the beads, but I wasn’t tempted. As before, I used my own nylon beading thread.
Also once again, I used an alternative to the metallic provided, this time a roll of gold I had come across on the Guild trading table, a softer thread with a fine cotton core.

This design  has an outer border of white. As before, thread for the predominant colour, in this case white, was almost exactly enough, while all other colours had excess. 


I mounted it in the display frame using the same fabric on the back as last time.


Again, I enjoyed stitching it. 


I don’t think the predominant white border works as well as black, but it provides an interesting, discussable contrast.


Tuesday, February 4, 2025

3rd Evil Eye kit


Yes, I’m addicted - or, if you prefer, on a roll. I bought these as a bundle of three kits on Etsy. There were 5 designs to choose from, the three I chose were the default. I have since ordered the other two, but they are coming from the UK and seem to be printed on demand, so this will be the last for at least a few weeks. 

I was wary of this one because of the number of close lines in stem stitch, but got into the swing with the central circle in black satin stitch. As before, I worked this in a revolving arch, continuing until all areas were covered. This creates a raised texture, more effective, I think, than side to side satin stitch.

As with the last one, I used Madeira metallic rather than the metallic supplied.

I began the blue rays with 2 rather than 3 strands of cotton. The lines are very close together and two worked well. After a few rows, however, I switched to split stitch. This gave me greater control over the line and a straighter look.

I love the way this works, intensifying the colour as the density of stitches get closer together. A design technique I would not have thought of for myself


Stem stitch is better on the border, where you want a solid block rather than a fine line. The additional black border makes it pop.

I had a bit of trouble with the beads.  The bead border on one side was slightly wider at one end although the photo of the finished work showed only 2 beads all the way. The gap at some places required 3 beads to fill the space. I filled the space rather than following the picture, using up all the beads provided, but it looked uneven.


I went ahead with the next section, but when that was done, raided the earlier kits for spare beads and brought all rows on that side to 3 beads. Much better.

Finally, the outer ring.


This time I found a piece of Japanese fabric in colours that worked for the backing, pinned and stitched it tight.


I was unsure of this one when it arrived, but I really like the finished product.


The three hang well together. The Guild Exhibition is coming up and I plan to join these three together and display them.

Tuesday, January 28, 2025

2nd Evil Eye Kit

I moved straight from the first into the second of my three kits of Evil Eye protection mandalas, beginning again in the centre of the eye, this time with black thread.  

The cotton thread brand isn't marked, but whatever it is, it is mostly good. It separates easily and lays flat with a lovely sheen. The black, however, I’m less sure about, as I will discuss below.

As I mentioned last time, the metallic thread is less than satisfactory. I did try it again, just to be sure. In the photo on the right, the two solid lengths are as it went into my needle. The length on the left of the photo is what it looked like after three stitches. It simply unravels and shreds as it goes through fabric.

I swapped to Madiera and had no problem as can be seen on the left.

The next problem was of a different nature. I had an operation 8 days ago to remove a myxoid cyst on my right index finger. The bandage, as you can see, was enormous. It stayed on for 3 days after the operation. As the embroidery was in a hoop, I could stitch with my left hand, but it was slow. 
 All was good until I came to the long straight black rows at the bottom in the photo. By now the dressing on my right index finger was reduced. While I couldn’t use it, I could hold a needle between my thumb and middle finger.and stitch with reasonable accuracy. Stem stitch requires accuracy.
In addition, the thread colour appeared uneven. I tried couching the thread but couldn’t achieve a smooth effect, so undid it and persevered with stem stitch. It’s far from perfect, but a bit better than I had feared.

Once I had added the final borders, I mounted it in the display hoop and chose a piece of a shirt of Jim’s as backing. The colours work, and he would have wanted to continue to be included for as long as possible. I keep the shirt for just such a purpose.

I’m surprised how well this has come up in the end, given the conditions under which it was worked. It goes well with the first one.

I’m still enjoying stitching these, so on to the next one, with even more straight lines!

Tuesday, January 14, 2025

Evil Eye kit no851


Before Christmas I bought three kits for embroideries designed to ward off the Evil Eye. The purpose is not personal use, but as examples for a talk I am going to give to the World Embroidery Study Group later this year. While I have a lot of information, I figure it will help to have some actual examples.
While I bought these from an Australian Etsy site, they appear to be designed and constructed in the UK, although the package itself does not identify the artist. 

I chose what looked like the most complex to begin. There are 5 different threads and three sets of beads. The stitches are simple - stem, straight, satin and a bead attachment.There is a simple diagram for each of these and a diagram showing where each is used, along with the colour. This all fits on the single instruction sheet. Needles and a needle threader are included. I thought this was clever. Because the stitches have been kept basic, a beginner would be able to work it out.

I began with the inner blue iris, working around in an arc so the stitches eventually overlapped. The next round, the gold metallic, was my only grumble. The gold “thread” was a nightmare to work with. Even short lengths quickly untwisted and broke after a couple of stitches. I persevered, but won’t do so in future kits. I will substitute Madeira metallic with a cotton core. 


The rest went fairly smoothly. I experimented a bit with the number of beads threaded at a time. Securing individual beads would not only be uneconomical of time, but wouldn’t get the flow implied in the photo.

When I came to the outer row of blue, I used blanket stitch rather than straight stitch.
I had purchased hoops with the kit. They are cream plastic, blending nicely with the design. I used my regular seated hoop to stitch it, but mounted the finished piece in the hoop provided.

I found a square of fabric I purchased some time ago from the Aboriginal Fabric Gallery in Alice Springs that seemed appropriate. I pinned it over the back, cut around it and then trimmed the corners off the embroidery, pinned, stretched and stitched.  
I am delighted with the result. I haven’t hung it as yet. I think I’ll wait to finish the three. It has been the most enjoyable embroidery I’ve done for ages.