Search This Blog

Showing posts with label Jenny Adin-Christie. Show all posts

Monday, April 16, 2018

Harp Needlecase: Jenny Adin-Christie

Those who followed my travel blog in March will already know a bit about Jenny Adin-Christie’s Harp project that I and my fellow Retreaters worked on inWindermere. Jenny designed the Harp Needlecase to replicate (and improve on) one held by the Wordsworth Museum in Grasmere. The original was made by Edith Southey, the daughter of the poet Robert Southey, while staying with the Wordsworths in Dove Cottage. It is an amazing tool that we saw, and fell for, at the Wordsworth Museum in 2017.

Jenny’s work to reproduce it is extraordinary. It combines so many skills of embroidery, design and construction. Having achieved that, she patiently taught us, in tiny meticulously explicit, steps, how to make it.  Unusually, the kit for this has been made available more widely after the retreat, for anyone interested.


We began by stitching the design on silk, in both silk and gold thread.


The rod and its finial  was a lovely and enjoya
ble piece of work, completed during class.


I finished off the last of the embroidery at home late last week.


The construction began in class. It involved a bit of careful ironing,


a lot of pins, a bit of glue, and fine, delicate stitching.


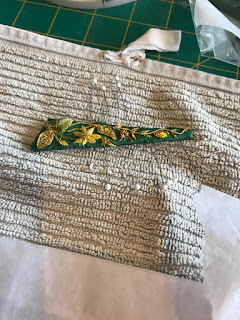
I didn’t attempt the construction until I got home, had unpacked, attended to accumulated tasks and could clear an afternoon and a morning. The pinning and glueing took an afternoon. The night before I had been through the kit to re-identify and organise the many component parts, all in plastic bags carefully labelled. It would be very easy to lose something -especially while travelling. The only thing I was missing were some little pins to sit in the underside of the sound box to act as little feet. A pity, but fortunately the harp is stable without them.


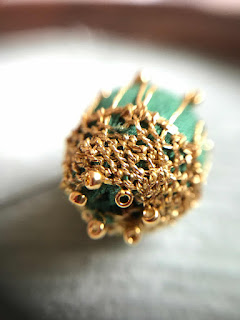
Inserting the needles ( bespoke -manufactured in Japan to Jenny’s specifications) was challenging. I hadn’t expected it to take so long but the placement needed to be quite precise and I needed pliers to do it. I don’t think I will be taking them out to use on a daily basis (probably not in any basis!).


The final result took my breath away. I’m not sure, confident as I am, that I believed I could really make this. It is exquisite. I have ordered a dome to go over it. It won’t arrive until October.  I don’t usually go in for display items but this project warrants it, I think. 

How amazing is that?

Thank you so much Jenny! 

Friday, June 23, 2017

Blackwell Roundel Box


This week the parcel arrived, securely and neatly packaged. I rushed to the Post Office to pick it up after finding the delivery card in my letterbox. I had been home but possibly missed hearing the buzzer. As I had hoped, it was from Jenny Adin-Christie, the box for my Blackwell roundel from my Spring Retreat with the Crewel Work Company. At home, out of the tightly taped post bag, here it was, waiting for me to open the box.
It was lovely. So lovely I forgot to take a photo. It was my grandchildren-after-school day and had a meal to prepare. I had to put it aside until evening.                                                                                     The kit had come with the backing fabric and the box came with a mounting board. When the family had gone I got to work.
The back was a little bulky - two layers of silk organza, backing silk and its cotton lining - but it worked fine. I added a circle of pellon.
The box is beautifully crafted - so smooth and lovely to hold.  The mahogany is perfectly matched to the colours in the embroidery.


The interior  mount-board backing is held in place with tiny brass screws.


  I'm not sure what I will do with this. I have more boxes than I know what to do with. This one is special - so beautifully designed and crafted.

I'm sure I'll find someone to use and treasure it.

It can sit here for a while, on my sewing box.


Thank you Jenny Adin-Christie!

Thursday, May 25, 2017

Blackwell Roundel

My last post on this project was from Windermere in March. This is the Jenny Adin-Christie project that we worked on at the Lady Anne's Needlework Spring Retreat. While a small piece, it is very detailed, with many steps and techniques. We had done something from each step but there was a lot of work to do to complete each one. My last photo from Windermere shows where I was up to.  
                                                                                                    I did not carry my work from the retreat with me while travelling. I didn't have a sitting frame with me and the work demanded greater care than I could give it. The Crewel Work Company kindly packaged and sent my projects on after I arrived home. It was only in early May that I had the instructions and projects set up and ready to go. I have been working on this one ever since - and not taking time out to write up my progress!
One of the things I love about a Jenny Adin-Christie project is the bag it comes in - a calico bag with a clear photo of the project firmly pasted to the outside and an identifying tag. These are so useful for working, storing, identifying and managing projects. I have all my projects in bags - since I love making them, but am  tempted to make myself a pile of simple calico bags that can be tagged in this way, or to find a way to adapt the concept to my existing bags.                                                                                                                              I have had the product I am aiming for constantly in front of me on the bag (This, of course, only works if you know what the end product will look like!). 
Jenny's instructions are also very detailed and sequenced. I went back to the beginning and worked my way through the project in order of the steps Jenny laid out. It mostly went smoothly - but in one place came close to disaster! 
The photos show my progress. It is delicate work - requiring (for me at least)  good magnification. I used a number of different magnifiers before settling on one attached to my daylight floor lamp.
I was doing quite well to this point. Then my attention faltered and I made an error in identifying the gold pearl purl I needed to couch down around the leaves and stems. Instead of the pearl purl, I used the cut purl, struggling to couch it (unsurprisingly, since it is designed for threading!). I persisted and got it almost finished with the wrong purl before I worked out what I had done.  
Some of it I could undo. Other sections, however, I was very reluctant to try to undo, given the silk organza on which the project is worked and the closeness of the fine couching. I opted for undoing where I was confident of not damaging the fabric,  and laying the real pearl purl over the other where I was not confident. Here you can see the real pearl purl laid around the outside, or on top of the wrong one. I then covered the mistake with gimp or the second row of pearl purl, or removed what I could.
I am writing calmly about this, but it rattled me and I am wincing at revealing the error in photographs. I had been so careful and followed Jenny's extensive and meticulous instructions so carefully, but made an assumption about packaging that was quite wrong - and in retrospect foolish. It came close to ruining the project. I recovered, but not without making significant compromises that a skilled needleworker's eye will pick up easily. I have progressed the project with some further imperfections - but nothing so dramatically wrong.. I tell myself that there is no way I would get this perfect with the limited experience I have of goldwork, and working on my own.
Here is the finished piece. I've learnt a lot from doing it, and am pleased to have finished it.  It isn't going to become my favourite kind of embroidery, and my eyes will be pleased to get back to  more forgiving techniques (not, however, before I finish the Nicola Jarvis whitework piece from the same retreat!).


I have ordered the small round box Jenny has designed for this project - it isn't the kind of thing I can put on a bag!

I am also grateful to Jenny for proof-reading this post and fixing my terminology. It is the generosity of a busy and committed expert. Thanks Jenny, on so many fronts.


Monday, October 17, 2016

BATB: Jenny Adin Christie, Whitework Buttons

I chose Jenny Adin Christie's Whitework Button class at BATB because I had purchased the kit for her 5 buttons at the last BATB two years ago. I had enrolled in her one-day class, chosen the simplest button and completed it in the day. The kit has been sitting in a drawer for two years, so I decided I should enrol again and at least complete one more button.
Jenny is a great teacher, and a class with her is a pleasure.
This time I chose what seemed to me the most complex of the buttons, the Scabiosa. It is quite large and involves shadow work, padded satin stitch, cut work, beading, French knots and a range of eyelet work. It is worked on French gauze mounted over fine linen - prepared in advance by Jenny as part of the kit.
The shadow backstitch/herringbone is worked first and then the inner eyelet circle and the padded satin stitch. The latter was for me the tricky part. - getting the satin stitch smooth. Jenny had several tips about this, which really helped.  The great advantage of working with a teacher is the very specific technique help and practice.


I made quite a lot of progress in the class - both in terms of improving my technique and in the amount I was able to do.

As I had expected in choosing this particular button, I did not finish it in class but Jenny had provided instruction in all components.


After the class I set myself to finish this button as a priority. As usual, I had only enrolled in two classes at BATB - what I can realistically take on and finish. The whitework button took me a week of working on not much else and was really enjoyable.


The outer ring of ladder stitch eyelets gave me trouble. I did not succeed in making the holes distinct enough. I need more practice in this technique.


Once again, I decided to turn the button into a brooch, rather than display it in a box, so, after backing and lacing, mounted it on the felt backing provided.


I now have two of the five buttons in the kit completed. I regard these as practice pieces rather than perfection (which is just as well!)  I am in it for the learning.

Having tackled this large and complex button, I feel more confident to proceed with the others without counting on Jenny to return to BATB three times over the next six years to finish the kit!

Now I can turn my mind to Japanese beading again.

Tuesday, September 30, 2014

BATB 2014: Whitework buttons with Jenny Adin-Christie

I enrolled in two classes in this year's Beating Around the Bush. This is the third one I have now attended, and each time I have enrolled in two, rather than three classes. Each time I have taken a one day class and a two day class. This way I have some hope of finishing the projects I enrol in. Less stress for me, more learning. My one day project this year was making an Ayrshire Button in Jenny Adin-Christie's Whitework button class.

photo courtesy Inspirations Facebook page
I chose this class because the techniques appealed to me, the projects were small and I could see a use for them.

Jenny offered five buttons to work on. Of course, I ordered the kits for all five. This sounds contradictory in light of my finishing goal - but the goal relates to learning as well as finishing.  I'd rather learn one thing thoroughly, get something to show for the class, then work more on it over time

Jenny worked hard. There were four different buttons being worked in the class. She used a nifty device to project what her hands were doing on to a screen - very efficient.

The Ayrshire button was the one most likely to be finished in class. The kit contained the linen already mounted on cotton - really good preparation by Jenny.

The Ayrshire button began with a large eyelet and progressed to needle-lace inset,

Jenny did a remarkable job of keeping tabs on what we were all doing, diagnosing, correcting and staying ahead of the game.


We got to do a bit of sanding to shape the backing disc.

We used curved needles to add the beads around the edge.


I was a bit too keen to remove my blue markers - ending up with a damp button to stitch the ric-rac on to - making it a more difficult that it needed to be.


I got there, however, before the class finished. I ended up adding an extra bead in order to align the bumps in the ric-rac.

Rather than mount my button for display, I chose the brooch option, and mounted the backing as soon as I got home and the button was completely dry.
.


I'm really pleased with the result, as well as the learning, the company and the camaraderie.

Each of the other four buttons will take a couple of days to make - but will make interesting and manageable projects - and great gifts.

I might take up one of the embroiderer's guild stitching evenings and work on each of the buttons in turn.