Search This Blog

Showing posts with label Adelaide. Show all posts

Saturday, September 7, 2024

Healing Blanket

I bought Martin Storey's Midwinter Kit in the Festive Colourway last December. I loved it, but had no idea how I would use it, or gift it. When a good friend who feels the cold was recently diagnosed with cancer, underwent a major operation to be followed by chemo, I knew what to do. Over the last 4 weeks blanket knitting has moved to the top of my priority list.

I finished it last Wednesday, delivering it on Thursday.

The design consists of six basic motifs, each knitted as a Fair Isle square. Each motif has its own colour and the blanket is constructed in 7 rows and 5 columns. There are only 2 motifs (and 2 colours) per column and 3 motifs (and 3 colours) per row. 

I began by knitting one of each motif, in the colours specified in the pattern. I then blocked them before stitching them together as specified, and completing the columns, again, as specified. 

At this point I decided I would vary the arrangement to create a greater mix per row. I began shuffling the squares as I went, spreading them on my sofa and trying various combinations. I could produce a square each day, block it overnight and by the next afternoon, play with positioning.

Before long, I experimented further, and began changing the colour of the motifs as well as the positioning. I left the two original columns stitched together and varied the rest.

This process was helped by a week without visitors - so half my lounge became a design board and the other half my knitting station!

The design symmetry made knitting easier. Both knit and purl rows could be read right to left to get the required result - except for the deer, which, being the odd one out, required a great deal of attention ( and some undoing!).

I also varied the final shape and number of squares, settling for 5x6 rather than 5x7. It wasn't time pressure that dictated the change (although the time saving came in handy). I wanted a squarer result. Each "square" is slightly longer than it is wide, so 5 rows and 6 columns came fairly close to a square blanket - what I was aiming for.

This is the result before pressing.

I added the border in the colour specified, but added a couple of extra rows, and a black edge.

The extra width was partly to accommodate text along one edge - initials and date. I have obscured some of this in the photo for privacy reasons.
Because this is a healing blanket, as far as I could, I thought about the recipient, our friendships, his healing and well-being as I stitched. I have knitted a number of shawls in this mode for specific friends. This one was more complex than most, demanding more concentration on the knitting. As I thought about this, I realised it fitted. Some illnesses reshuffle our lives, take us out of neat, repeated patterns, demand adaptation and adjustment.  

I hope the blanket provides warmth, cheer, care and a reminder that something new can emerge from disruption.


Thursday, January 5, 2023

10 Bag Days

After the success of my Christmas fabric bags, I remembered that I had also purchased 2 other tubs of fabric offcuts from the Guild trading table - one of green coloured fabric, and one of checks and tartans.

As the year drew to an end,  I   rolled my eyes and wondered if, on a bag roll, I could use the fabric up before 2023.  The attraction of one tub had been the pieces of gingham it contained. I enjoy embroidering gingham, so set those pieces aside - to maybe make gingham lace (chicken scratch) aprons, table cloths or, yes, bags. 

The remaining tartans, and the greens were of various sizes and shapes. I got to work with my scissors and cut all of them into bags - 125 of them. 

Madwoman.
Amongst the green collection was a  piece of patchwork (top left) just waiting to be turned into a bag. It also reminded me that I could turn any left-over strips of fabric into patchwork. The lower two photos are the result. The one on the right is quite large - around 40cmx60cm.

As the pieces were probably the remnants of quilting projects, a few were odd shapes.  Bags don't need to be standard.

Unlike the Christmas fabric, which was in significant lengths, these greens and tartans were smaller and more varied. Only a couple of the resulting bags are large. The majority are medium sized and there are probably around 25 that are quite small - jewellery size.
I worked them as a production line for one worker. I cut them all out into the most efficient sized bag . The next day I ironed them all - ironing in the seams and hems. It took several days to machine them into bags. I stitched about  15 bags in an hour to an hour and a  half. I worked them in batches of around that number.


Once I had about 50 bags, I spent an hour or so choosing drawstrings from my ribbon and cord stash. I was in danger of running out, but Katherine came to my rescue with her substantial ribbon stash, which is now severely depleted.
Before long I had a pile of bags waiting for stops to be put on the end of the cords, a pile waiting for the cords to be threaded and a pile waiting to be machined, giving me a choice of activity each day. 

This kept me busy for 10 days - with breaks for reading, shopping, washing, catching up with friends and family, or taking photos. 


I didn't quite make my 2022 finishing goal. I wasn't tempted to push the envelope. It's been a good holiday activity. I enjoy it - and the end was in sight. 

I put the final touches on today - and did a bit of reorganising to clear a big red storage tub, which now holds the 125 bags - quite a good supply. Except for the gingham. all the trading table fabric is used up. 

Now I need to resist the temptation to buy any further bargain fabric from the Guild's trading table. After all, I still have drawers of my own left-over fabrics, without buying someone else's! 

I enjoy making bags, I like recycling and family are very welcome to any bags I have in store.  

Now it's back to my knitting. Oh, and there's the gingham......


Tuesday, June 28, 2022

Another needlework roll

While looking for fabric for the Boro workshop at the Guild last weekend, I came across another cotton banner that Jim had bought for me while he was on an official visit to Japan around 1996. These are lovely, but I hadn't found a use for them until I thought of using them in embroidery rolls - the device preferred by embroiderers to roll, rather than fold, work-in-progress (another benefit I derived from the Guild's Basics to Beyond Course).  Although having more rolls will only encourage me to have more works-in-progress, I felt that was preferable to the banner going unused in a drawer.

I had the inner cardboard from a roll of hand towel in my store of items-that-might-come-in-handy, so got to work while the mood was on.

The banner had quite a bit of plain green fabric at both ends. One formed wide hem into which the roll was inserted. I cut a strip about 6 cm wide from the other end, and from that cut two circles. Using a row of running stitch around the outside edge of each, 

I gathered them into balls which I filled with wool stuffing and inserted into the ends of the roll once it was inside the hem of the banner.                                .

I then stitched it around the edge of the tube to hold it in place.


The result is another useful roll. The banner will be admired, and the gift appreciated, each time the roll is used. 


Feels like progress to me!

Monday, February 21, 2022

Bush Sentinelle Experiment 2

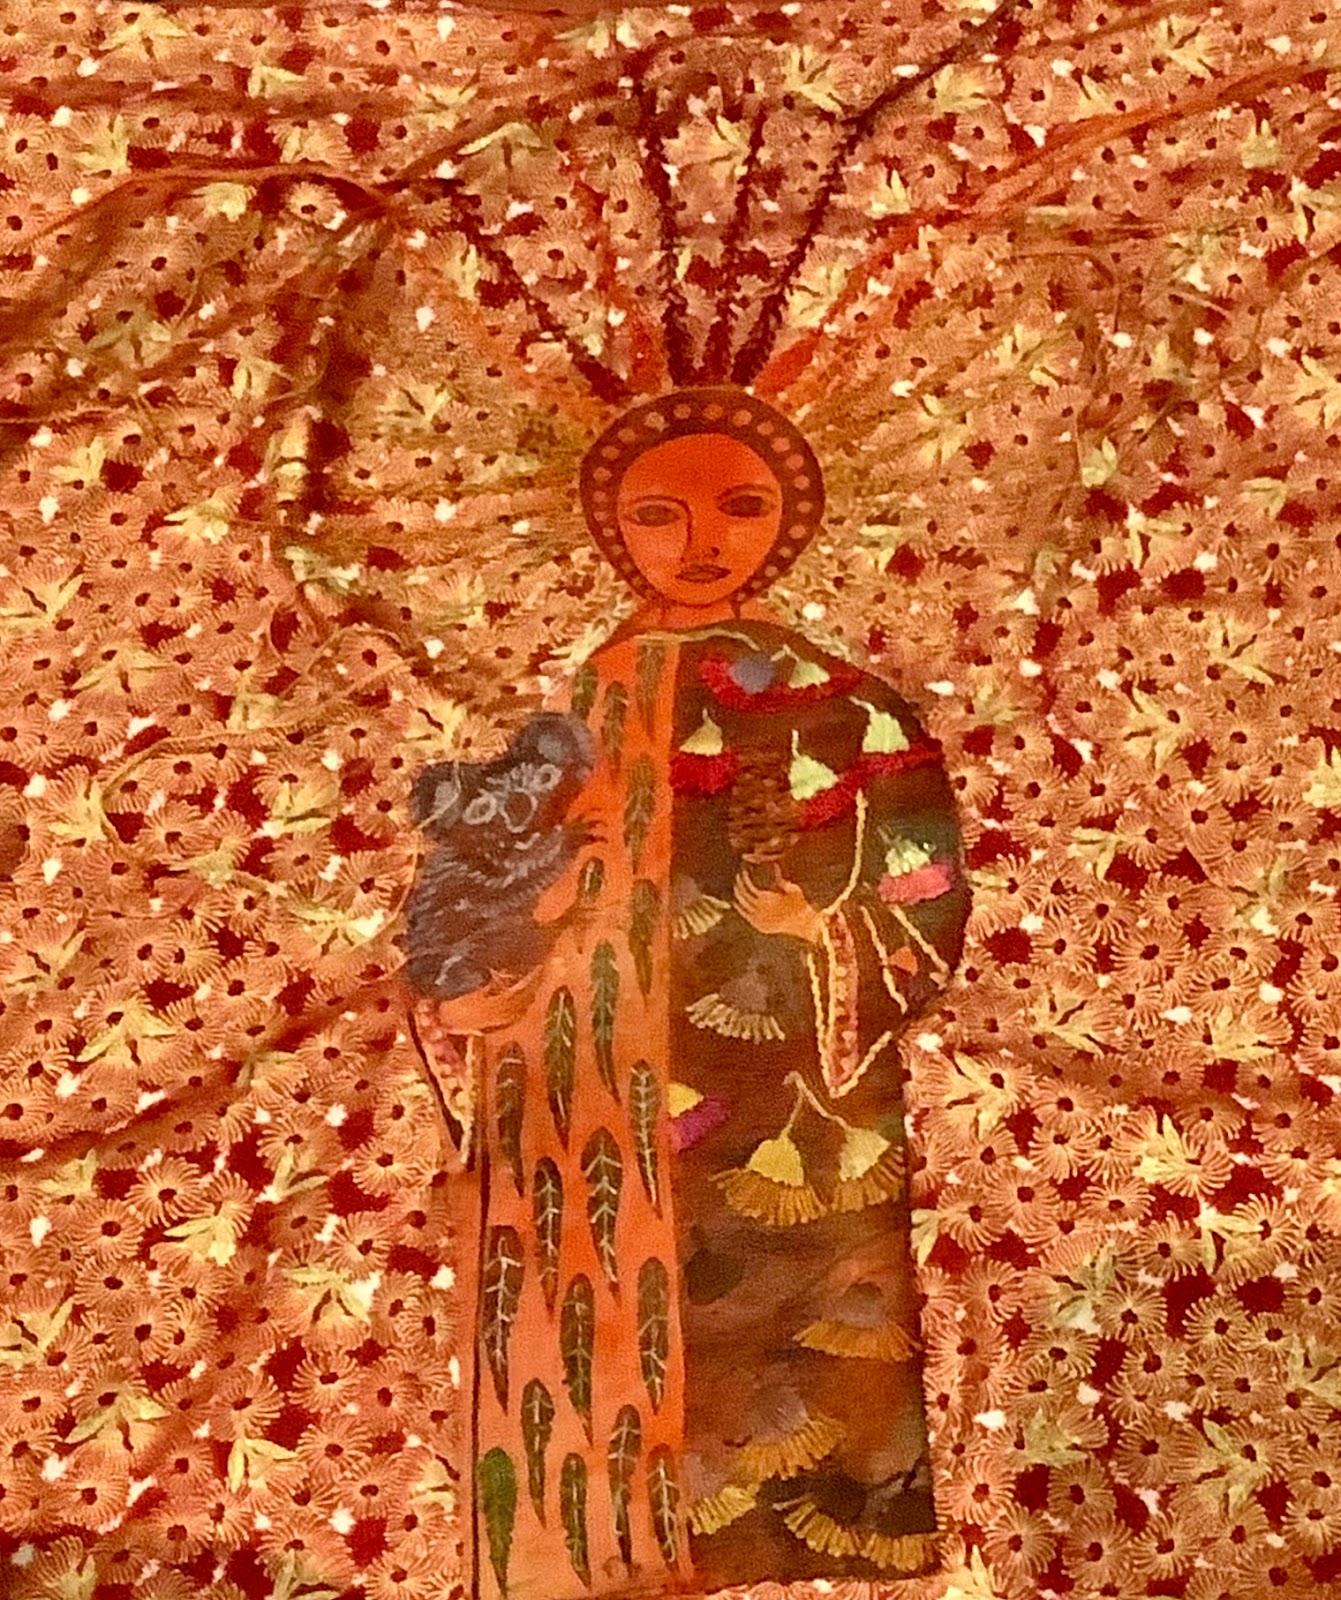
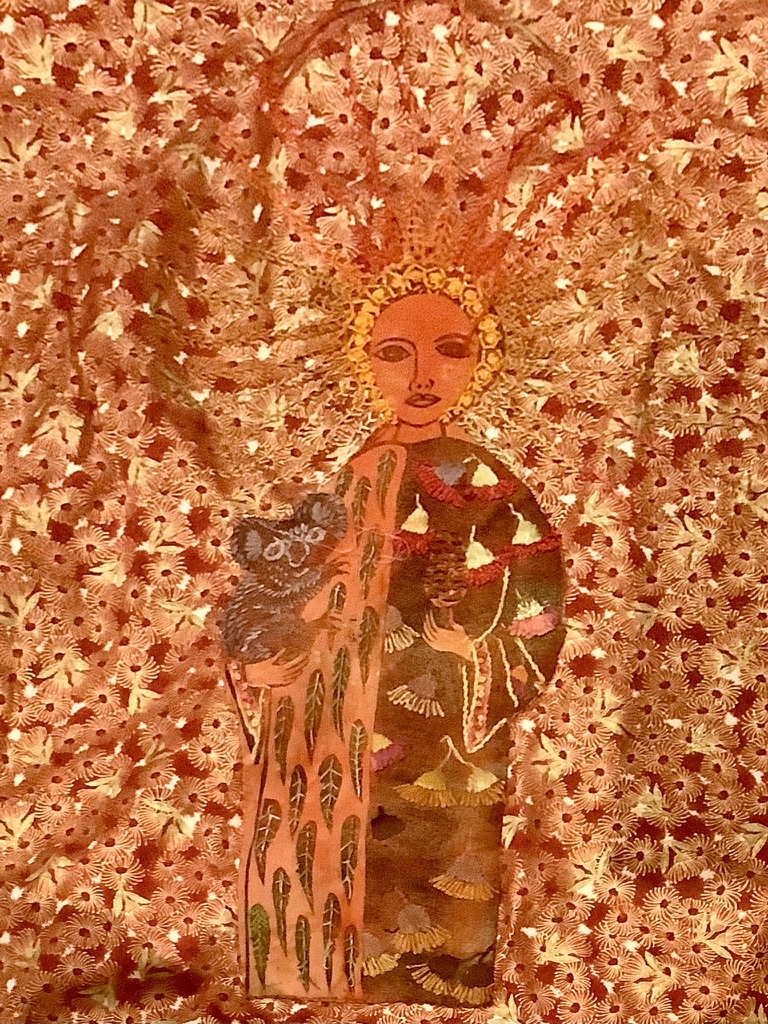
This is the first of the orange-based Sentinelle prints from Dijanne Cevaal. I began with the leaves, which again, I kept to a minimal gimp line held down with three strands of green silk.


The gum blossoms, as with the first panel, I worked in satin stitch and pistol stitch, using both silk and linen threads.  This time I worked from bright red at the top of the dress to  orangey-gold at the bottom.

I used variegated silk around the cuffs and shades of grey on the koala.
To manage the necessary join in the metre of fabric I used a zip at the top, rather than an overlapping envelope closure


and this time I fussy-cut around the leaves in her head-piece, removing entirely the ring of the halo.
My idea was to embroider the leaves, extending them out into the fabric, to create a sun goddess effect. I began with gold at the shoulder level, moving into oranges, then reds, intending to reach the deep red of the blossoms in the fabric in the top centre. It didn't work. 

The result was more like horns than the sun. While historically, horns were often a goddess symbol, they were not what I was looking for here, so i removed the lines that were red-blue and replaced them with colours in the red-gold range.

Much better.

I used gold thread ( silk and linen) in satin stitch for the dots (gems) around her head and added some bordering stitches to almost eliminate the black print.
I was pretty pleased with the result, but felt that the contrast between the two sides of her clothing was too stark. I had begun with the intention to embroider only the unprinted sections. 

I modified this approach and added seed stitches to the dark side of the cloak.


It achieves the impact I was looking for, blending the figure into the background, with a sense of dimension and power.


I knew when I chose this fabric, that it would be effective. It exceeded my expectation. I've learned a great deal about colour in working it. The look of the fabric changes with the imposition of each colour. I now want to see the impact of working it with red, rather than gold, predominating. It occurred to me I could work the remaining orange Sentinelle on the back of this cushion cover instead of on the more traditional banksia fabric I had chosen for it. Katherine however, pointed out how good it would look to have two cushions either end of a sofa worked to show the contrast, so I have ordered another 1.25 metres of the fabric.  That will be Experiment 4.

Tuesday, December 28, 2021

Christmas Projects 2021.

This is a summary of a few Christmas projects that I couldn't write about in my weekly blog, because they were to be a surprise for someone who may have read the blog. 
The first two were samples of Lagatera designs I wanted to try out and thought they would make good pinwheels - which they did.

I'm very fond of pinwheels, as I have said many times. They are a very safe and convenient way to carry pins - and double as Christmas decorations!

These fridge magnets came as a kit of four. I haven't made the other two. On plastic canvas, they were designed for embroidering in the hand, but I had to mount the plastic on cotton and use a hoop because my I developed pain in my hands from holding them. A bit tedious - but a lovely result. 


I also abandoned the tiny magnetic pieces provided in the kit for lengths of magnetic strip purchased at a hardware store. Now, of course, I have enough for dozens of magnets!

The magnum opus (or, in fact, magna opera) was a garlic bag, which began as a Jenny McWhinney project from Inspirations Magazine 41. 

I really liked the look of it and went looking for the materials to make it. Sourcing the hessian proved challenging. 
By the time I was looking, Jenny no longer had the original hessian but I sourced something equivalent. I also decided that silk was not my choice for something that would get handled and used frequently in a kitchen. Furthermore, I decided few kitchens could easily accommodate a bag on a dowel, and even the most regular user of garlic did not need a bag of that size. So I adapted.


I used stranded cotton, inserted plastic stiffener in the opening and reduced the hanging tabs from two to one. It easily holds 6 head of garlic - more than most families need at any one time. 


There's usually a handle or hook somewhere in a kitchen that might be used.


I had intended to make two of these, one for each of my daughters' families, but got to thinking of the message of a rooster on a garlic bag.  One of my daughters keeps chickens, so it seemed appropriate enough, but if you didn't keep chickens, was the bag suggesting the best use of garlic was as a flavouring in chicken casserole?

So I redesigned. 

Bag 2 features a garlic plant.

I reckon it works.


I had a lot of fun with these - and great satisfaction.
I made two very lightweight scarves from a cotton/acrylic mix, that I paired with magnetic scarf holders from Scarf Pins & Rings. Unfortunately I forget to photograph the second one finished with its holders.
This is the front and back of Fallahi, a pincushion from Inspirations 72 which I bought as a kit years ago and decided to finish as a gift for a granddaughter.


I adapted it to hang (a pincushion entirely surrounded by tassels did not seem like a good idea to me) and added black pins. We were both happy with the result.

I wanted to give one of my daughters a pair of scissors but discovered it is considered bad luck to give scissors as a gift. Fortunately, the bad luck can be avoided by requiring the receiver to pay for the scissors, so the protocol is to tape to the gift a coin  which must be returned. 


To further strengthen the protection I made a bag for the scissors with an adaptation of an Irish scissor blessing designed to keep your scissors sharp. I figured it was more important to bless the scissors themselves than to keep them sharp, so kept it simple.

A few other Christmas gifts have been covered in earlier posts which the recipients were unlikely to see.  Finally, these two were gifts for November birthdays. The hat is a mix of cotton yarns as an experiment for someone allergic to wool. 

The wrist warmers below are from a Marie Wallin kit 
They were a challenging and fun knit, useful in limited times and places in Australia - but useful nevertheless.


I've really enjoyed making these things over the last few months and it's good to be able to share them here at last.