Search This Blog

Showing posts with label cushion. Show all posts

Thursday, March 13, 2025

It’s a cushion!

This morning I spent time trying the Nordic Square against fabric in my stash. The best option was a patterned piece of Ink and Spindle linen. I was tempted, but perhaps a bit of overkill.

I had also done quite a bit of searching online, to see if I could find a suitably coloured cushion back, to save me constructing one. No luck with that.

I did, however, find a lot of cushions. and began to wonder if I could find a suitably coloured cushion cover to which I could add the embroidery.  None of them appeared to be the right shade of navy, until I came across one in an Adair's sale email. 

So this afternoon I headed to Adair's with the embroidery in hand to look at their Navy Belgian Vintage Washed Linen cushion. I couldn't locate it on their shelves but a helpful assistant went to their storeroom and came back with one. When I placed the embroidery on it, the assistant suggested I buy a lottery ticket - it was clearly my lucky day!


It is 50cm square and lovely quality. The filling is feather. Even better, I don't have to make it!

Back at home, I ironed the square, folded in the edges to 4cm all around, pinned the square on the cushion - yes, I did measure in all directions rather than judging by eye. 

I considered whether to attach it using just the same cream colour as the existing border or whether to add some brown and blue. I had a variety of ideas 


I started with the simple option. It was a bit tricky to get the tension right. Obviously I had to take the cover off and work it in my hand. It wouldn't go into a hoop or frame.

I liked the result and decided against further embellishment.

My decore isn't navy and I would be open to gifting it to any family member with a matching colour scheme. In the meantime, I'm pretty chuffed with this result  and it's not out of place on my Alison Snepp -designed Men of Skyros chair. The cushion is, after all,  a Japanese pattern of a Nordic design embroidered in Australia and mounted on a cushion made from Belgian linen. 
Sometimes it's a wonderful world (and I just bought tickets in the Deaf Lottery, which closes in 3 days).


Monday, March 6, 2023

Banksia Cushion 2


As I indicated last time, I decided to work my last Dijanne Cevaal print into a cushion for myself. I had another fabric from Missy Rose that I had bought with this in mind. I had to source another 60cm cushion, which took a bit of searching. Those that were easily available were mostly feather, which I didn't want. I've decided I prefer firmer filling. Eventually I found what I was after at Adairs.


I had chosen a range of threads - mostly DMC Etoile, plus some variegated stranded specialty threads, a bit of linen and some gimp. The Etoile really came into its own. Photos unfortunately don't show the glints and glimmers that are there in reality. I began with the Banksia itself - a different variety to the last one but still a pleasure to work.

The first cone I worked in a pinky-red variegated cotton, using black Etoile in the centres. The pink is a bit of a cheat, since cones don't usually retain much of their red colour. Artistic licence.

The other one I worked in more realistic colour, surrounding it with dark green slightly glittery leaves. 

I really enjoy working with gimp, and used three different ones on stems.

I am particularly pleased with the black I used on the brown cone.


For variation I used olive greens on the right hand leaves - older and drier.

Finally, I quilted the background down with reddish linen thread, to  blend with the background, and found some black braid to frame the embroidery.

Colourwise it is bolder than my other cushions.     


Needless to say, I'm delighted.          
        

Monday, March 14, 2022

Bush Sentinelles Experiment 4.


The fabric for this one arrived safely on the first of a 7 day isolation period because I was a close COVID contact. 


The fabric came brilliantly packaged - simply placed inside a cardboard envelope. It travelled well, fitted easily through my letterbox slot and didn't create waste that will last decades! 
I had begun embroidering the figure before the fabric arrived, using a more solid fill on the leaves than the previous ones and trending to reds rather than golds in the blossoms.

I had, this time, ordered enough fabric to comfortably make a 60 cm cushion cover. I had plenty to make an envelope closure, but chose to put in a zip.

I cut out and appliqued the body of the Sentinelle on to the cover, cut away the halo and around the leaves in the coronet.Then the real work and challenge began. 

I wanted this one to use the red-blue end of the sun spectrum in contrast to the gold-orange end of the second experiment. I used a range of threads - some silks, some perle 5 & perle 8 cotton and quite a bit of DMC Etoile - my favourite at the moment.


It took quite a while. I used a 12" hoop, but even so I needed to work it in several hoop moves, leaving a thread hanging at the end of each ray to pick up on a later move.

I added the headband part way through the rays to see how it fitted together. The colour in this photo is far too pink, but I can't correct.

It is hard to capture the impact and contrast of these two versions of the Bush Sentinelle. The background fabric does, as I expected, change behind the predominantly gold or  red thread.  It's a polished cotton and has a lovely sheen, especially in light. 
I took this as the late afternoon light shone through my west window.

The four experiments are now completed. I don't have 4 x 60 cm cushions to show them properly together.

I think they look good, and tell a story. I hope that I have not broken any taboos in creating them. The Sentinelles are European-inspired figures. Does the addition of Australian flora and fauna to the design link them sufficiently to an Australian landscape? 

I have tried to blend the figures into their backgrounds. My researches into Goddess embroidery has further convinced me that both now and for as long a time as we have archaeological evidence, borrowing and adapting  in art and craft, as in language and ideas, is the norm. 

There is also evidence that solar goddess figures feature in the mythology of most cultures, over thousands of years,  including First Nation stories, as, almost universally, focus for metaphors of meaning shift from earth to the sky. I did not begin thinking of this as a Goddess figure, but see it that way now.

I hope these contribute to discussion, connection  and conservation.

Monday, February 21, 2022

Bush Sentinelle Experiment 2

This is the first of the orange-based Sentinelle prints from Dijanne Cevaal. I began with the leaves, which again, I kept to a minimal gimp line held down with three strands of green silk.


The gum blossoms, as with the first panel, I worked in satin stitch and pistol stitch, using both silk and linen threads.  This time I worked from bright red at the top of the dress to  orangey-gold at the bottom.

I used variegated silk around the cuffs and shades of grey on the koala.
To manage the necessary join in the metre of fabric I used a zip at the top, rather than an overlapping envelope closure


and this time I fussy-cut around the leaves in her head-piece, removing entirely the ring of the halo.
My idea was to embroider the leaves, extending them out into the fabric, to create a sun goddess effect. I began with gold at the shoulder level, moving into oranges, then reds, intending to reach the deep red of the blossoms in the fabric in the top centre. It didn't work. 

The result was more like horns than the sun. While historically, horns were often a goddess symbol, they were not what I was looking for here, so i removed the lines that were red-blue and replaced them with colours in the red-gold range.

Much better.

I used gold thread ( silk and linen) in satin stitch for the dots (gems) around her head and added some bordering stitches to almost eliminate the black print.
I was pretty pleased with the result, but felt that the contrast between the two sides of her clothing was too stark. I had begun with the intention to embroider only the unprinted sections. 

I modified this approach and added seed stitches to the dark side of the cloak.


It achieves the impact I was looking for, blending the figure into the background, with a sense of dimension and power.


I knew when I chose this fabric, that it would be effective. It exceeded my expectation. I've learned a great deal about colour in working it. The look of the fabric changes with the imposition of each colour. I now want to see the impact of working it with red, rather than gold, predominating. It occurred to me I could work the remaining orange Sentinelle on the back of this cushion cover instead of on the more traditional banksia fabric I had chosen for it. Katherine however, pointed out how good it would look to have two cushions either end of a sofa worked to show the contrast, so I have ordered another 1.25 metres of the fabric.  That will be Experiment 4.

Saturday, December 30, 2017

Sentinelle Cushion

For the last couple of months I have been working on some of my Dijanne Cevaal panels. I began with the Sentinelle - for the sheer enjoyment of doing it. When one of my granddaughters expressed enthusiasm for it as it emerged, I conceived the idea, first of making it for her, and then of making a 'Guardian' cushion for each of my grandchildren. This was helped along in conception by Esther Vigil, who has made an angel embroidery for each of her grand-children.


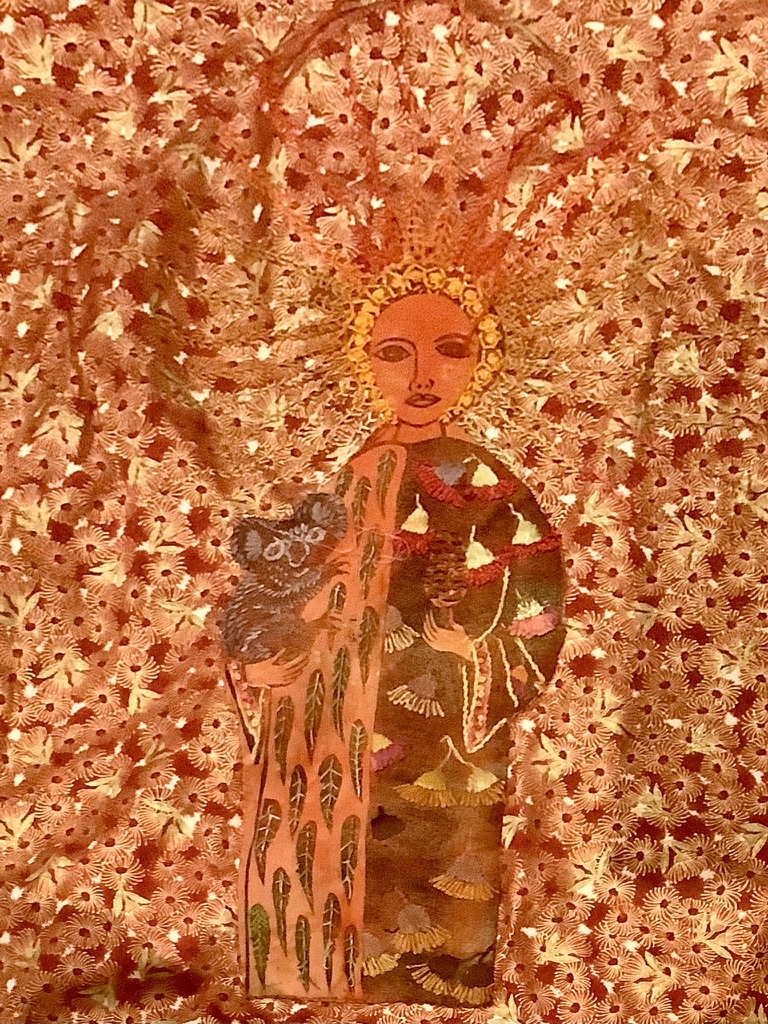
The term 'sentinelle' relates to the English term 'sentry'. It is someone standing guard, watching over, guarding.

I began this one with the halo. Given the shapes in the screenprint, I looked to see if I had any round beads and found a couple of packs of heart shaped ones almost the exact size I was looking for.

Having done that I needed bugle beads for the outer edge.


While I was buying these I found the large lozenge shaped mauve beads that fitted well with the other shapes on the cloak

From the beginning I had the notion of using shisha mirrors on the cloak. The circular motifs seemed to cry out for it.

I experimented with metallic thread to hold them in. Somewhat to my surprise, it worked quite well. It took a bit of time, and required working with a relatively short thread , but proved fun to do.


I worked the mirrors in first, then added the surrounding spokes and the lozenge beads.


Because I was, at the same time, obsessed with Colcha embroidery and Colcha/Bokhara stitch, I used the stitch for some of the embroidery on the cloak. It worked well for the long folds - stitched on the diagonal rather than the full length of the fold.


For much of it I used chain stitch. I also ran some gimp down the edges of the folds. This was quite hard to keep tight, no matter how hard I tried. I tightened it several times.

I also worked out colours as I went - working from a general notion of the effect I wanted.


The metallic mirror surrounds worked the same way - I used two metallics in dark blue and bluey-red.


I filled the background in using a black synthetic with silver - very easy to use and providing some texture along the lines of the print


I also used a very fine copper metallic to outline the facial features and more bugle beads on the head band.


Here"s the finished panel, being blocked, ready to be mounted in batik. The blue of the panel is truer here than in previous photos.

Once again, I'm delighted with the batik - from Crissy at Batik Fabric Online.

Again, I worked a border in one of the Kantha edges from The Art of Kantha Embroidery, by Niaz Zarman.


Here she is, very crumpled, in all her splendour and, on the right, with continental pillow insert on Christmas Day.

In the next couple of weeks I will post the other three guardian cushions.

Wednesday, November 23, 2016

Dijanne Cevaal: Figure 2, King.

The second of my Dijanne Cevaal Medieval figures has been hugely enjoyable to work on. The figure was printed onto a brown hand-dyed cotton and I decided to work it in a predominantly red palette with gold highlights. I used a range of red silks for the body of his cloak and an Embroiderers' Guild overdyed red-gold stranded cotton on the piece folded over his arm.

I had originally intended to insert shisha mirrors in the circles decorating his cloak, and what looks rather like a sporran, but thought better of it when I remembered my collection of operculum (or cats' eyes.  I have collected these since I was a child and a much-loved uncle gave me a jar of them that he had collected in New Guinea during World War II. These are not from my Uncle's collection, but from a collection I bought at an Antique Fair a few years ago. I attached them using a metallic gold thread and the simplest shisha attachment method.
I treated the cloak a bit like a sampler, working each section, as far as possible, with a different Kantha stitch.

The pouch, or sporran challenged me, until I remembered a tanned cane toad skin I had bought a couple of years ago from Alison Cole. Cane toads are an introduced invasive species causing considerable damage to Australian wildlife and tanning their leathery skin seems a fitting response.

I'm pleased to have found a use for mine!


It seemed to me that the King should also have some fur on his cloak, so made it from Madeira stranded silk and Giordes Knots.
The scroll that he is holding in his hands I worked in a black running stitch, in Kantha style, using black stranded cotton.


I used the same stitch for his beard, but found a Madeira synthetic with a bit of sparkle that worked well. I beaded the crown in gold, jewelled with some coral pieces. A couple of dark purple crystal beads give his eyes a bit of regal flash.


The batik background fabric is quite spectacular with a greeny-gold lifting the red. To link it together, I used a variegated green and gold machine thread to quilt the background and some green over-dyed Embroiderers' Guild stranded thread to work a border that links it to the panel.


I think these panels are improving as I go along, and get braver at experimenting with embellishment.