Search This Blog

Monday, November 26, 2012

Toy chest etui: pincushion top


The final piece!

By the time I came to it, I had most of the border, the lettering and a few vine stitches in place.

 The inside satin-stitch frame went in fairly easily - it's fairly careful counting to get the gaps for the greenery to go through, but otherwise straightforward.


I discovered at the end that I miscounted and not left enough space for the intended clay geometric motif. Rather than unpick the tiny stitches I opted to adapt the geometric motif to fit. It's a bit of a squeeze - and looks worse in the photo than on the fabric.

I'm not too distressed about this - I may yet choose to remove the geometric design altogether. The pincushion will always remind me that I got to the end and adapted!


This is the finished piece on the frame.

Below is the finished piece off the frame. The two small dots in the top right are my blood - from a finger prick early in the piece!

I am, of course, itching to construct, but I don't have a workspace at the moment with our building work. Given that I have some Christmas projects to do, I am intending to put the construction aside until after Christmas.


Saturday, November 24, 2012

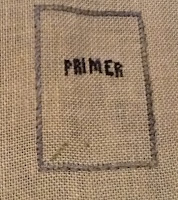
Toy chest etui: Primer pincushion bottom

I am now on the home stretch - the two pieces of the pincushion are the last items from the single piece of linen on my frame.  When the pincushion is stitched I can remove the whole piece from my frame and think about construction. There are two extra pieces for the chest, but they are separate.


The pincushion is a Primer - stitched like a box with a lid.
I had a little bit done from left-over thread.
This piece tested my original decision to do the back-stitch outline of each piece before I started. I still don't think I could have done without it - unless I had outlined each piece in tacking, and replaced the tacking with back-stitch when finished. I'm not sorry I skipped that!

With this piece I had quite a bit of difficulty with the borders. It was really difficult to see what I was doing on either side of the back-stitch line that marks the central rectangle. As well as a very crowded thread line, the sage thread is pale and blends.

Also, of course, I am tired and wanting to finish.

After working on it for the best part of a day, I took a break in the evening and worked on some ballet bears for the Christmas tree.

In the morning the satin stitch border came much more easily.

I also fixed that lower -left corner of the cross-stitch border (upper left on this photo), where I think I must have been stitching in my sleep!


The final product.

Now for the last piece - the front cover of the primer/pincushion.


Tuesday, November 20, 2012

Toy chest etui: scissor case side 2.

The Amish woman side of the scissor case looked like this when I began. The limited colours used in the Amish pieces meant I have not had many threads left from other pieces that could be used on the scissor fob.


I put her white cap in first, to give myself a reference point, then tackled the black apron, with the tricky pleat counting.


Once that was done, the satin stitch was  a bit more relaxing.


Her basket was a treat: a neat little basket-weave to finish off.


I'd prefer to have faces, but am staying true to the intention!


Friday, November 16, 2012

Toy chest etui: Scissor case side 1.

At BATB Betsy Morgan said she thought no toy chest would be complete without a doll, so she created the scissor case (this is the term I am now using after deciding there is no consistency about fobs and keeps!) to represent an Amish woman on one side and an Amish man on the other. In the style of Amish dolls, they  have no faces. While the exact original reason for this is no longer clear, researchers relate it either to the Old Testament injunction to make no graven image, or to the notion that only God can create a person.

I find the no-face Amish dolls disconcerting, but will stick to the tradition for this one.

I began with the man.

Once again, I had a few odd bits already done.


The hard bit for the male side of the scissor fob was the top section of the trousers - lots of tricky counting with both one and two threads to get the effect of pleats.

Once that was in place, the rest was more straightforward. Here he is with all but the handle and contents of his bag finished.

Two strands of thread would have given better coverage for the black, but that is more obvious in the photo than it is on the piece itself.

After using up some left over black thread from his breeches, I came back and filled in the handle and contents - corn, or possibly wheat.

Tuesday, November 13, 2012

Toy chest etui: scissor keep side two


The second side of the scissor keep has the same basket weave pattern, but the top of the piece has the date and initials. I decided to use my own initials as the maker, even if I decide to give the Toy Chest away as a gift.

Once again, I began with a bit already done.


As I said in the last post, I have been doing a bit of investigation of the term 'scissor keep'.
Since a thimble keep is a container for a thimble, I would expect a scissor keep to be a container or cover for a pair of scissors. This however, is not how the term is commonly used. Mostly 'scissor keep' refers to a tab of some kind that attaches to a pair of scissors and enables you to locate them.The cover for a pair of scissors,  is usually called a scissor fob or case.

Now that I have got my head around that, I can confidently say that I have finished the Toy Chest's scissor keep!


This is what my linen canvas now looks like. There are two pieces - the back and front of the pincushion, out of the photo at the top.

Sunday, November 11, 2012

Toy chest etui: Scissor keep, side one


As I reach each piece of the Toy Chest contents on my laid-out fabric, I am now finding more and more done because of the thread ends I have used up. I can see it won't be too long before I will run out of places to use those ends!

My notes from the BATB workshop indicate the scissor keep is an easy piece to stitch. That was pretty much so. one side is squared rather than curving, and has a basket weave pattern on just over half.


While the basket-weave is straightforward, I found myself thinking of that exercise in coordination - pat your head with one hand and rub your tummy with the other.

The basket-weave pattern is made up of three stitches over a count of four threads. I reckon at least six times I had to unpick my four stitches over four threads!

I did quite a lot of this stitching outside in the sun - now that the weather has warmed up. It is easier to stitch in natural light if I stay out of the glare.

That's why the linen in the photo of the finished item is washed out and shows the sun shining through!


This is now what my 'canvas' looks like.

Thursday, November 8, 2012

Toy chest etui: Button box

When I moved on to the button box, I already had a few bits in place from using up the ends of threads, so my order of work was determined by picking up on what was there.
I worked the edges first with the clay-coloured thread, then the lower-case 'b' which is also in clay.
The little gold rabbit (well, 'bunny' to keep the 'b' theme going!) was one of those smile-inducing motifs.

I needed to pay attention as I turned from square to square - it would be very easy to stitch a motif upside down.

I have by now rolled the linen on to the beginning frame.  Six pieces to stitch after this one!

I thought I had finished, but notice in this photo that there is one yellow stitch missing on the bluebird's beak. It will be done the next time I use the primrose thread!

Tuesday, November 6, 2012

Toy chest etui: waxer box drum

The next piece on my laid-out linen for the toy chest was the drum, which provides a storage place for a knob of wax for waxing thread - a tool I have found quite handy in the last year.

I already had a few lines partly done on this piece when I came to it - the result of using up ends of threads.
The satin-stitch leaves required concentration to get positioned, but also provided a  flowing break from the cross-stitch.

It also has the nice touch of the chord around the drum, held in place by bullion knots at the top and bottom.


This piece is the same size as the thimble-keep we made up at the workshop. The stitching for that took me about 10 hours. This piece took less than half that.

I must be getting more efficient!

Monday, November 5, 2012

Toy chest etui: button box lid.

This is a tiny piece, but does have the eye-straining challenge of a solid circle of petit-point in white.

I worked the circle first - partly to centre it, partly to have a break from outlining, partly because I had already used up a bit of white thread to do the corner crosses.
Again, I began using tent stitch, but ended up turning it to cross-stitch as I didn't think the coverage heavy enough. If I had thought in advance,as Monica did on her Juin sampler, two strands rather than a single one would have done the trick.

The photo is blurry, and I've now wound the linen on, so can't easily retake it.


It does, I think, look like a button!

I am on a roll now, stitching well ahead of my posting, so I hope to post more quickly this week.

Thursday, November 1, 2012

Toy chest etui: white horse end.

 The white horse end was a bit easier on the eyes than the black horse end, but the white thread is fluffier than the black, so it is more inclined to shred and shed.

I had a few problems with the outline of the white horse. I didn't put in a guideline row across the body of the horse as I had done with the black, and worked the back of the horse from the top down. A miscalculation of a couple of threads delivered me a horse more like Van Dyke's in his portrait of James I, than Betsy Morgan's horse, so I had a bit of unpicking to do!


I  reworked the back from the bottom up, and put in some of the black spots as guides.The mane is a bit longer than the design, but I'm now happy with the shape. I am still about one thread out at the top of the horse - so the star is too close. I intend, however to live with this.


I was tempted to add a horn, and turn this one into a unicorn, but resisted!

I now have all the pieces for the chest itself finished.