Search This Blog

Friday, August 17, 2012

Another Bag Binge

I haven't answered my own question of how many of the small bags I can use or give away - but there is probably no end to the number I can make! This week I have been on a roll and here is the result.


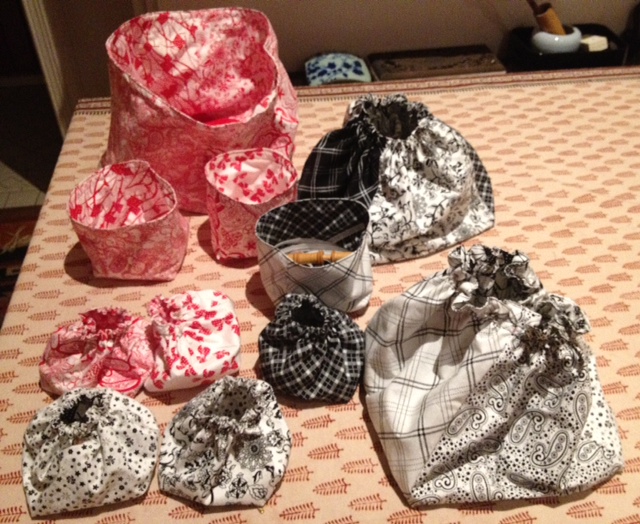
I had a supply of 5 inch wide fabric strips in a variety of black and red prints, so I made more black bags and some red, along the lines of my prototype and designed to hold a ball of wool.

 I also had some 10 inch squares of the same fabric, so I used them to make some larger bags of the same shape.

 I then made a few without the elastic at the top to serve as baskets or bowls. I bought some polyester boning (based on my experience with the bag embroidered with native flowers I made earlier this year). I thought the stiffened rim on the larger bag might make it useful for storing patterns. I have yet to decide if this will work.


I've found uses for the small open ones already.


This is the array so far.

They all fit inside the large one with the boning in the rim - so I have made a pile of bags and a way to store them.

Hmmm....

Why do I feel so satisfied? I will find uses or homes for these - I really am a bag lady!

Tuesday, August 14, 2012

Bag experiment

I was inspired by a post in Gill Thomas's Elegant Sufficiency blog to dig out some fabric squares and strips I got as part of a magazine subscription package and experiment with a little bag to hold one ball of wool. I've been wanting to try one of these for a while and Gill's post pushed me to give it a go.

Gill and I recently connected through a family history website. It is uncanny to find someone, living on the other side of the world sharing a common ancestor in the eighteenth century, who has so many similar interests. There is a whole new area of research here - looking for the bag gene!

Gill has a great post on making some of her bags. In my somewhat cramped sewing space at the moment, due to the building work going on around us, I used a much more rough and ready method to construct my prototype. I will, however, work out a set of measurements and employ some accuracy when replicating.

My precut strips were 13cm wide - about the height I wanted in my wool bag. I folded the end over to get a square. This became my base.


I then folded the square over four times to get my length - minus  3 seam allowances - since I was going to use one long strip for the side instead of 4 squares. In fact, I underestimated the 3 seam allowances and needed to reduce the length of my side piece slightly when I pinned the base to the side piece.

I stitched it and made a second one as lining, stitched around the top and turned it inside out. Yeh bag!
So it would work for my ball of wool, I added a casing and elastic.

Voila! reversable bag.


Not only does it work for my ball of wool, but on my current project the knitting and needles sit in the bag as well.

Exactly what I wanted.

Now how many more of these can I use or give away?


Friday, August 10, 2012

Chicken towel

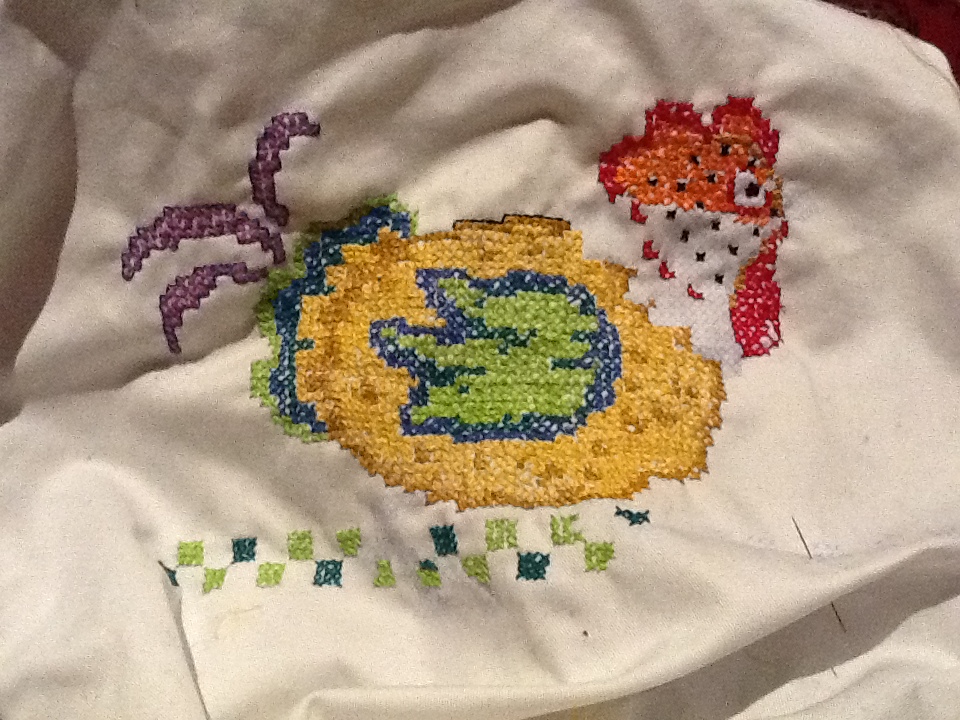
I bought a pair of chicken towels along with the apron. They were inexpensive, didn't add to the postage, and I was curious to see what they were like. They looked more like runners to me, but I guess you could use them to cover something or to wipe your hands while cooking. They are, however, quite thin cotton without absorbency. I embroidered one of them to go with the apron, but haven't proceeded with the second one.

I kept telling myself I was completely insane. The thread is not very good, there is not much skill involved and I doubt the 'towel' is very useful. I think the chicken mesmerised me.
Once the head of the chicken was done it made me smile so much I just kept going. It is such a jolly chicken - full of personality and life, even with the weird colour combination.


The edges of the towel were over-stitched. I didn't much like them so decided to give it a herringbone border.


If all else fails, it would make a flag to hang on the chicken house!


My daughter's chicken palace, made from our old shed - it now has a verandah added.

Wednesday, August 8, 2012

Chicken apron

I am a sucker for quick and easy kits. I couldn't resist a Herrschner's special on a cheery apron with a cross stitch chicken printed on it - and matching 'kitchen towels'. I ordered the thread kit for good measure.

The colours are not those of any chicken I can remember - but I am no chicken expert! They are bright and attractive, so I went along with them.

In addition to the chicken, the apron has rows of off-set squares, under the chicken to represent (I presume) the ground, and along the hem of the apron for decoration. These proved very useful for using up the ends of thread from bits of the chicken.

This was a fun project. It reminds me of the children's book Rosie the Hen Went for a Walk. It is a Rosie kind of chicken.

I didn't much like the Craftways thread - some of it frayed and shredded - but I got by.

It made a good present.


Monday, July 30, 2012

Feather and Fan Silk Scarf

This is the longest break between posts since I started this blog. The gap is caused by a combination of factors - the building work beginning on our extension, my giving priority to my family history blog and publishing the a book from that blog on my grandfather's family, and the fact that I have been working on  upcoming birthday projects that can't be blogged about until after the birthdays.

Yesterday, however, I blocked and finished a scarf I have been working on.

The yarn for this was a gift from a friend who came across it on a visit to Sydney. It is a hand-dyed silk yarn produced by Ann Collins, a Sydney textile designer. It comes in 100gm balls - so quite a lot in a ball. There were two patterns with the yarn, both for scarves, one with a wave pattern, one feather and fan.  One ball will make three scarves.

I decided to make the feather and fan scarf for the friend who generously bought me the yarn - an unexpected and no-occasion present. There is plenty left to make something for myself.

It knitted up very easily - so light and soft to work with. I've knitted quite a few lace scarves and I still find it hard to believe the blocking makes a such a difference. I kept thinking the lace wasn't emerging.

I put off the blocking for a week or so. Our kitchen is packed into my sewing room and it isn't easy to find a space to block even a scarf, but yesterday I managed it on a rug on the floor of my study.

Miraculously, the lace appeared. This morning when I took out the T pins there was a really lacy scarf . The feather and fan pattern is evident and it will look great on my friend.

Now to pack and post it to her.


Sunday, July 8, 2012

Navia shawl

I have been working on a Navia kit for a shawl in the style of the Faroe Islands. Mine is in black. I wanted to try both the yarn and the pattern.

The yarn is a mix of Faroese wool, Shetland wool and Australian lambs' wool. I was intrigued by the history of the Navia company, which began in 2004 as a school project business plan on the Faroese Islands. Ã“li Kristian á Torkilsheyggi was so committed to the project he carried it through to a successful business.


I liked the story, had been interested in both Faroese and Shetland wool, and the style of Faroese shawls, which are knitted in the round with a gusset down the centre back, and shaped over the shoulders. The kit was very reasonably priced from The Fox Collection so I gave it a go. I chose black because I wanted to wear this myself, at home as much as when going out and thought that more serviceable.
The wool is lovely to work - soft,  firm, no splitting. The instructions were minimalist, but the chart clear. I soon got the idea and the rhythm. I enlarged, photocopied and folded the chart, marking  the panel of pattern repeats with highlighter to help my memory. The dark bits on the chart show the stitches that no longer exist.

I used ring markers to mark off the repeats and coloured rings to mark the central panel. I would not have managed without these, even though the pattern is relatively simple.

I am not usually a fan of garter stitch, but it certainly made for simplicity. Once the lace pattern was completed  the ring markers for the repeats could be removed and the pattern of decreases takes over the rhythm of knitting.

When the knitting was finished, I had the challenge of crocheting around the front edge. I got out one of my mother's books of crochet instructions and tried to teach myself a treble. I don't really think I succeeded, but I made a passable edge anyway. The instructions were for a panel of trebles and didn't transfer very easily to an edge. I suspect what I ended up doing was a double, not a treble, but it gave a finish to the edge.


The last bit was the knotted fringe. I had no idea how much wool it would take, but I made it with quite a bit to spare.

Best of all - it is astonishingly light and warm. I have been wearing it when it is not quite time to turn the heating on but a bit cool to sit still. It's a great shape; doesn't keep falling off as straight shawls tend to do.

I would certainly use the wool again, given the opportunity, and I will now try some of the more complicated patterns I have for Faroe Island shawls.

Wednesday, June 27, 2012

Bright Bag

Promo shot - no-one I know!
I had a few days away from home again recently and needed a project to take with me that didn't need too much equipment. I decided on a Charles Craft Bright Ideas cross-stitched shoulder bag I had bought from The Fox Collection some time ago. It comes as an already made Aida tote, with a set of three suggested patterns and colour charts. It is designed to showcase DMC's neon acryllic thread range.

I had the yellow bag with orange handles and decided to go with the pattern on the bag in the promo shot.


I tried to get the border and large flowers outlined before I went travelling, so I could have bits to do that didn't require a lot of chart scrutiny.

The bright yellow Aida is lovely - very cheery and quite soft to touch. Working with a hand inside the already-made bag wasn't too bad at all. The bag is large enough. There is one angle that is a bit awkward, but on the whole I could avoid holding the bag in that position.


It turned out to be a good travel project - a bit of work that required close reference to the chart, but a lot of area that was 'colouring in'.


As soon as I put in the white petals, it took on a dimensional quality - quite exciting to see.


It took me a bit longer than I had thought it might. Although the Aida is easy to work, there is quite a lot of detail and the ribbon and roses have three shades.


While I really like the effect, and I will use the bag a lot, I dislike working with the acrylic thread, which shreds, catches and frays at every opportunity.


The effect, however, is so bright, cheery and dimensional that is has been worth persevering. The key, I think, is using the neon acrylic thread for highlights rather than the total embroidery. The cotton thread was such a joy to work with after the acrylic. There was enough cotton to keep me sane.

I am very pleased with the finished effect and the bag will be very useful.

Would I make another one? I'd certainly be happy to work a couple more of these bright bags. I'd prefer to work them in cotton thread - but  I think I would make judicious use of the acrylic thread - it produces such a pleasing effect.