Search This Blog

Tuesday, May 31, 2016

Iron-in-a-bag

I went to the recent Adelaide Stitches and Craft Fair with a friend. The best thing was the very inspiring wall of crochet.
I was pretty restrained about buying - a few skeins of thread for a thread-hungry project I'm working on - and a tiny iron.
I've been looking for some time for a small iron to get into the corners of embroidery projects. The smallest I had found did not have a version with an Australian power cord, so I held off. Both the friend and I, however, were convinced by this little iron, which can be left hot, face down on the little (about 6" square) mat it comes with.                                                                       Also in the package is a pattern for a bag in which to keep the iron.
Late in the afternoon of the next day, when I had done all the chores on my list, I dug out a fat quarter of bright fabric - purchased when I had grandchildren under 5 who might like something with lots of enterprising ducks on it. They are all way past that now, so I used it to make the bag for the iron.                                                                                  Some oddments of wadding and I was underway. The pattern asked for a 20" zip which I didn't have. I thought I'd just get the bag made, then buy a zip the next day. I was, however, on such a roll that I dug out a zip I had purchased for a now-forgotten project - about 14 inches. Why not give it a try? 
With and adjustment to the hinge connecting the lid to the box I was in business - 20 inches would have been too long anyway!

Voila! I now have an iron-in-a-bag which can live neatly in a cupboard beside my dining table to be used for those quick jobs that don't require the ironing board. 


Then, lo, Patchwork and Craft magazine publishers had a Mother's Day special on the ironing mat I've been eyeing off for about 3 years.
I indulged.  The mat - and yet another year of Handmade Magazine - is (I hope) on its way to me. I can't believe I'm overjoyed about an iron and ironing mat! Of course, a week later Patchwork and Craft had the ironing mat on special WITHOUT the subscription. Nevertheless, I struck while the iron was hot, so to speak.

Wednesday, May 25, 2016

Fisherton-de-la-mere

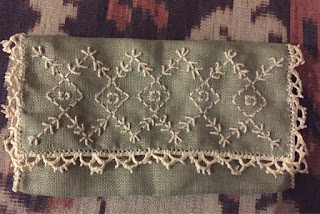
On the last weekend in April, I did a two-day course in Fisherton-de-la-Mere embroidery with Christine Bishop at the Embroiderers' Guild of SA. It was terrific.                                                   I used a piece of Permin linen that I had bought as a remnant at the end of 2014 at The Crewel Gobelin while on a visit to Sydney. It proved to be a great buy.
The main embroidery was done using ecru cotton a broder. I lost count of threads in the centre of the pattern. As I only realised this after completing the basic squares and beginning the bullions, I stuck with the error and adapted the rest of the design.
As always with Christine's classes, this was a well-designed project. The number of stitches, the size of the piece and the challenge fitted the two-day class. The stitches included pulled stitch, wrapped bullions, a pulled edge, buttonhole and needle lace.


The stitches new to me were the wrapped bullions and the picots on the needlelace edge. The wrapped bullions were terrific - a real advance for me over the usual needle wrapped version.

The challenge was the picots on the needlelace. I am comfortable with needlelace per se, but the picots challenged me. I undid quite a few before getting some I was prepared to live with. I achieved them - but crudely. I need to keep working on them.


I used a large, fat pincushion to support the needlelace.


We had the option of making our piece into a mat or a pouch. I chose the pouch and decided to line it with a piece of raw silk left from a past dressmaking project.
I really like the way this turned out. There are errors - which act as a prompt to check and double check my thread counting - but it is harmonious and elegant.


Many thanks to Christine and my fellow students for a really pleasant day, some new skills and a most pleasing little pouch.

Tuesday, May 17, 2016

Blackberry tea cosy

This is another pattern I found in a magazine - this time Patchwork and Craft- and that the friends with whom I sit and stitch every couple of weeks decided we should make together. It is by Bianca Kingham of Wolfberry Knits and called Blackberry Teacosy. Patchwork and Craft describe it as " a teacosy with knitted blackberry and leaf applique , giving the effect of embroidery". Bianca's Ravelry  page has a vest using a similar technique.
We spent one session knitting the base. This is mine - using some leftover Bendigo Woollen Mill Murano- the only roughly 10 ply wool I had to hand.  As you can see, I forgot when I started that this wool develops a slant unless you knit into the back of the stitch! I switched as soon as I remembered but decided not to undo, relying on the leaves and berries to distract from the slant.
At our next meeting, the two of us who were there decided to embroider the leaves and berries rather than knitting them. We used reverse chain stitch for the leaves and stems
and straight stitches at different angles for the berries. We could have used French Knots but found the straight stitches gave a better finish on the surface of the wool. I used only oddments of wool I had in my stash so the leaf colour is a bit limited.
This was a pretty simple project and a lot of fun to do together. It lends itself to endless variations and play.

Sunday, May 8, 2016

Gilaf finish

Today I'm feeling blessed by the talented teachers we have in our Guild.
My gilaf was meant to be finished with decoration in the corners of both the inner and outer borders. I found some tiny opercula to attach to the inner corners. The outer corners were meant to be finished with shisha mirrors but I didn't have any. Barbara, our teacher, had a supply but  I missed the second day of the course when she brought them in. I phoned around various Adelaide craft stores, but without luck. I therefore improvised, trying out a few buttons and shells. In the end I settled for some flat pieces of sea glass.

We collected these decades ago on the beach in Loch Ard Gorge, Victoria. The wreck of the Loch Ard, a clipper ship that ran aground in 1878 lies just off this beach. The beach was accessed by a steep track - so not an easy beach for casual visitors and not a safe or patrolled swimming beach. We found a lot of old sea glass - some with the rounded pieces from the base of very old bottles. Quite possibly the glass is from the Loch Ard.

I used five small, flat pieces in place of shisha. I stitched these in as if they were mirrors, using the Cretan Stitch variation with the help of Mary Corbett's tutorial


It worked well.

I had found a piece of Japanese fabric - silk as I assumed - for lining,  but melted it while ironing! I substituted a piece of pink dupion.


The work was, by now, not completely square, but close enough to achieve a workable pouch.  I had obtained some faux coral beads for the tassells and added these, along with a cord.

I chose, at this point to add in a little triangle (suitably rustic and - unintentionally - skewed.                                                                      This has been a fabulous project.  I love the result, but more importantly, had a lovely time making it. I have a much larger square of blanketing that I am hoping one day to work using similar techniques.
I am booked to do a day's design work with Barbara Mullan at the Embroiderers' Guild in June. Maybe that's my chance!