Search This Blog

Monday, October 17, 2022

Andrea Mowry's Nightshift as Prayer Shawl

Nearly twenty years ago I came across the Prayer Shawl Ministry which describes itself as a program of applied Feminist Spirituality.  I like the concept - and have used it numerous times since. While I have most of the knitted Prayer Shawl books, any pattern can be used.  

For the past few weeks I've been working on a third Nightshift shawl using Noro Ito wool. I made two for my daughters last year and had the wool for a third for myself, but other things had higher priorities. When a friend in Sydney became very ill this year, I decided to make her a prayer shawl - and Nightshift was perfect. Using the Noro yarn simplifies the pattern - and adds to the effect.


It's also a joy to knit. The meditation of knitting for healing works both ways.

It's a simple pattern in the mosaic style, using two balls of yarn - two rows from one, two rows from the other.

I prefer knitting shawls from the long side, decreasing with progress.


This one works the other way - so rows take longer as you progress and it takes longer to see that progress. I just kept going until I judged I had only enough yarn left for the cast-off.

I blocked it on the carpet, using blocking wires to keep the edges straight.
It blocked really well and came out large, soft and flexible.


It has reached its destination and is bringing pleasure and warmth to Robin as she recovers in the last of our cool weather.

It brought me pleasure and warmth too.

Tuesday, September 27, 2022

Russian Goldwork Pouch


Last Saturday was an Embroiderers' Guild Certificate Course Workshop taken by Jackie Denniston on Russian Goldwork. Jackie had done quite a bit of research and a lot of preparation for what was a really engaging and fun workshop. I won't share her work, but I can, I think, without compromise give some idea of my experience. 

Jackie had prepared kits we could purchase and I had a choice of cream silk with edges neatened or blue silk not edged. The cream was ready to distribute so I went with it. Most others went with blue.   
                                                          
The method of transferring the design was by dressmaker's carbon. I managed to dig out a packet I reckon I bought in the 1960s. It must have been after 14th February 1966 as the price is in decimal currency!

The instructions were very clear and Jackie was on hand to help. We used a range of metal threads as well as pearl beads. It was slow and meticulous work. 
I didn't get it finished in class, but it only took me an evening to finish at home. This is as it came out of my hoop, a bit crushed and with a few marks remaining from the carbon.
It's a pity I didn't make sure I aligned the silk and the calico backing before putting it in my hoop. The mis-alignment meant I had to trim and manipulate in order to construct something from the result. Nevertheless I proceeded with my plan to make a jewellery pouch.

I didn't have a gold zip, but after a bit of consideration and trial I decided a fawn one I had would work quite well. I folded the piece so the zip was in the centre back and machined the ends.

The lining is from a piece of gold silk in my stash. I dug it out this morning and finished it off.


I'm very pleased with the result. I have worked most of the techniques and threads before, but it's not an area at which I am very competent. I'm really pleased to have a chance to practice and learn more.

Plus I now have another pouch for pearls or other jewellery to either use myself or give to someone else who would use it. 

Wins all around. 

Thanks Jackie.

Sunday, September 11, 2022

Knitted Vest Finish & Reflections on learning new techniques.


For nearly a month I have been knitting a vest for one of my daughters - a birthday present she chose.  The pattern is Carbon from Rowan 70, which I bought, along with a yarn pack, from Morris & Sons Online. It is knitted in the round and has the option of a gold thread addition to the borders and red-brown bands, which we went with.

There were a few challenges. First, the delivery of gold thread, DMC Diamont, was delayed, but fortunately not for more than a few days.  I couldn't start without it.

I was also frustrated that the chart included in the pattern showed only a section of the pattern repeat and not a whole diagram of decreases and increases. A generic summary of these means the knitter has to literally create her own chart, or set of instructions. You need to be experienced.
And have plenty of time.
Next, it became apparent that the one 50 gram ball of 190 Stone prescribed in the pattern was not going to be enough. The other colours all had 2 balls (3 of Barn Red) and since 11 of the 18 main pattern rows used Stone, it was clear I was going to run out. When I reached this point with a spare ball of Lotus, red-brown and dark brown, but none of Stone, I ordered another ball of the last, contacting Morris & Sons to say there was a probable error in the pattern amounts. They were, as always, responsive and helpful. They sent the extra ball within 24 hours, refunded my postage and asked for detailed information to help others. 
Their response enabled me to keep knitting to the next challenge - the steeks. I haven't knitted steeks before. I have knitted gussets in ganseys, but they don't require cutting, as steeks do.


The purpose of steeks, as knitters will be aware, is to enable you to continue knitting in the round, with no side seams, so you insert a gusset, which you later cut in order to create  holes for the sleeves and a neck. 


Creating the gusset is easy (stitch markers keep track).  It certainly makes it easy to keep knitting.When you reach the required length, you cast off and join what will become shoulder seams to form a bag of sorts. You have a few stitch holders to contend with, waiting to be picked up at the base of the steeks.


Then it gets scary. You take your 'small. sharp scissors' and cut down the centre of the steek. I took the optional path (for wimps) of stitching a double line on my machine to mark, and secure, the cutting line. While it gave me confidence, the stitches disappeared into the wool and were difficult to follow.


To be fair, the cut threads don't run, because you are cutting through vertical rows. Cutting horizontally would be a different matter. Nevertheless it needs to be done carefully. 

 I ignored the instruction to cut ALL the steeks at once, and proceeded one at a time. beginning, as instructed with the neck, picking up stitches around the outer edge of the steek, then knitting the neck band.


On the inside, the cut edge needs to be turned under and stitched down. I then repeated the process with each of the sleeve openings.


Here's the (almost) finished piece.
The 'almost' is because I realised I had made a mistake in a small section of the pattern on the back.

You can see, in the lower pattern band, that the patterned rectangles do not have the centre cross they should have. It was a small section that I had not noticed until I was too far ahead to be prepared to undo.
I resorted, therefore, to an embroiderer's solution of a few chain stitches on the surface to rectify (restore, cheat).

Voila!

I'm very pleased with the result, and, more importantly, so is the recipient.

It fits the bill - and that's what it is all about. I'm really glad I made it and tried new things. It is a lovely design, lovely wool, looks good and is fit for purpose.

I am not sold on steeks. It seems to me it would have been much simpler to have divided the stitches at the underarm and knitted the fronts and backs separately, then joined them at the shoulder.  If the pattern had provided a full chart, it would have been easy to adapt to this method. As it was, it would require much greater re-calculating. In future I'd consider that.
This is the wool left over. As I suspected, the pattern should have listed one ball of 205 Lotus Leaf and two of 190 Stone.  This has been corrected on the Morris & Son's website. I didn't need the third ball of Barn Red, and had 3 spare reels of Diamont, but I can understand why these might have leeway.

I feel happy to have worked my way through this, got a good result and delivered for my daughter.

My thanks to Morris & Son's for their help and customer service - and for family and friends who put up with my steekaphobia along the way!

Monday, August 29, 2022

Certificate Course Bulgarian Embroidery Workshop.

I had such a good time last Saturday, presenting a workshop on Bulgarian Embroidery. There were nine students and the two organising tutors  present. It is such a focused, engaged and supportive group - intent on learning. I was well prepared (as Lee, one of the students, said ' belt and braces') with back up plans in case the technology failed, a container with Nelly Ivanova's collection of embroidery by her mother-in-law Vala Georgieva ( thanks Nelly!), who is still embroidering in Bulgaria, a bag of reference books, and a box of printed student notes and my own worked samples. 

There was a problem with the projection, but with Christine's help, we got it working sufficiently to use the PowerPoint. 


I am always nervous about these presentations, because my interest focuses heavily on the history of the embroideries I am working on, and as this is not the usual focus of Guild groups I'm always worried I will bore the socks off the group. I'm beginning to believe I can stop worrying. Those who come, it seems, have now self-selected, and are as fascinated by the history as I am. I seem to have found my tribe.

In this case, of course, I have the added advantage of Vala Georgieva's fabulous collection for students to pour over. This photo doesn't do justice to the lovely black dress - hanging on the black pinboard doesn't aid the photograph.

Having such a rich collection means students can see first hand, explore and go back as they work their samples, to see how it was done by the originator.

The exercises I set were those I worked out 12 months ago, and had assistance from Margaret Adams to chart, based on two motifs from two items in the collection.

I, of course, turned mine into a bag. To finish it I added a simple elbetica design on the back. Some students were very interested in this.  The point of the Certificate Course is to learn a range of skills and to show that in a series of samples. I always prepare too much in the project. I would hate anyone to run out of work, or feel they were not sufficiently challenged. 

We spent a good two hours just stitching the design, but even so, I think there is a few hours of work for most to do at home if they wish to have a finished product.  On the other hand, they could stop once they  have tried out the four stitches used. 

I also gave the option of an alternate design based on the Great Goddess motif. No-one started this but at least one will, I think, try it. As Lee said, belt and braces.

I really enjoyed this workshop - the content, the interaction and shared knowledge. It is, for me, the Guild at its best - all of us learning and sharing our knowledge. This workshop has the added benefit of learning more about our own local community embroideries and their connections to the rest of the world.

It doesn't get much richer than that.


Tuesday, August 2, 2022

Shisha Workshop at the Guild

Last Saturday was a Certificate Course Workshop on Shisha Mirror Embroidery taken by Christine Bishop. 

The project was a tiny purse - of the folded-in corners variety. The starting square was 10cm. Christine, who often goes for pastels, argued strongly that this should be in bright colours. I had brought along strong colours, but she kept advising me to go brighter. I adjusted a bit when I got home, but I'm satisfied. 
 
I've used shisha mirrors before on several projects, but I'm not convinced I got this one in absolutely securely. Time will tell!

To line it I found a piece of silk left from a dress I made in the 70s and a partial cowrie shell as a catch.


I  spent a few hours more on it at home and I'm happy with the result. I love this pouch design. It works regardless of the size of the pouch. This is about 7cm square.


It's a cute little pouch that will come in useful to hold a gift of jewellery. 


A good, fun workshop and end product.


Monday, July 11, 2022

A use for some chicken prints.

Earlier this week two prints I ordered from Tatiana Popova arrived. These were art works by Marina Popova, printed on to fabric for embroidery. Tatiana and Marina are Ukrainians who have sought refuge in Australia and hit the ground running with art and craft.

I wasn't sure what I would do with the prints - but I do like a good chicken. Maybe a pouch.

When they arrived, I decided against embroidering them. They are lovely, and printed on to cotton using the panels you use to print on to t-shirts. I have used these on t-shirts. They work well, but the resulting surface is not one I fancy embroidering on. 

It occurred to me that these panels would work well as patches on some of my t-shirts that have those pesky holes from zips. I have a several of them, so dug out a couple that fitted with the chicken colours.

The chickens were just the right size for the job, so I tested the size, cut them, backed them with iron-on fabric adhesive and ironed them on.


Oddly, this worked well on the red top, but the adhesive didn't take on the cream. Maybe it was something I did in the process, or the composition of the fabric. In any case, I stitched around both of them. 

Hopefully both will hold for a couple of seasons of wear. The red, which has adhesive as well as stitches, might last longer.

I have put the patched tops away until the weather warms up a bit, but I'm pleased to have two more tops that I feel good about wearing outside the apartment - and I've found a way to display these very attractive chickens.


Makes me satisfied and happy.

Sunday, July 10, 2022

Blanket finish

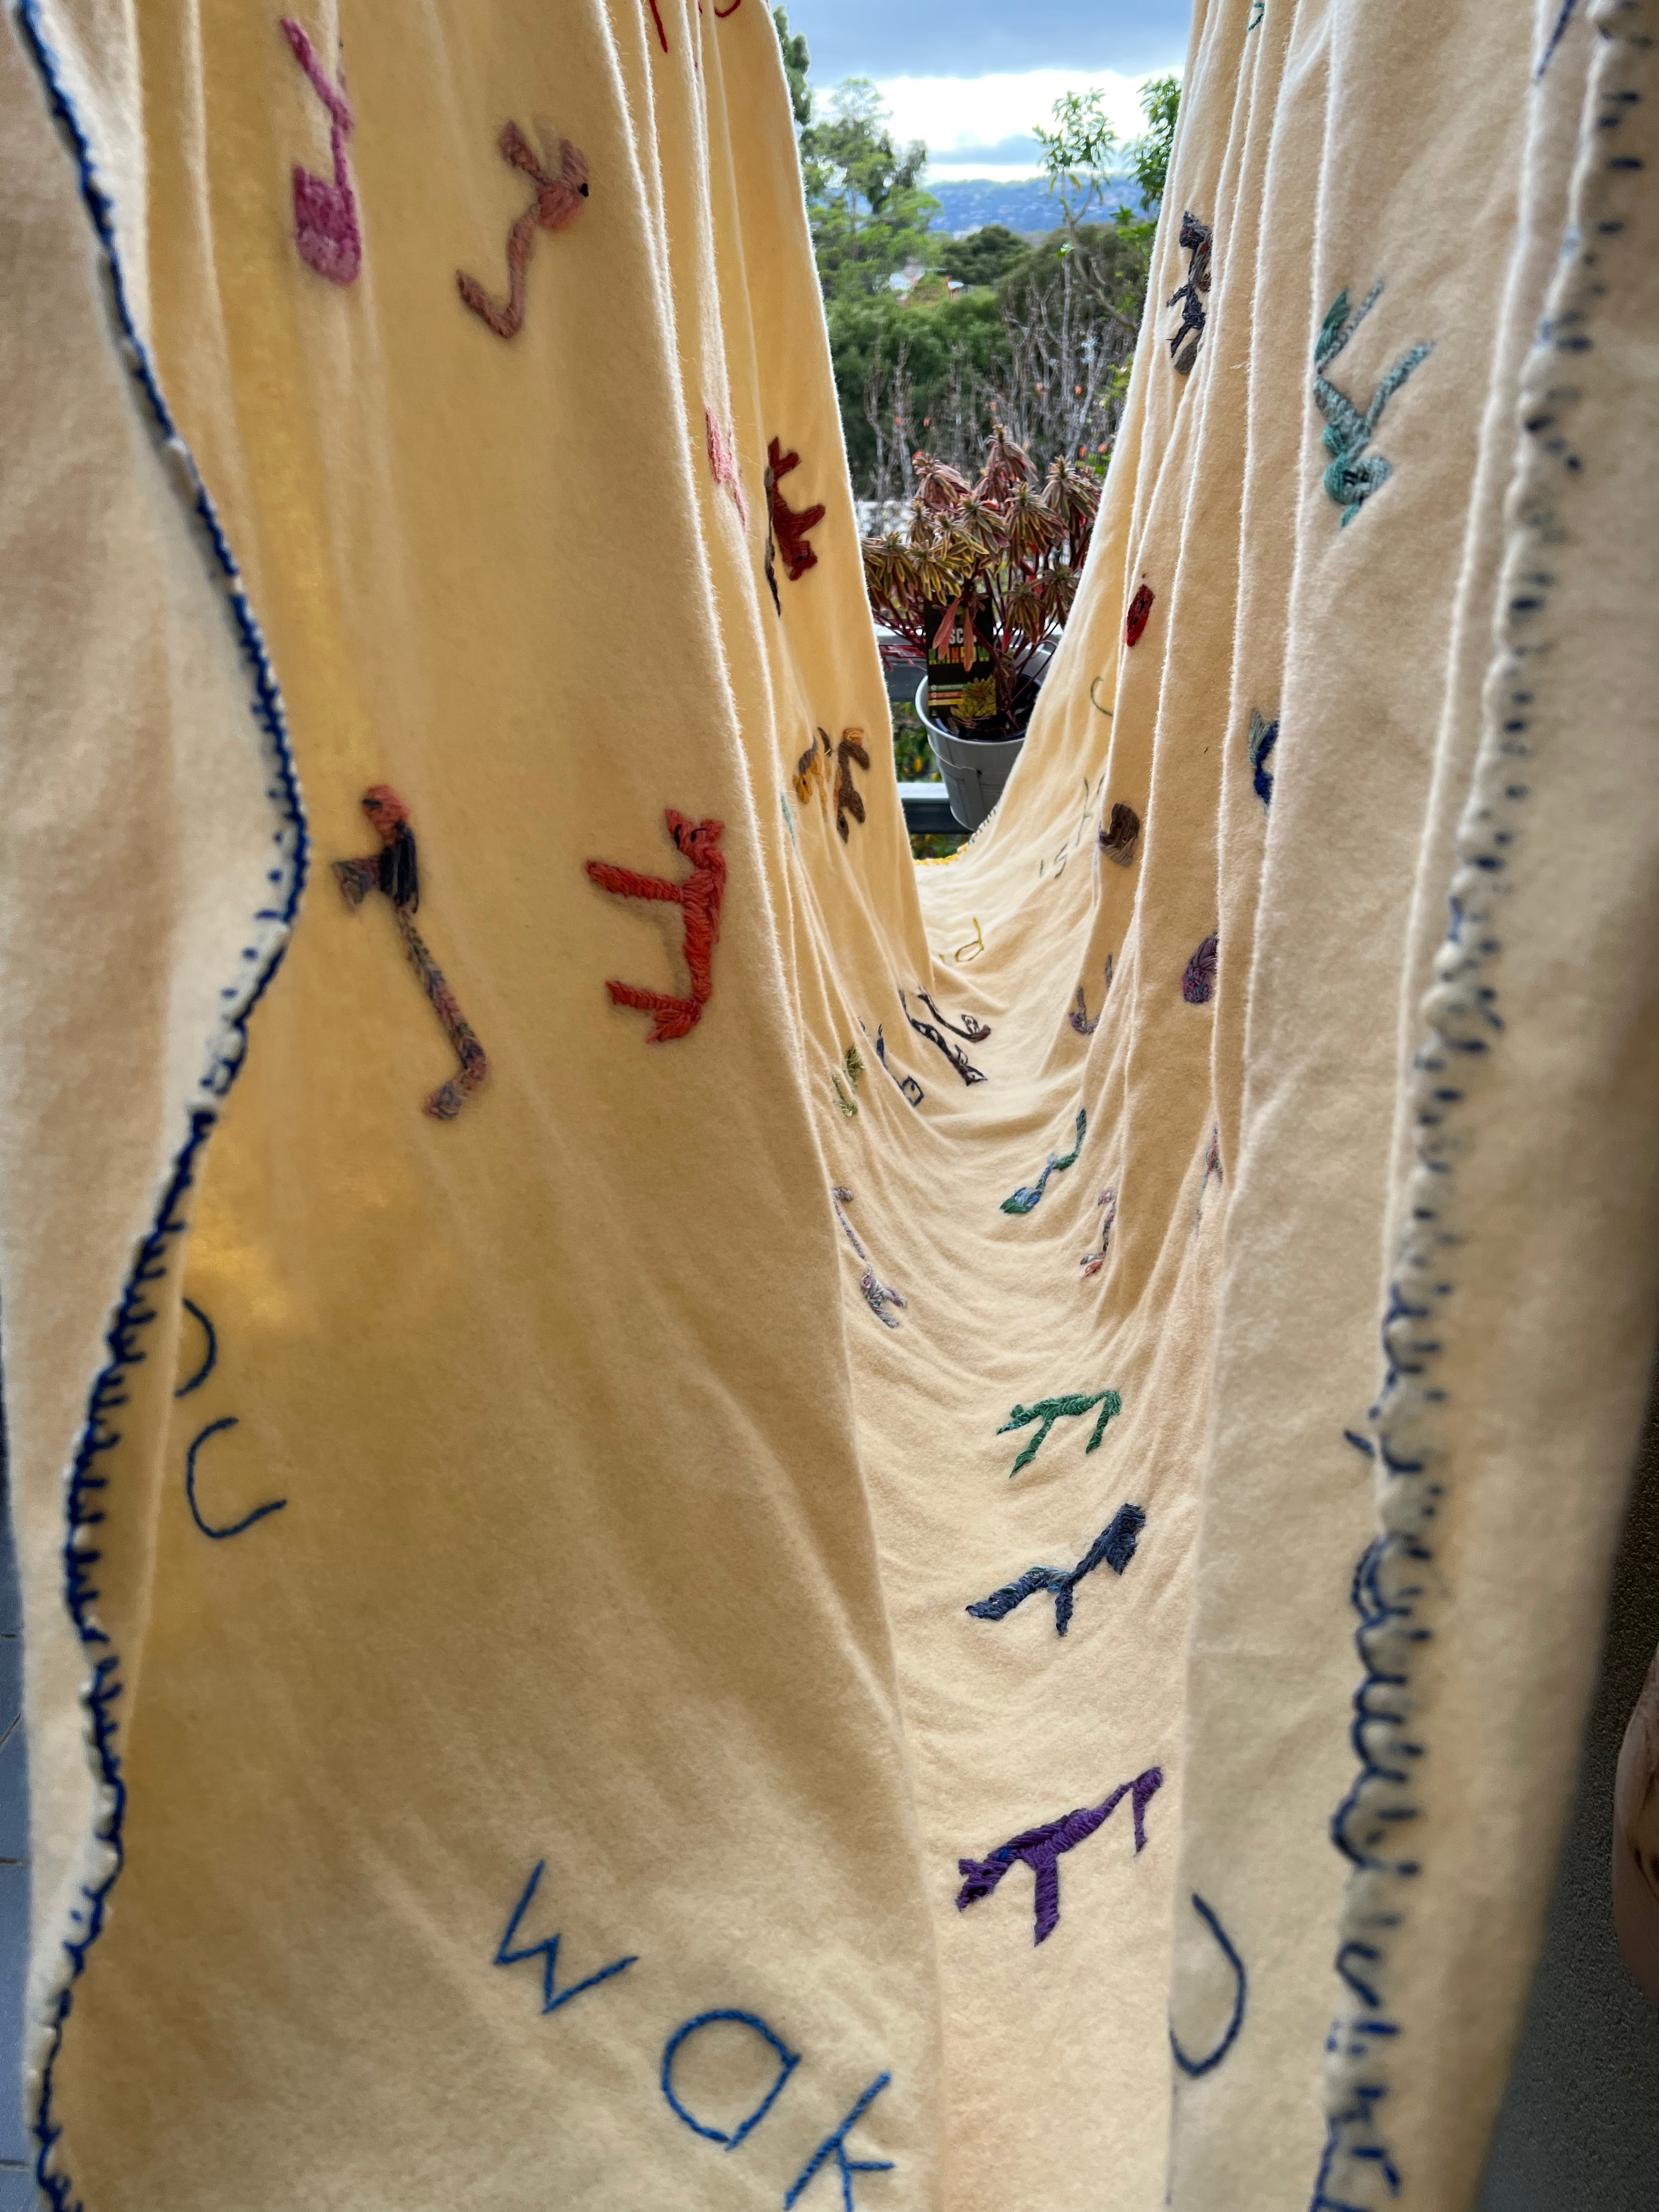
I took my finished blanket into the Junior Embroiderers' meeting to ask their advice on whether I had enough horses on it - and to get their tutor's advice on washing it! The girls thought there were enough horses, and Margaret's advice was to hand-wash the whole thing, spin it dry and hang out. So that's what I did. It has been raining in Adelaide, but I got 4 hours in the middle of the day - and it dried.    


I wasn't entirely satisfied with the coverage, so consulted Niamh and Veronica who agreed it needed a few more in the corners.

So I added a few more. 


I've got used to these little horses! 


It is almost impossible to photograph the whole blanket. Maybe I need a drone! I tried a few different angles and directions, but it is all partial and the light isn't good enough. 

                      
In the end I made a little video - more for my own record than for sharing. 

I had promised Bernadette, who helped me choose threads for the text, that I would take it in to show her at Create in Stitch, so before delivering it to Brigid, I duly called in on Tuesday to discover she is returning to her dressmaking career and now longer working there. Di Kirshner's class asked to see it, so we showed each other our work! Loads of fun.
It was while doing this that I realised I hadn't signed the blanket, so brought it home again and added our initials and date to a corner.

I delivered it on Saturday night and Brigid is pleased. She is house-sitting for the next few weeks and has taken it with her. It is very warm and cosy - I miss it over my legs while stitching - so will not go unused in our current chilly winter.

I tried inserting the video here for my own record - I didn't expect anyone else to view a video of a blanket!  However, as I have found with video before, it took far too long to load, so I have abandoned that idea.  

It's been 15 years from conception to making and I am delighted to have delivered.