Search This Blog

Monday, March 7, 2011

Zen and the Art of Needlecraft

I have just finished reading Sandra Detrixhe's book, published by Adams Media, Avon, Massachusetts in 2005. It is now, I think, out of print, but I found a copy on Abebooks.

The first thing about this book is that it feels terrific in your hand. It is very light and a great shape - just slightly wider than a normal paperback. The cover is very smooth, and the pages quite thick.

Detrixhe takes the three goals of Zen Buddhism, to balance the mind, enlightenment ("superalertness") and enlightenment-in-our-daily-lives and applies them to needlecraft. While her writing is chatty, homely and centred in her own life it is rarely condescending. Her application of the Zen concept of  'beginner's mind'  (the ability to experience everything as if for the first time) was helpful and would be useful to anyone teaching needlework.

She goes on to explore the eight pathways to overcoming suffering: right understanding, right purpose, right speech, right conduct, right livelihood, right effort, right alertness and right concentration. Along the way are many stories about historical roles of sewing, the role of sewing in her own and other women's lives and stories about sewing in literature.

I found this a very comforting book. I empathise with many of the author's attitudes and experiences. For me, too, needlework is focus, de-stressing and deeply satisfying. It is good to take the time to reflect on why this might be so.

Saturday, March 5, 2011

Dressing Gown

When I made the nightdresses ( http://jillian-alwaysstitching.blogspot.com/2011/01/nightdresses.html) I realised that given their lightness and thinness, it would be good to make the matching dressing gown.

I also made bags for the nightdresses to be kept in. I remember having a couple such bags for pyjamas when I was a girl. I'm sure they had a name, which I can no longer remember. 'Sachet' is the word that comes to mind, but it isn't quite right. The smocked nightdresses deserved such bags.

The first was relatively straightforward, using an iron-on transfer from my mother's stash and a monogram from Susan O'Connor's book Monograms: the Art of Embroidering Letters. I outlined and filled the B with stem-stitch, then satin stitched over the top.

The second one was slightly trickier. I always collect the little pieces of smocking cut off to form armholes after the smocking is complete, thinking they must be useful for something. This seemed like an opportunity to experiment, so I used the off-cuts from the nightdresses to form decorative corners on the second bag.

Each corner is two offcuts handstitched together. It worked OK. The B in this one is in stemstitch.

The Victorian Dream for Girls pattern I used for the nightdresses has a gown pattern with it, so I purchased more fabric from Country Bumpkin, this time in a slightly heavier cotton. It pleated and stitched nicely.


 The sleeves have an overlap rather than an underarm seam - quite easy to do. I edged the sleeves and bottom with a cotton/polyester lace left over from the second christening dress for the twins. It is a very easy way of edging - just lace edge wrong side to fabric edge  right side with a fine zigzag, then turn down and straight stitch around on the right side.

I was unsure about the length, but I decided to stitch a pleat around the bottom if it was too long - which it wasn't. Since taking the photo I have added a small pocket and a tag inside the back for hanging on a hook.

Wednesday, March 2, 2011

Thirty Pretty-ish Coasters

We regularly use coasters for drinks on the small glass or polished wooden tops of occasional tables. We have some very nice coasters - bamboo,ceramic, wooden, acryllic - but the most practical are made of fabric, purchased from a Japanese shop. They look good, wash and don't form a vaccuum with a cold or wet glass in the way glass or wooden coasters do.

On a recent visit, my brother commented on the advantage of the fabric coasters, so I decided to use some of the small pieces of Japanese fabric in my stash to make a supply for our house and for my brother.

Finding fabric was easy and fun. I wanted something firm, cotton, with a small pattern. I made most of them reversible (I confess this gave me the licence to claim thirty to get my title rhyme - only 24 separate coasters!). After choosing the fabric, I ironed interfacing to the back, cut them to a suitable size, matching pairs and then selected edging. After running out of suitable bias binding in my stash, I noticed some of the Japanese coasters I was using as a model were edged in gross-grain tape. A visit to Hetty's Patch down the road delivered enough ribbon and tape to make coasters for the Adelaide Hilton!

My first attempts were pink Japanese fabric bought in Japan by my friend Judith. I tried different corner techniques. On the whole, the going-all-the-way-around-and-folding-the-corners produced, I think, the best result. They all require some  hand-sewing.


I then did a few by edging two pieces with narrow gross-grain ribbon and stitching the two together around the edge of the gross-grain. That worked pretty well.


I rather like these ones with calligraphy

or blue and cream flowers

I did browny flowers,a Japanese stripe,


and some pink experiments.

Finally, I got bold, and used some small adhesive-backed circles of fabric that Judith bought me in Japan (designed, I think, for covering buttons) as the basis for some simple embroidery on black. I am rather pleased with these. They are not reversible.


They are very much 'folk' craft. They are not perfectly square. In the end, I hand-stitched about half of the edges. I found it quicker and more enjoyable than manoeuvring the machine around the corners and ensuring I  caught both sides of the edging evenly.

These would be very simple indeed if I used pre-cut 5" quilting squares or a single fat quarter cut into the same. For the moment we are all coastered-up with enough for my brother. I did, however, order a pack of 5" squares in the recent One Stop Fabric Shop sale.....

My thanks to Judith for her gift of interesting Japanese fabric.

Sunday, February 27, 2011

Sewing Bag for Eight-year-old

Recently I put together a first sewing bag for Brigid's eighth birthday. Rather than making an elaborate sewing box - which was my original idea - I settled for making one of the round bags in my earlier post, but adding pockets to the outside to hold various items separate from the space inside. The sewing box can come later if interest lasts.

Brigid likes snakes, so I used two different snake print fabrics, one inside and one outside.  The prints were from the One Stop Fabric Shop. I made the pockets on the outside by lining a strip about half the width of the bag, laying it along the fat quarter for the bag and stitching sections vertically , then gathering the whole piece to the circle base as usual.

This is the result, laden with tools.


Tools included the Needle and Pin case and thread holder from last week's blog, some needles, a tin of buttons and beads, an embroidery hoop, a thimble, a tape-measure, a selection of threads and two pairs of scissors.

One pair of scissors was for cutting material and attached to a simple tab-keep so the scissors don't get lost. 


The other was a pair of embroidery scissors in a   scissor-keep embroidered from a drawing Brigid did a couple of months ago and which sits on our fridge. Figuring out what she would look like from the back took a bit of imagination.


I used chain stitch, stem stitch and Atma stitch - learned on the Ottoman Scarf - for the embroidery scissor keep. 

I added another bag, this time purchased from a Vietnamese seller in the Adelaide markets, and hand-embroidered in Vietnam. This bag contained three 'kits' for potential projects.

Stitched cards
This stitchable stationery can be used as notecards.

Peg dolls
I put together some threads, wool, pegs, felt, small samples of material and simple patterns to make and clothe peg dolls.


Doiley
Finally, I found one of my mother's yet-to-be-embroidered printed doily/traycloths that requires only lazy daisy stitch and gathered some potentially useful threads to form another 'kit'.

I hope there's a lot of fun in the making  whatever and whenever she chooses.

Friday, February 18, 2011

The Gift of Stitching

Last year I subscribed to an online counted thread and cross-stitch magazine, The Gift of Stitching. Edited by Kirsten Edwards from Kellyville Ridge, NSW, the magazine comes out monthly and has a wide range of projects, mostly cross-stitch, by designers around the world. Subscriptions are very reasonably priced,even for one year, but you can take out a 10 year subscription for $120 - a great bargain.

The Gift of Stitching website, www.thegiftofstitching.com.au  also sells kits and accessories, especially a range of collectable thread winders.

Until this month I hadn't tried anything from the magazine, because I had too much on the go already, but I have now worked versions of two of this month's projects.

The first is 
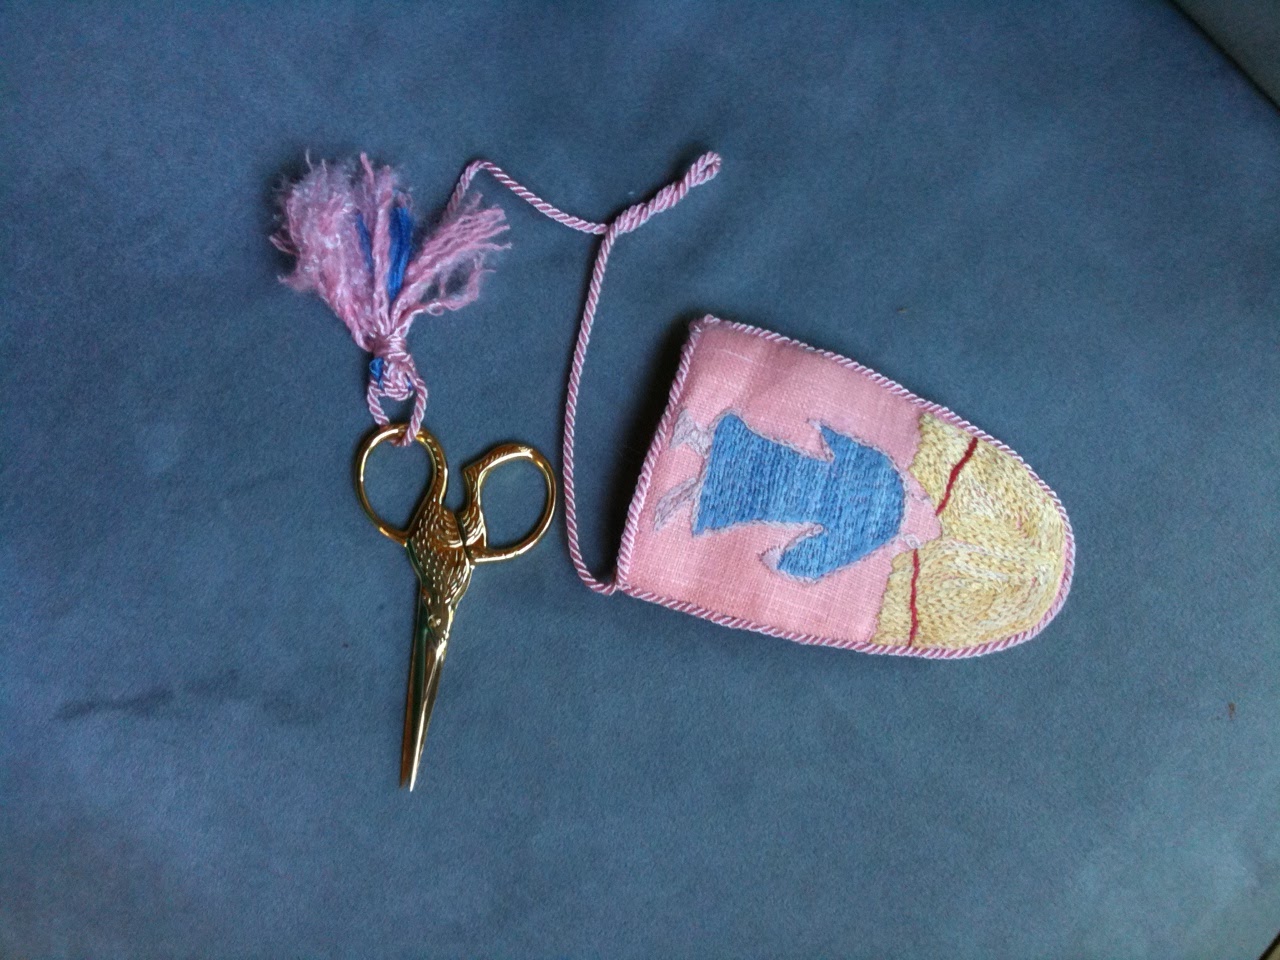
Pins and needles for a lady by Tanya Haines of Thimble Cottage Designs. It is a circular needle with edges that can be used as a pinwheel. As a pinwheel was, I think, the second project we made in Primary School, when I was 8, I thought I would give this much more attractive and ambitious project a go, using linen and threads from my stash.

It is a long time since I have done a cross-stitch project using linen rather than Aida. It took me quite a while to adjust and there are some irregularities in the counting - before I realised I would need to use a magnifier if I wanted to be anything like precise. Things got better after that and I really enjoyed the project.                  
                                                                                                                                                                                 I worked the flower on the front and the little motifs on the back in yellow with white centres, the reverse of The Gift of Stitching design. As I didn't unpick, the result of my miscounting is evident in the symmetry.


I used a small blue medallion print for the lining, to pick up the little motifs on the back of the needlecase and used backing felt as padding and finer felt for the needle pad.


I enjoyed the making. It is satisfying, if fiddly, to embroider, construct and put together such a pretty little thing.


I am pleased with the result - even with errors. I learnt so much doing it and finally got into the swing that means I can do more such cross-stitch projects.


Friendship Bird Floss Tag
So to keep my practice going, I made another project from The Gift of Stitching Issue 60, the floss tag by Michelle Lutzen of Stitchy Kitty. This was great fun, especially after the practice I got from the needlecase. I got quickly into a rhythm.                                                                                                                                                      


 It is a really charming design that made me smile all the time I worked on it. I made a few mistakes but they were very easy to undo without messing up the whole design. I began to see why so many stitchers are addicted to this form of embroidery.

I stitched the ric-rac down all around the edge, rather than pinning it to stand up because this is a gift for a child and I wanted it to be secure. I am very pleased with the result.


I might try the flowerpot sampler purse from the same magazine issue.

Thursday, February 17, 2011

The stitching books I got for Christmas

My daughter Alison gave me three stitching books for Christmas. Each is likely to produce things that will be the subject of later blogs as they are full of very substantial ideas.


The Art of Manipulating Fabric, by Colette Wolf was published by Krause Publications in Wisconsin in 1996. It is encyclopaedic - giving instructions for every imaginable form of fabric manipulation - gathering, shirring, making ruffles, flounces and godets, pleating, smocking, tucking, cording, quilting, stuffing, using darts and various combinations of these. It has a useful section on Italian smocking and different traditions of surface smocking. It shows different effects of a technique, for example, the effects of different angles of a dart. There is a section on yoyos and puffs and their use as decoration and another on stuffed applique.

There is a lifetime of creative ideas in The Art of Manipulating Fabric.

Uniquely Felt by Christine White was published by Storey Publishing in Massachusetts in 2007. It is  a handbook on all kinds of felting but also contains 46 projects to illustrate and help master the techniques. It also features artists who specialise in the techniques. I am not sure that I am going to take up felting, but it is interesting and useful to know about the techniques and how some felt is created - such as jelly-rolled jewellery.

I really like the project-based approach and some of the objects are truly beautiful.


Victorian Needlepoint Designs is interesting on a couple of fronts. First, it is a 1975 Dover Publication, and although I have quite a few Dover books that I use for designs, none of them are actually embroidery or needlepoint books. I was unaware that Dover published a whole range of books of designs especially for needlework - most of them, like this one, reproducing designs of older publications.

Secondly, this book has a very clear section on the variations on tent stitch, the standard needlepoint stitch, with explanations about the effect on shape and strength from each stitch.

Finally, a couple of the designs (such as the bicycle on the cover) are really terrific. I'm considering ways of using them.

Stitched gifts I received recently

I was given some stitched gifts for my birthday in January and some books about stitching for Christmas.

The stitched gifts were made by my daughter Katherine and her family.


This is a fabric tray, or basket, used for serving bread or other dry food. The underside (left) has a pocket for an insert of thin wood or heavy cardboard. The ties on the corner then form sides. It's very clever and useful.                                                                      
                                                                                                                                                                                                                                                                                                      
This bright and clever strawberry potholder was made by Brigid, aged 7


while                                                                                                                       5 year-old Fionn did the fabric drawing on the heat mat below.

Veronica, aged 3, contributed the drawing to the teatowel above, while Niamh, also 3, illustrated the matching apron below, both of which I believe came from Gaganis Bros in Adelaide.

My thanks to Katherine, who coordinated the effort, and did most of the machining.