I came across a
really useful blog post by Hannah Cuviello that looks at the way a hand-knitted fabric is altered by the way we angle the needle into a stitch and wrap the yarn around the needle. Cuviello works through each combination, explaining the twist that results. It takes two detailed blog posts for her to work though the 16 combinations that are possible in creating stocking stitch. It is a valuable resource - worth tagging to return for reference.
While not attempting to replicate her work, I have found it a useful exercise to knit my own set of samples and mount them on a grid. I stitched the samples to a piece of sheeting, in the grid formation, machining each one on two sides, then blocked the whole piece. I only stitched down two sides so that each piece can be lifted to see the back.
There are fundamentally 4 ways of working each knitted stitch. You can insert your right hand needle into the front of the stitch on the left hand needle, or you can insert it into the back of that stitch. Once the right hand needle is inserted, you can wind the yarn over the inserted needle (anticlockwise) or wind it under (clockwise). If you are knitting in the round, these four options will give four different effects on the emerging fabric. If, however, you knit back and forth, purling on the return side, the four options are repeated for the purl stitches, giving 4x4, or 16 possible effects.
I found it interesting that the two combinations that involve the most consistency were not the smoothest in outcome.

This one was worked knitting and purling into the front of the stitch, and winding the yarn clockwise, that is, under the stitch. There is a distinct twist and it doesn't look smooth (nor entirely consistent!).
At the other end of the spectrum, the one to the right results from inserting the needle into the back of both knit and purl stitches, and winding the wool over the needle (ie anticlockwise). It is a bit more consistent in effect, with a dominant \ stroke.
I am a loose knitter, particularly on purl rows, which lengthens the stitch. Wrapping the yarn under, rather than over the purl stitch modifies this as does purling into the back of the stitch. This was reflected in the two samples that proved to be the smoothest for me, No.12 (left. The glitches in the centre are where pins caught in the blocking process.)
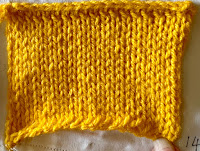
and No 14. (right) perhaps, the most even of all the samples.
No 6 is the way I knit on autopilot. I'm not sure if it was the way I was taught (some 70 years ago!) or if it has evolved. I will think about whether I want to amend my style to either 14 or 12 when knitting areas of stocking stitch. Much of my stitching is patterned where the eye does not focus on the shape of the stitch.
Not many of the other samples appeal to me, but I can see uses for a couple of them.
No15 and No2 both have a raised, almost braided effect.
Left is No 15, where I stitched into the back of the stitch on both sides, but wound the yarn clockwise on the front, and anticlockwise on the back.

The effect is similar on No 2, where I knitted into the front of the yarn on both sides, but wound the yarn anticlockwise on the front and clockwise on the back. 
No 5, left, has a consistent look, with distinct columns.
The back of the work also tells an interesting story. Some samples resolve into a two-row combination, while others are straightforwardly single rows. I haven't tried to work out why this is.
For almost 70 years I have knitted by habit and assumed my habit is fairly universal. A couple of months ago I became aware that a friend's habit was different. I don't want to become an expert in this area, but it has been useful to do some experimenting and begin to understand how I can control the look of my knitting. I have stored the gridded samples in a roll so I can consult them in future for particular knitting projects.
Of course, these patterns only apply to knitting back and forth, not knitting in the round which is entirely different. I'm not currently planning to test that out!


