Search This Blog

Wednesday, June 27, 2012

Bright Bag

Promo shot - no-one I know!
I had a few days away from home again recently and needed a project to take with me that didn't need too much equipment. I decided on a Charles Craft Bright Ideas cross-stitched shoulder bag I had bought from The Fox Collection some time ago. It comes as an already made Aida tote, with a set of three suggested patterns and colour charts. It is designed to showcase DMC's neon acryllic thread range.

I had the yellow bag with orange handles and decided to go with the pattern on the bag in the promo shot.


I tried to get the border and large flowers outlined before I went travelling, so I could have bits to do that didn't require a lot of chart scrutiny.

The bright yellow Aida is lovely - very cheery and quite soft to touch. Working with a hand inside the already-made bag wasn't too bad at all. The bag is large enough. There is one angle that is a bit awkward, but on the whole I could avoid holding the bag in that position.


It turned out to be a good travel project - a bit of work that required close reference to the chart, but a lot of area that was 'colouring in'.


As soon as I put in the white petals, it took on a dimensional quality - quite exciting to see.


It took me a bit longer than I had thought it might. Although the Aida is easy to work, there is quite a lot of detail and the ribbon and roses have three shades.


While I really like the effect, and I will use the bag a lot, I dislike working with the acrylic thread, which shreds, catches and frays at every opportunity.


The effect, however, is so bright, cheery and dimensional that is has been worth persevering. The key, I think, is using the neon acrylic thread for highlights rather than the total embroidery. The cotton thread was such a joy to work with after the acrylic. There was enough cotton to keep me sane.

I am very pleased with the finished effect and the bag will be very useful.

Would I make another one? I'd certainly be happy to work a couple more of these bright bags. I'd prefer to work them in cotton thread - but  I think I would make judicious use of the acrylic thread - it produces such a pleasing effect.


Thursday, June 21, 2012

Socks!

The second ball of yarn I indulged in from Morris and Sons in Melbourne was a ball of Noro Taiko Sock Yarn - 50% cotton, 17% wool, 17% nylon and 16% silk. I thought it time I knitted Jim a pair of socks.

I looked at a lot of patterns before settling on the basic pattern from I Can't Believe I'm Knitting Socks. The yarn is variegated, so didn't need much to make it look good and the explanation and measurements for the basic sock shape are good.

It took me a couple of goes to get the tension right. I ended up varying my needle size quite a bit. I used 3.5 mm for the top of the band, to make sure it wasn't constricting, went down to 2.25 mm for the rest of the leg to keep if from falling down, then used 4 mm for the foot.

Actually, I finished the foot in 2.25 as well, discovered it didn't fit, so  unravelled to the gusset and redid it in 4 mm.


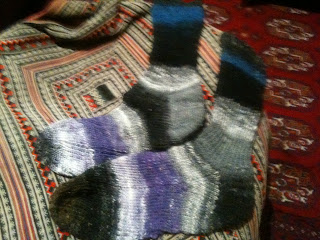
When the first sock was finished (no. 2 finish, that is) it looked like a proper sock, and the colours had come out quite well.

I weighed the remaining wool to be sure I had enough, then wound it on a little to begin at about the same colour  change as I had with the first one.

terrible photo of the two socks - bad idea to place on knitted blanket!
The colours didn't align exactly,- there was more blue in the second part of the ball- but it was near enough to be recognisably a pair.


I had a bit of trouble with a line in the space between the needles. In the second sock I managed to keep my tension a bit firmer at the needle transition, but you can still pick where the needles connected.


I thought I might use a round needle for the second foot, but didn't have one small enough. In her Country Crafting blog, Karyn suggests knitting a couple of stitches into the next needle at each join - I'll try that next time.

The yarn is not soft to knit and it twisted quite a bit, but I think it will wear well and be comfortable.

They fit well and look good. What more can a girl ask?

Monday, June 18, 2012

Frilly Scarf

In a brief visit to Melbourne earlier this year, I found Morris and Sons, just down from my hotel - yarn heaven. I was restrained in what I bought, but one of my two purchases was a ball their own Morris Osten acryllic in the red/black/burgundy variation (although I would have described it as orange/black/brown!) to make a scarf for my daughter in Canberra. I've been wanting to try this since my friend Vivienne knitted me one for my birthday.

It took about 5 hours to knit and was a pretty good TV watching project.

I had watched a demonstration of the technique for this yarn in a Lincraft store but downloaded a free pattern to remind myself. The yarn label suggested 9mm needles. I had either 7.5 mm or 10mm to hand, so went with 7.5 mm which worked fine.


It took about 10 minutes to get the hang of it. Then it was very easy.


Started one evening about 5pm, had it in the mail the next day. Two working days later I received photo of happy daughter.

Feels good all around.

Tuesday, June 12, 2012

Mola Reverse Applique

On Saturday mornings we shop in the Adelaide Central Market. We rarely miss. We have breakfast there, usually with friends, before shopping. A couple of weekends ago, however, I made an exception. We went to the market during the week so I could go to an Embroiderers' Guild of South Australia class in mola - reverse applique embroidery.

I enrolled in a Mola class once before, but the class was cancelled for lack of numbers. This time I was in luck. Barbara Mullens was teaching the class for the Certificate Group at the Guild, and members are free to join in. Saturday morning saw me iron my two A4 size pieces of bright cotton, a pile of smaller pieces of bright cotton in other colours, gather my sharp scissors, cottons and needles and head off to class.

Barbara provided us with a simple design of a bird.


We traced it on to our top layer of fabric with the aid of a light table, put our two layers of fabric together, tacked around the bird shape and cut it out. We then turned the edge under, about 3-4 cm at a time and slip-stitched it down, exposing the layer beneath. 

We repeated the process with the wing shape on the cut-out piece, placing two different coloured pieces of fabric underneath to show through when the wing shape was cut out. This time there were two layers to turn under and stitch down to create a wing. We then re-inserted the cut-out bird in the  exposed shape, turning its edges and applique-ing it down.

 About where we were by the end of the day.
The straight lines on the design are slits. You tack around them, cut them, turn the edges under and form oval shapes of varying sizes. You then use your imagination to cut other shapes around the design, to expose the colour of the second layer, or by inserting small pieces of fabric under each area of the design, you can introduce new colours.

The pale pink is out of place - bold colours rule!
It was a lot of fun. The group was a very mixed one - I wouldn't have been the oldest and, because it is the certificate course, there were plenty of younger women. 

 I worked on my piece all the following week, experimenting with inserts of fabric and shapes, before moving on to embroidery over the top.


I followed Barbara Mullen's example in her sample piece, and applied a third layer (mine is yellow) to the back, and cut through to that in a few places.

I particularly enjoyed the running stitch embellishment, and using feather stitch to try to get a tail on the bird.


I haven't finally decided what to do with it - since I don't want to file it as my record of work, as certificate students must. Although it would go well on a bag, I might just make it into a small cushion and put it where I can admire it every day!