Search This Blog

Monday, July 25, 2011

Another smocked skirt

I have been working on a skirt I promised Brigid last year when her original could be repaired no more. The replacement is the same black featherwale cord, with braid chosen by Brigid from my stash of braid and trim.
The pink and green braid is from Eastern Silk in Adelaide - fabulous silks and trims. This was one of their few non-beaded trims.The other black braid with red roses came from Cleggs in Melbourne.


I wasn't sure they would go together, but Brigid was - and we worked out I'd match the smocking to the zigzag braid.


You smock a cable row and then add the points below and above before finishing off with the lower row of border cable.


The top border of green is added after the skirt is attached to the band.

The pleats sit on the hip and the band goes from waist to hip.


I stitched the black flowered braid on by machine and the pink and green zigzag trim by hand. I couldn't see a way to do it neatly on the machine as the picots needed to sit flat.

I found it very difficult to keep the braids running straight even when pinned.


I used large heart-shaped buttons, one pink, one green to match the thread. The points on the hearts look quite good with the points on the zigzag smocking.I really like this pattern. It is simple and effective, with lots of possibilities for variation.


It is also much liked by the serious wearer!

Thursday, July 21, 2011

Silk bag therapy - One of Three.


When I was looking for some braid for a skirt recently, my daughter put me on to Fabricana's Etsy shop.The braid wasn't quite what I was after, but I was sucked in badly by her 'sari scraps' - fat quarters of antique sari fabric in silk and brocade. I ordered a selection which arrived from India within days - a treasure trove of beautiful, inspiring fabric, each piece inviting a story about it's embroiderer and wearers.


I couldn't bear to put the treasure away in my stash, so laundered each piece, got out my bag of taffeta and silk linings and cut 24 bags from the 25 pieces of fabric I bought. I let each piece dictate the shape of the bag and whether it needed lining or not. I have two pieces left uncut.

Over the last few days I have stitched up and finished the first seven bags, lining some of them and using ribbon and cord from my stash, finished off with buttons, beads or old earring pieces to stop the cord from disappearing into the casing.


In the end I restricted myself to simple drawstring bags because the fabric is fine and highly decorated so simple seemed best.

The bag to the left is from a simple piece of brocade while the one below is checked silk appliqued with embroidered medallions and edged with cut work.


I imagine someone commissioning and wearing it for a special celebration.


This piece is patterned silk with the occasional flower in the pattern embroidered and beaded. I used shells from earrings to finish the ties and lined this one in a piece of blue Vietnamese silk.


The detail featured at the top of this blog post is again embroidered silk, this time with motifs embroidered in running stitch on the dyed silk - red merging into green.This one is lined with maroon taffeta.


I used a small glass chilli from a Chinese decoration to finish the ties on the maroon silk bag below, from a satin-stitched and scalloped border piece.


.


This  bag I lined in figured blue Vietnamese silk to reinforce the transparent blue of the over-dyed muslin. This piece has it all  - embroidered in paisley-like patterns, beaded and sequinned.
Embroidery on the body of the fabric is in a pale gold thread, while the border is stitched with deeply coloured thread.


Finally, I made an open-topped carry bag with both  long and short handles to do justice to the design of this strikingly dyed and gold-thread embroidered piece of fabric.                                                                           


Including postage, the cost of the fabric averaged $4.50A for each bag . Allowing a little for lining, cord or ribbon, they probably cost around $5-5.30 per bag. I am not thinking of selling them, but I worked it out to see if bags using this fabric would recover their costs at a fete or charitable event.  I think they would.


There is certainly much pleasure in the making.


Tuesday, July 12, 2011

Madame Weigel's Knitting Patterns

Since writing about the daffodil tea cosy, I have had some requests for patterns from the book I used, so did a bit of research into the company that produced the book. That particular book seems to date from 1935.


The Weigel company, that published the book, was founded by Johanna  Weigel, born as Johanna Wilhelmine Astmann in Prussia in 1847. She went to the USA and met and married her German-born engineer husband in New York, where she worked for McCalls, designing paper patterns. They visited Australia in 1877 and stayed on in Melbourne.


She made patterns with clear instructions, initially just for friends but eventually established a business in Lennox St, Richmond, Victoria. In 1880 they published a monthly subscription journal, Weigel's Journal of Fashion. Her business thrived throughout Australia and New Zealand. When she died in January 1940 she left a trust to provide exhibitions for engineering students and a substantial proportion of her estate to the employees of Madame Weigel Pty Ltd, which continued until the death of the last one in the 1960s. 
Both the National Library and the Powerhouse Museum have collections of Madame Weigel's paper and knitting patterns. She has an entry, written by Deirdre Morris,  in the Australian Dictionary of Biography http://adb.anu.edu.au/biography/weigel-johanna-wilhelmine-13242.


At least a couple of her knitting patterns are in the public domain, including the daffodil tea cosy of my last blog, available at http://britex.ithus.com/blog/wp-content/uploads/2010/08/mdm-weigel-knitted-tea-cosy2.pdf


The cottage tea cosy pattern has been transcribed in the public domain at http://knitting-and.com/knitting/patterns/teacosies/cottage-cosy.htm.  I am posting a photo of the pattern , now well out of copyright, below. It's a bit huge for the blog, but  hopefully readable.

Monday, July 11, 2011

Tea cosy

A few months ago I had a request for a tea cosy for a small teapot. It's an easy thing to move on to from the cardigans and hats, while I am preparing for my next smocking project, so I dug out an old pattern book of my grandmother's - stored with other patterns in an old box commode in my study!


I made the house tea cosy from this book for a friend about 25 years ago. One of these days I just might get around to making the koala, but this time I thought the little frilly one might fit the bill.


It is meant to resemble a daffodil and I liked the idea of graded colour, but I went for shades of red to orange from bits of wool I had around about 4 ply.


I knitted a sample to get a sense of the size. Although the pattern said it was for a five cup pot, there were no dimensions. My sample was half size - and ended up tiny - about 6cm.


The full pattern, which I finally made, casts on 159 stitches, which seems huge.

However, the pattern starts with p3 k10 across the row, then reduces every  knit row to p3 k8, p3 k 6 etc so it is forming little tucks, and dramatically reducing the length.


This is the reduction after 9 rows.


After 20 rows there ar only 39 stitches left on the needle and the knitting width is reduced to about 12 cm. 

You then k3, cast on 10 all the way across and start again in a slightly lighter shade.


I used four shades to get the size I wanted.


Last night I finished it off - made the little leaves in the two of the base colours rather than introduce a green. Autumn leaves!


I had thought I might need to line it, but I think I'll give it a go as it is.


The teapot is squarish and the cosy stretches to fit.

I think almost all the teacosies I knew as a child must have been made from this pattern. It is very familiar to me. I picture it in dark greens and browns.


Wednesday, July 6, 2011

Rosie Hats

The hats to match the Rosie cardigans were relatively easy. I really like knitting shapes that decrease in the second half - so much more fun to be getting smaller than larger.


The Harmony yarn is lovely to knit with, very soft and smooth on the hands. It will be great to wear too.


The photos of the girls wearing them were taken in their car, after dark. Certainly not the greatest shots, but you get the idea - cold, wintery night, warm heads, happy girls!                                                                    

Monday, July 4, 2011

Rosie Cardigans

A few weeks ago I received the Spring issue of a gift subscription to the Canadian needlework journal, A Needle Pulling Thread.


A subscription takes about 13 weeks to come from Canada, but since the seasons are out of kilter with Australia's it doesn't much matter, except at Christmas time!


A Needle Pulling Thread covers a wide range of projects - including knitting, rug-hooking, quilting and contemporary fibre arts.

I have found the knitting projects of particular interest.


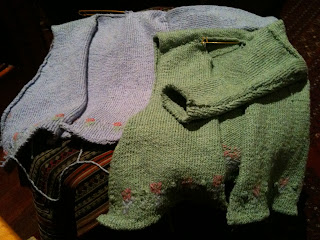
This issue includes a child's 'sweater' - that I am calling a cardigan - for up to 5 year-olds. It is designed for cotton, which is what I especially liked. I have decided to make one each for my twin granddaughters using some Bendigo Woollen Mill's Harmony yarn I have in my stash. It is a blend of cotton, wool and a little lycra.

I have the yarn in sufficient quantities in a green, a blue or a pinky-mauve. The girls chose (somewhat to my surprise!) the green and the blue.


This is what is is supposed to look like. Will mine look the same?


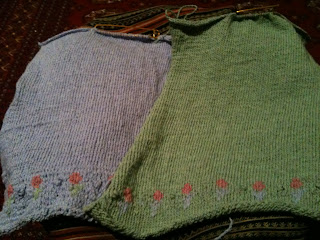
I decided to knit the two piece for piece,beginning with the backs. I began  with the blue, and found my purl rows were very loose. I undid it back to the flowers and redid it, looping my wool under the needle in purl rows instead of over the needle. Much improved.

I have also simplified the flowers - using only one shade of pink instead of two, mainly because I have three colours in this yarn. For the same reason, the leaves on the green cardigan are blue!


It has worked quite well. Knitting the two at the same time means it is a longer time until you have anything finished, but it means I can show the girls the progress and is preferable to finishing one, then having a whole repeat to do.


There are a couple of small errors in the pattern, so I had to concentrate the first time, but it became much easier on the repeats.


I am pleased with the result, and I think the girls are too! The hats are underway and hopefully will match up.