Search This Blog

Sunday, October 31, 2010

Past bag therapy

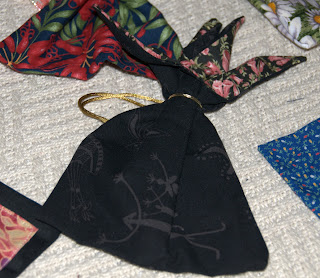
Here are a few of the bags I made earlier in the year while doing 'bag therapy'. Some were made using oddments of kimono silk.

Another group were made from cotton, using as a pattern a bag I bought from an sale at the Embroiders' Guild of SA. This uses a curtain ring on a long tab as closure.


These bags are made with no internal seam. You stitch the lining and exterior fabrics together, with points at each short end, then fold in half and stitch on the outside of the sides.


I also made some black bags with braid as embellishment,
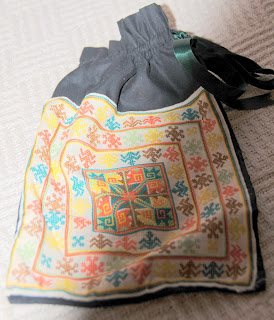
one using the embroidery section of a cushion cover bought in Chiang Mai in 1972.

The cushion cover had worn beyond use, but the embroidery was sound. I couldn't bear to think of this meticulous work being discarded, so remade it into this bag.

My favourite of these recent bags, however is a simple embroidery, based on one of the very first things I made at primary school - a hand-towel with an edge made by weaving coloured thread under and over the loose threads of a waffle-weave. I inserted a panel of waffle-weave into this gingham check and just picked up the threads in a zig-zag. It is very relaxing embroidery.

Sunday, October 24, 2010

Bag Therapy

Last weekend I bought a couple of bundles of remnants from a stall at the Gilles St Market in Adelaide. One bundle was made up of small pieces of Christmas fabric. Last week I spent a couple of afternoons doing my bag therapy - making drawstring bags to use in lieu of wrapping paper for presents. I find this very relaxing, especially when I have a finite selection of fabric pieces and my bag of lining fabric. I have even learned to take enough time to iron everything first.

I finished off 15 bags this weekend from the market fabric and 5 from other fabric. I have a few more on the go, using pieces of the Gilles St Market fabric appliqued on to calico. 

I used the ribbon I happened to have in my ribbon stash and added buttons as keepers on the ends of the ribbons. I think this makes the bags more useful to the recipients - nothing discourages use like the drawstring disappearing on you.


 Some fabric is very Christmassy,

but other pieces are more versatile. 
I lined a few of them, where the fabric lent itself to a longer life.
I also added a few bags I had already cut out from other fabric. It pleases me to make bags that (1) save me using up more paper (2) look enticing and (3) go on giving pleasure in use - especially if the use is quite mundane.

These little purses and pencil case are from some upholstery fabric I had left from cushions.

 The buttons on the pencil case come from a suit I had when at university in the 60s! Even then I kept buttons and sometimes fabric, from clothes I liked. I am very glad to have finally found a use for these!
The final piece in this week's effort is a drawstring bag from a piece of Japanese kimono fabric, purchased from a shop in Salamanca Place, Hobart a few years ago when I visited there regularly.

I was not as diligent in using the Japanese fabric, due to pressure of work. There is still quite a bit in my stash
 for more bag therapy.

Friday, October 22, 2010

Travel projects

I like to have a project that I can put in my handbag when travelling, especially on planes. Time was when I knitted on planes, but the post September 11 security put an end to that and led me to find simple embroidery projects that I could substitute.

For a year or so I worked on a candlewicking project, my first, a cushion cover with flannel flowers and dune grasses. It was perfect for travel - only a few colours, easily memorised, and the colonial knots were interesting enough in themselves but very soothing to fill in.


That project is now completed, and I have begun another simple travel project.

This is a cushion kit, already assembled in a cotton/modal mix, from Belgium. The embroidery is all stem stitch, in two colours - a light olivey-green and a silvery-grey. The fabric is even weave, making it easy to get an even stitch length. It has a nice continuity of line, quite Eastern in effect.

My requirements for travel projects are:
  • small enough for a handbag, or at most a use-onboard bag
  • a pattern that is self-explanatory and doesn't require reference to charts or instructions
  • threads that are or can be cut into usable lengths and don't require cutting at the point of use
  • can be managed with only a thread cutter and no scissors
  • needles that are easy to thread
  • do-able from memory
  • interesting enough to sustain me to the end of both the journey and the project
  • easily explained to curious fellow travellers.

My only problem now is that, now I am not travelling very much, can I bear to have a project on the go that goes for weeks or months between progressions? I'm not sure I can, so I may have to find 'just-in-time' travel projects in future.

Finished the cushion kit. I will now have to find a new travel project.

Friday, October 15, 2010

Margaret Preston Cross Stitch Bag

This is a project I have been working on for over a year. I bought a little Semco Cross-stitch kit of a Margaret Preston painting from the National Gallery of Australia. Only 15cm square, it was interesting to do and reflected the colours and shapes of her work very well. It is also terrific to be working with Australian rather than European flowers.

I liked this so much I went looking for another three similar kits to use as the panels on a four-sided work-bag/ necessaire. I have made a couple of these and really like the making and the useful end product.
I couldn't get the kits online from the NGA, but found them on eBay from chiton11, very reasonably priced.

I have now completed two more.


This one has an almost 3D effect from the waratah in particular, presumably from the black background.


The Cinerarias are not especially Australian, but the composition and vase are unmistakably Margaret Preston's.

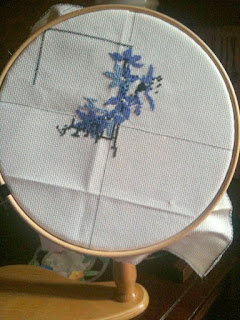
I am now working on the last one, simply called 'Still Life'. It is very blue.


I hope the bag will look good. I will update this post as I progress from here. If it works, I have a few more ideas for similar bags using other cross-stitch designs.

22 October.
Still Life is still progressing. There is an interesting overlay to come - green back stitch over the top of black cross stitch.

Sunday 31 October
I have found the flowers overlapping the base of the vase quite a challenge. It involves quite stitches that divide the units of the aida fabric - where four stitches are required in a square, using two different colours. The chart looks like this:
Adjunct Senior Research Fellowship (Honorary) UniSA
In the end I have found it easier to follow the picture of the finished product, in order to understand what effect is being achieved. Essentially it is the sense of the edge of the flower (especially the flannel flower) against the black background. It is much the same effect as outline stitch on the flowers above the vase.

I now have most of that section finished. I am now trying to define the limits of the major sections left.


I finished this piece over the weekend. It took quite a while to complete the outlining of the flowers above and around the vase, but makes such a difference - giving a 3D effect.

Now all I have to do is make the bag!
6 December
The bag is finished. In spite of my best effort with exact measuring, two outside pockets do not quite line up, but otherwise I am happy. I used black linen from my mother's stash as the main bag fabric and found a perfect lining fabric in my stash - Australian wildflowers printed on black fat quarter purchased from the Australian collection of the One Stop Fabric Shop (www.onestopfabricshop.com.au).

Using a fat quarter meant shaping the lining differently to the bag,  but it worked well.


Wednesday, October 13, 2010

Little Chef Aprons

Today I tried out a pattern from Meg McElwee's book Sew Liberated  - the little chef apron. It is a great design. Instead of long fiddly, narrow bias strip ties it has a big fat band with velcro that can be opened one-handed from the front by the child - either right or left handed depending on how you construct.


It is made with a double layer of fabric (ie it is lined). I used fabric from my stash, so lined it in a plain green. The back view is below. This size should fit a 6-10 year old I think.


I think it is a great design with clear instructions. I reckon it will be comfortable and easy to wear.

I hope to try it out on a child tomorrow  - and see if there is demand for more. I have just about enough crocodile material to make another one.


Saturday, October 9, 2010

Adding to my stash

This morning I bought a couple of pieces of handprinted cloth from Ink&Spindle at the Bowerbird Bazaar, now on in Adelaide.


I think I could embroider these with people, animals and plants. These pieces are cushion size, but bags would also be possible.

Friday, October 8, 2010

I begin pleating.

In August I bought my own pleater from Country Bumpkin. I enrolled in a September class, but took the pleater home and had a play with the help of A-Z of Smocking, which has good instructions. First I pleated some small, straight pieces for picture smocking. These resulted in a pair of jeans, using three pictures from various AS&E editions and one from a drawing made by the owner of the new jeans.


I have pleated up a lot of things ready to smock (in my if-it's-fabric-pleat-it mode), including an English smock and a tunic for myself and more picture smocking.

My second self-pleated masterpiece is a dress for myself in russet Vietnamese silk - one of the pieces that has been waiting for a good project. I used the pattern Iced Tea from AS&E Issue 52.

It hasn't been warm enough to wear it properly, but I risked the unseasonably cool Adelaide weather to have a quick photo to celebrate.


Thursday, October 7, 2010

Nativity Bling

Today I have finished baby Jesus on the Bucilla felt Christmas stocking I have been working on.


I am grateful that I didn't ever have to make costumes for calisthenics or ballet performances. Adding sequins to the stocking is interesting, providing definition and signalling status - but I can't imagine doing thousands, or even hundreds of them. They also catch on any subsequent threads as you embroider around the sequined section.

I can't help thinking how difficult it must be to change a nappy with your own clothes full of bling and the baby's halo shining in your face.

I like the three- dimensional effect, though. The felt layering and progressive stuffing gives quite a sculpting feel to the work.

I am now down to the flowers and leaves - a bit more red and green to off- set the blue and white of Mary.

Friday update: I now have only one poinsettia to go.  It is quite a dazzling tableau. I do like working with the felt - it stretches just a little and shapes easily.
I did a search to find out more about Bucilla, the company that makes these extraordinary stockings. The name is an acronym of it's original name Bernard Ulmann Company Incorporated, Lace, Linen, and Accessories. Bernard Ulmann sold napkins, handkerchiefs, doilies and embroidery designs from a handcart in New York in 1867, opened his only retail store in 1870 and then became a wholesaler.


His family owned the company until 1922 when it became an employee-owned company. Since 1962 it has been owned by the Indian Head Corporation and Greyhound, amongst others. Today it is under the wing of Plaid Enterprises. They still produce a new stockings and ornaments to mark each Christmas. The stockings cover a very wide range of tastes, but there seem to be enough online sellers on unopened kits from many years ago, so it was easy to find what I wanted. I think this one was from 1999.


This is the final product, minus the name, to protect ( a little) the Christmas surprise.

I am pleased with it.