Search This Blog

Showing posts with label satin stitch. Show all posts

Tuesday, December 5, 2017

SA Embroiderers' Guild Certificate Workshop: Monograms and Satin Stitch.

I learn so much from being able to attend the Guild's Certificate Workshops, even though I am not enrolled in the course. The November workshop was taken by Christine Bishop and focused on Satin stitch via the medium of a monogram.

Christine provided us with some lovely linen on which to experiment. I chose a solid, large but not gigantic, letter J from amongst the many stencils Christine brought along. For the sake of seeing clearly and being bold I chose to work in red. It was only after Christine pointed it out that I realised I had opened myself to a Christmas theme!

I have, of course, worked quite a lot of satin stitch in my time, but there is a lot of room for improvement.  Christine's tips and instructions certainly helped. I ended up with a reasonable letter - improved by backstitch around the outside edge.

With some instruction, I added a trailing vine and French knot berries.


I discussed with a couple of my fellow students some options to turn this into something useful. I was thinking of a button to wear as a brooch. A stocking was also suggested.


Once I got home, I found some red beads to liven up the berries. I played with the brooch idea but soon hit on the idea of a pinwheel. I like pinwheels, and have been thinking for a couple of months of making one.  So  pinwheel it was.


I had some pieces of milk carton in my Basics to Beyond kit, so cut them to size using a tumbler as template, along with some wadding.


I scrounged around in my stash to find some appropriate figured linen for the back, gathered and lashed the two pieces.


I chain-stitched around each disc- in cream on the back and a two-colour chain in red and green on the monogram.
To help me keep track of it - and so it can also hang as a decoration - I added a twisted cord.


I then whipped the two discs together.


As a special treat I ordered a pack of red glass-headed pins to complete my pinwheel. They arrived yesterday and worked as well as I hoped.


A great outcome - a useful, pretty object, improvement in my satin stitch and a really pleasant 5 hours spent with a great group of women.

Tuesday, July 4, 2017

Mountmellick ring cushion finish

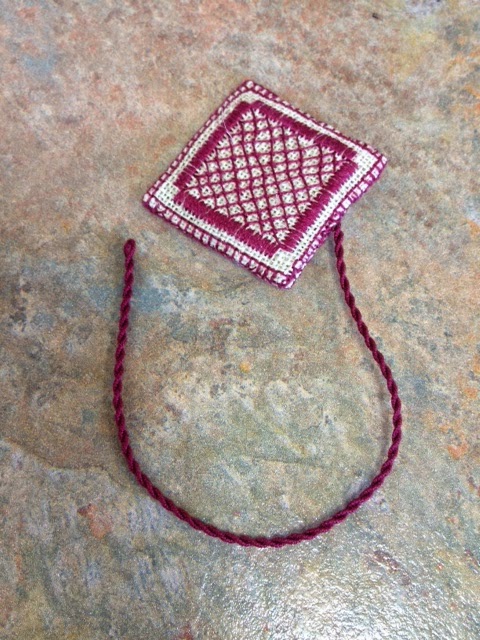
This is where I got to at the Lady Anne's Needlework Spring Retreat with Nicola Jarvis's ring cushion in March of this year.

It sat reproachfully on my Lowery Stand waiting for me to finish the Blackwell Roundel and then focus on Mountmellick.


I was finding it difficult to proceed until I had worked out what I was going to do with it when finished. I didn't want a ring cushion. I can't imagine the circumstance in which I would want one. If my grandchildren were to ever want one, it should, I think, be designed especially for them. The work is rather too delicate to be displayed without glass, and I am not into framing work to hang on the wall. In the end, I hit on a display tray produced by Sudberry House and available through Australian Needle Arts. After much measuring, I found a tray that was the right fit and ordered it.  It took a while to come, but in the meantime, I could now get on with the embroidery.

On the Embroidery Retreat we had worked an example of each stitch on the project, but had not completed any section. I returned to Nicola's instructions and began at the beginning.

I had to work hard to get back into the rhythm, especially when I got to the satin stitch using a single strand of cotton.

I also learned a lot about working with white thread. Somewhere along the line I mislaid the stranded cotton and the cotton-a-broder. I had a supply in my stash, but the cotton-a-broder turned out to be not quite white - no doubt it had been so once, but it had discoloured slightly. The stranded stitched with small patches of discolouration - whether from handling or the affect of storage I don't know.

It does not show clearly in photographs, but it was obvious in the light. I purchased new thread and put another layer or so over the top.


In the end, I enjoyed the satin stitch!  When you break it down, step by step, and focus on the bit you are working, it is quite soothing.


It was, however, satisfying to get to the blingy bits at the end. This is where I discovered I had also mislaid some bugle beads and was just a few short.  I searched in the tin I inherited from my mother but found what I needed at Cottage Needleraft.


I was so excited when my tray arrived that I forgot to photograph it empty. I was concerned that, with the beading, there would not be enough depth for the piece. There was no way of telling until I had lashed the finished piece to card and tried it.


It worked! I now have a very useful and attractive tray, full of associations of original purpose along with wonderful memories of both the retreat and my subsequent work on it.

I have not been able to photograph it to show the sparkle to good effect. It glints and glitters in the light. I can use it for serving drinks - or for holding my stitching bits as I sit on my sofa.

It has been a lot of fun and hugely satisfying. I hope Nicola's original brings her much joy and sparkle.  It is such a generous project. I love the association - and the usefulness of my final product.

It also looks pretty good next to the roundel!


Friday, May 8, 2015

Progress on Owl

 I  have made some progress with my silk fantasy owl.  This is the piece on silk for the Embroiderers Guild 50th Anniversay Exhibition this year. I am posting this away from home from my iPad - so can't control the photo sizes.

From where I was when I last posted on this project, I moved to the area below the breast feathers and tried out the Bokara stitch I learned with Alison Snepp in 2011 then used in the chair project. Once again, this stitch served me well.


I also admit to its addictive hold over me, once I get going with it. I extended it. I also used satin stitch and open chain stitch to try to keep the rows of feathers in the outline drawing.

Using variegated silk thread both helped and hindered the effect I was after. While it got me variation within the band, it gave me rigid divisions between the bands vertically. I had to go back and alleviate this by blending with single colour thread. There is still a bit to do - and a couple of places to unpick.

I had originally intended to leave the breast in open fly stitch, but then filled it in. It really IS like colouring in with thread - try a bit, see how it looks, then add a bit more from the pallet.

It is coming along. I have the tail feathers and irises to go, as well as a bit of blending - best done in daylight.


Saturday, January 10, 2015

Rooster Cushion

I fell for a couple of easy folk art cushion kits in very bright cottons from Herrschners a few months ago. They are produced for Herrschners by Duftin, a Hungarian company whose products I have successfully used before. I like their products that come ready-made and stamped to embroider. They make for easy, attractive products to embroider while on holiday, talking or watching the world go by.

This was no exception. The threads were sufficiently well organised and labelled to be usable without further work, the pattern was clear and the instructions simple, bold and easy to manage.

I began just before going to Carrickalinga for Christmas by embroidering the central line of the design.

By the time I went away I had some tail feathers done, and had decided to use stem stitch and split stitch in place of satin stitch for a good part of the design.


When I came home on 26 December I had a large part done and was enjoying it very much.


It is a lot of fun to work on something so bright and shapely. It is an exercise in colouring-in and the interest and satisfaction is in adding each component and watching the colours lift and complement each other.

The body of the roosters and the pink flowers practiced my long and short stitch.


I finished it, appropriately, on New Year's Eve, washing and blocking it on New Year's Day. I haven't inserted a cushion yet. I will give this to someone who could do with a cheery cushion!

A few days ago Herrschners had a special on the shoulder bag in the same pattern and fabric. Even with the deteriorating exchange rate and a generous stash of projects I did not resist.


Thursday, November 13, 2014

Second BATB class: French Birdcage

The second class I took at Beating Around the Bush in early October was a two day class with Christine Bishop, to make her French "Birdcage" Workbox and Accessories.

Christine was kind enough to hold up her finished piece so we could photograph it.

It has six panels - and quite a few accessories!


We spent the first day of the class learning the stitches required for the panels - by working one panel, not to completion, but to the point where the components were clear.

We worked Italian four-sided stitch, satin stitch and double running stitch, before learning Sorbello knots - which give texture to the birds.


On the second day we switched to the Scissor Fob and worked the whole thing in a day - helped along by Christine making all our cords for us!


It was terrific to go home with something completed. I have added a pair of scissors to my fob and will use them in completing the project - as an incentive.


Since the class finished I have worked on a second panel. I took it to one of the Guild's Thursday stitch-in evenings.

I need, however to take a desk light if I am going to continue to do this - counted thread work is hard on my eyes. I found even the double running stitch quite difficult without light. I found it hard to place my needle in the same hole on the return journey - you can see where the needle has glanced off by one thread. This, I learned from another class, is a common problem, addressed by angling the needle under the previous stitch.

Nevertheless, I have one panel finished - minus the bird.

I need to work on some Christmas items - as well as the other classes I am attending - so am not sure how much more I will get done in the next couple of months. This is a medium-to-long term project.


Saturday, April 19, 2014

Hoodie

I was inspired by a book reviewed in Stitch Magazine to embroider, in a small way, a hoodie for my grandson.

The book has a wonderful project for covering a hoodie in embroidery. I got my copy of the book from The Book Depository and I find it very inspiring. The patterns on the hoodie in the book were adult but I had never thought of embroidering a hoodie before and thought I could adapt it to meet a boy's sporting interest.

I didn't have a lot of time to complete this project in time for Fionn's birthday, so thought I would embroider the logos of two soccer teams he follows in relatively discrete places on a hoodie. If he likes the idea, I can add the logos of his AFL and SANFL teams - or any other motifs he wants to display.


The current logo for Adelaide United Football Club is a shield with streaks in club colours curving around the shape of a ball with stars.

I outlined the shield in double chain stitch and did the streaks in stem stitch. The letters are satin stitch. The stars worked very well using Mary Corbett's star stitch - a stitch to which I am becoming addicted.

Because the hoodie was blue, I needed to fill in the background of the shield in white - the hardest bit. I used fine cotton-a-broder and split stitch. The result is quite neat.


The second logo was more challenging and interesting - Liverpool Football Club, followed by Fionn and his Dad.

I chose the figure from a couple of variations on the club website and transferred it to Solvi. I then outlined the figure with three strands of red using stem stitch, then removed the Solvi.


I filled in the figure with slightly lighter red and finally inserted white to preserve the spaces between wing feathers and the stitching on the ball.
I placed this one to one side of the hood and added the words of the club song and club initials.


If Fionn wants more added, there is plenty of room on the hoodie ( and a year of so growth in the size) - and I can tailor it to suit his need.

This has proved to be very easy to work and popular with the recipient. I can see lots of possibilities for the future.

Monday, March 24, 2014

Patchwork progress

The last time I posted progress on my patchwork quilt, I thought I had eight rows of hexagons to add to get the required size (25 rows).

Since then I have worked steadily and have added four of the eight rows.

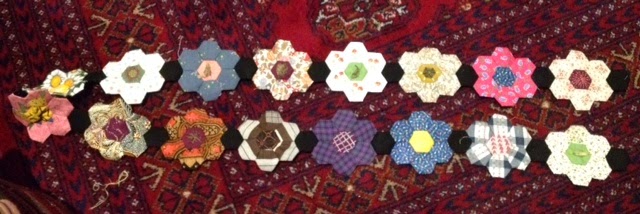
I am still working to a routine of constructing the hexies two rows at a time - black hexagons first, then coloured, join each into a row, then embroider the centres of the coloured rows, then join the two row together and add them to the quilt.

I enjoy each bit of the process but the treat is the embroidery of the centres.


I've experimented with a few on the rows just finished, including some bullion buds, a circle and a satin stitch flower.


Of course, there have been quite a few old favourites.


When I tried the now 21-row quilt on our bed I decided that I only need two, not four more rows. With the edging, this will easily be as high as I want the quilt to come on the bed. In fact, I am wondering if I could/should make the top border on the quilt narrower than on the other three sides. I don't want a black border to overwhelm the look of the quilt and I don't want to have a double layer of quilt around our heads. I will think about this as I add the last two rows of hexagons.