Search This Blog

Showing posts with label Inspirations. Show all posts

Saturday, April 5, 2025

Meadowsong: Mountmellick pouch

I'm beginning this post with the finished product. Getting to it was a bit of a process, so I want to reassure any reader (and myself) that I did get there! 

This was a kit I bought from Inspirations 122, A Mountmellick pouch which the creator, Deborah Love, named Meadowsong.

I had not, as far as I can remember, attempted Mountmellick before. The kit came with the fabric - described as white jeans material -along with 3 threads of different thickness wound on cards, white machine cotton and needles. From reading Yvette Stanton, I gathered Mountmellick always uses non-polished white matt cotton, usually sold in three thicknesses.

The first challenge was to transfer the design. The fabric was too thick to transfer the design by tracing on to it, even using a light table.  In the end I used the old pencil method. A is the printed design sheet. B is my pencil copy onto tracing paper and C is the pencil design transferred to the fabric by rubbing over the reversed tracing.


It gave me a clear image of the end motif ( yes, I stitched the design in reverse) to work with and a single line around the length and breadth of the piece to be embroidered.

I knew that the thread would pick up graphite from the drawing as I stitched. I also knew it would annoy me, so prepared myself to be patient.

I began working in the recommended place (the rose) and generally stuck to the suggested order, deviating a little to use up the thread left in my needle when it was still in good condition.

Most of the stitches were familiar to me, but the methods of stitching a couple of the leaves were new, as was the linked chain stitch stem.


I was right about the thread getting grubby, but I held off washing it and moved on to the border. which I had only marked with one pencil line.


         It was a long way around with two-length blanket stitch border topped by french knots, but soothing, if a little hard on the hands without the aid of a hoop.

This is followed by an inner border of herringbone and detached chain.  I just had enough of the recommended medium thread to finish the herringbone and a few detached chains. I worked the remainder in the heavier thread until it also ran out. Rather than use a polished thread, like coton-a-broder, I found a roll of vintage matt thread. It is a 3ply knitting thread and too thick but I removed one of its plies to finish the last 15 detached chains. Might as well try to be a purist!

As soon as I finished the stitching  I washed it and blocked it. Blocking wasn't in the instructions and didn't work very well. It did help to show heavily embroidered areas where the pencil hadn't come out. I washed these again, using a nailbrush to get into the thread layers. Once I was sure the pencil had gone, I ironed it.

I opted to line the pouch. It seems to me that to be really useful, the inside needs to be smooth, without the risk of contents catching on stitches. It also, I think, is better not being white.I chose some pink silk. 

I cut it slightly larger than the embroidered piece, folded the extra under as a hem, ironing as I went, and pinned it. The curves were a bit tricky, but OK.

I stitched it down all around with pale pink machine thread.


The kit included white machine thread for joining up the sides of the pouch by hand with running stitch. I thought I'd get a better finish on mine (especially since it is lined)  using a buttonhole stitch and the remaining fine white Mountmellick cotton. I had enough of the thread to use it double.

The result is the introductory photo at the top of this post. 

The back view when folded and the front view opened are shown here.

I'm very pleased with it. I learned quite a bit, improvised a bit and have a(nother) useful pouch. It may end up holding jewellery - an idea at the back of my mind when I went for silk lining.

Tuesday, November 5, 2024

Floe, the happy penguin.

On the cover of Inspirations 123 , Floe, the Fairy Penguin captured me immediately.  I loved the concept, the embroidery, and the felt medium. I also have a friend who loves penguins. I bought the kit. Once my major knitting projects were completed I decided to treat myself to making it. 

Carolyn Stanton, the designer, has an Etsy shop, with lots of felt projects. This one, however is only available through Inspirations.

Cutting out was fairly straightforward. The instructions for transferring the design seemed to me unnecessarily complicated, so I copied the pattern markings by hand, using lead pencil on the white and chalk pencil on the black. I had, of course, to either work fast or keep renewing the pencil marks on felt, but a combination of both worked well.

There is a variety of threads, including several different wools and silks. Getting the right one for each stitch kept me focused.  (Would it matter? Not sure.)

The trickiest part was getting the curves right while stitching it together.  


Without a beak and flippers it took on a slightly sinister look which I could only pray would disappear when finished.

The stuffing, however, had to come first.  I decided against the recommended filling of either rice or oven-hardened beans. I figured the chance of a doorstop getting wet was too high, so bought a bag of stones from Bunnings. These went neatly into the base in the kit-included cotton bag. Filling the upper body to make it firm took a significant amount of wool fibre stuffing, but worked the required magic on the shape as I stitched over the back join (not in the recommended colour!)


I am delighted with the result. 


As I had hoped, the beak and flippers turned it immediately into a recognisable penguin. 

Floe emerged in all her splendour, with plenty of personality and anxious to get to her real home.

She didn't  fit into any of the standard Australia Post boxes, but I had one that had already travelled the world and packed her in using bits of bubblewrap, shredding, tissue and paper bags. She travelled overnight and reached her new home this morning.
She is already at home and welcome. My friend refuses to put her on the floor and she has found her new niche at eye level.

I really enjoyed the challenge, both stitching and construction. It isn't a project I would recommend to an embroidery beginner, unless in a class or group with help, but with a bit of experience it is a really satisfying project.
I'm glad I went with the Floe.

Saturday, March 20, 2021

Another Turkmen Pouch

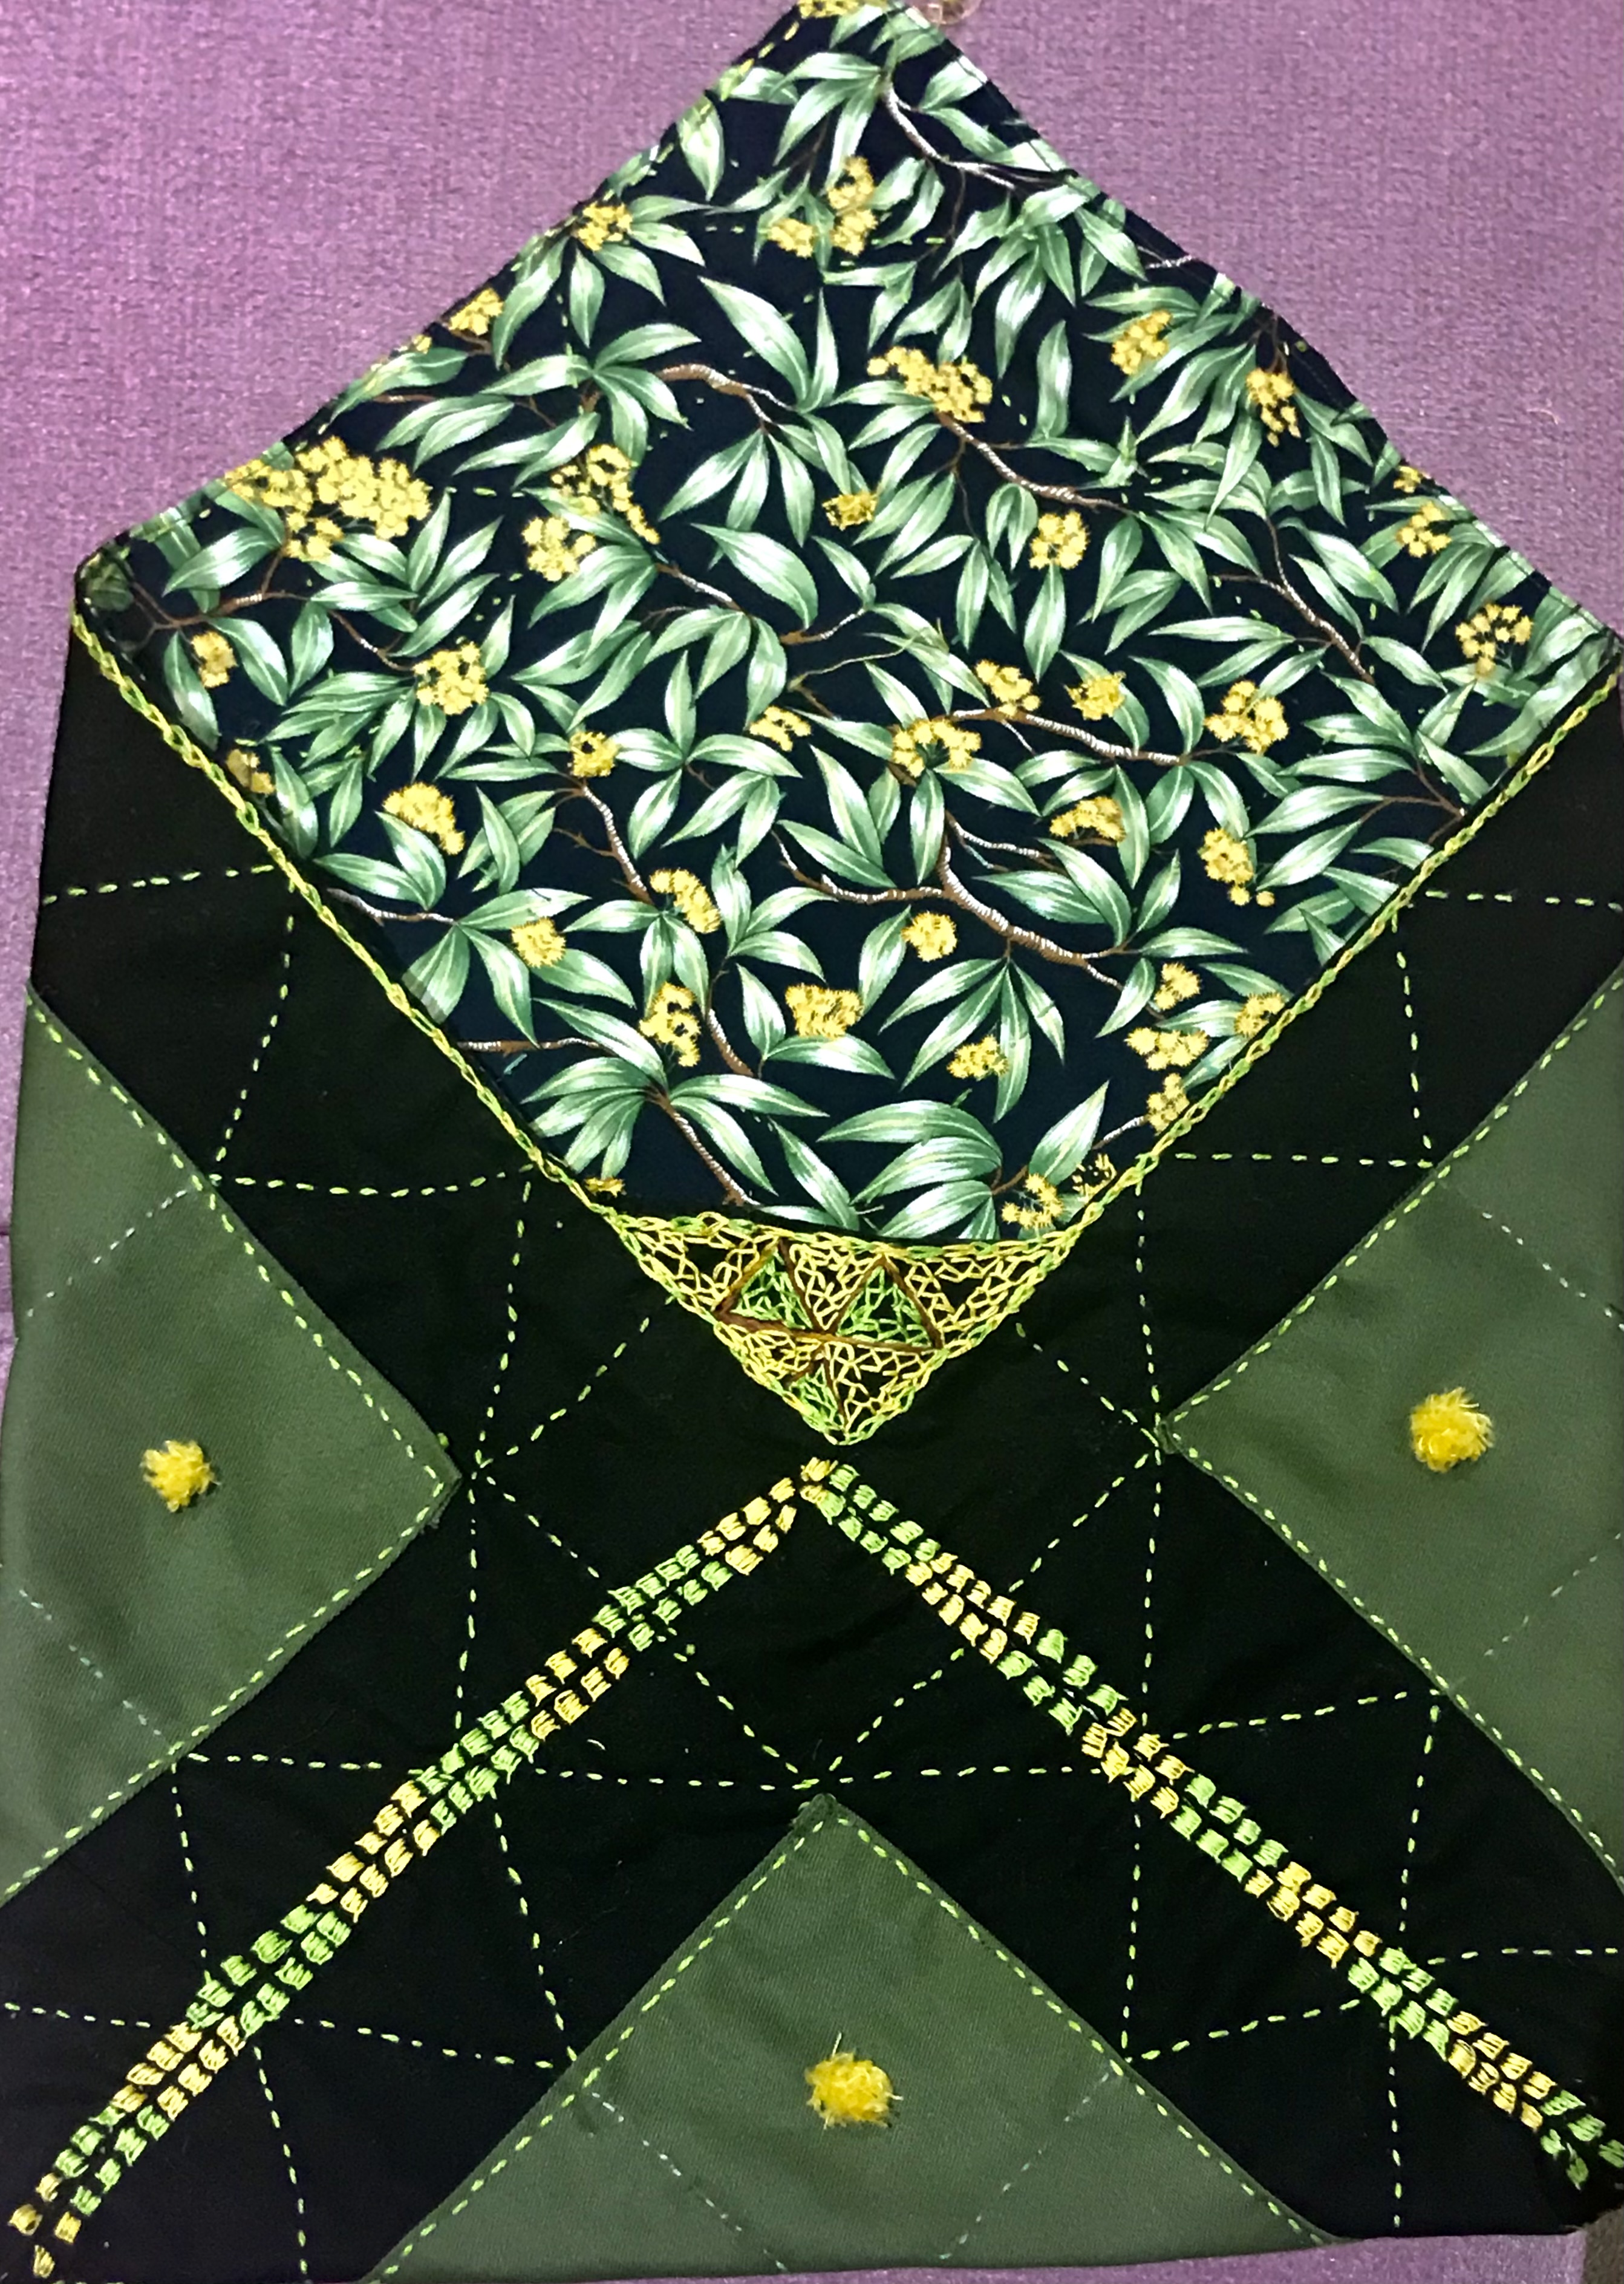
 I've been working on another of Alison Snepp's Turkmen Pouch (Inspirations 69, 2011). Back then I made one, and yes, the green fabric is the same. I've made many variations on this. The shape is versatile.  I cut this out a couple of years ago, when a friend wanted to make one. She finished hers long ago and my fabric stayed in the drawer, cut out but not assembled. The friend now has a craft group engaged in making them, and got me involved.


I had to remind myself of the processes for putting it together. Measuring - never my strong point - is crucial, because the design depends on a more-or-less perfect square. Given the dominance of the wattle lining fabric, I decided to limit myself to threads in the colours in that print - greens, yellow and a little bit of brown. There was already enough black!

The design calls for button-hole pinwheels in the squares of the grid. I don't much like stitching them and I decided it would be fitting to use Ghiordes knots to make little wattle blooms instead.I fluffed them up using my faithful boo-boo stick.  

I liked the result.


The edges are decorated simply, the piece folded and the joins ladder stitched. While this was easy stitching, the black fabric was a bit denser than is ideal for hand-stitching. I realised that the next steps were not going to be easy.                                

I tried several different needles and threads, but stitching along the edge was difficult through 4 layers of fabric, two of them dense. While the colours work, and it has an appropriate folksy look, the stitches are far from smooth and even.

Similarly, the triangular insert with it's turkmen stitch, gives the right effect, but isn't accurate.
The pouch did, however, join up nicely. and works together as it should.


The final challenge was the button and tassels. The button was easy. I have had this one from Tasmania for quite some time.  Made from a large gum nut, the clever artisan who made it inserted a piece of fine dowel to form a shaft. It was, I think, a gift from my daughter Alison after a trip to Hobart. It was easy to add a tassel and attach it to the point of the fold-over, then to make a loop on the back of the pouch
I gathered a few small gumnuts from a street tree and gilded them with acrylic paint, then tested them as a tassel. I decided against it. I thought they would make the pouch a bit fragile and involve too much glue. The gumnuts are too hard to pierce easily with a needle. 

The pouch needs to be used without fear of damaging part of it.


I opted instead for a tassel from variegated linen thread with one gumnut attached. I was able to pierce the gumnut with the point of a darning needle, then insert a fine needle through the small hole with machine thread attached. Once through, I attached a bead to one end of the the thread and tied it on with several knots, then pulled it into the gumnut as a stopper. The other end of the thread I stitched to the tassel. 

If the gumnut comes off in use not much is lost and the tassel still functions.
This is how it folds over for closure.
It can, of course, be easily used  without the closure.

I'm satisfied with this finish. 


The pouch will be useful, and act as an example to anyone wanting to make one in the future.

Tuesday, March 2, 2021

Remembrance Poppies

I'm beginning somewhere near the end, because the photo shows some up flaws, but still, I think, looks good.


I bought the kit for this project from Inspirations 109. My first problem was the colour of the poppy. I should have picked up from the magazine photo that there was a great deal of orange in the colour of the poppy. When the kit arrived, both the fabric and the thread were decidedly orange.  As the article points out, the red of remembrance poppies represents the blood of the fallen. I couldn't live with orange. Just before I set out to buy replacement thread, I checked my stash and found an excellent red silk that would do the job. It is  Soie Cristale, by Caron, part, I think, of a monthly thread pack that Katherine gave me for my birthday a couple of years ago. It is lovely to work with and the perfect colour.

I was not so worried about the fabric, as it was to be covered with stitching. As a background on which to work red it was OK.  I also wanted to make two poppies. There was enough fabric to do this if I placed the petals carefully.


I read the instructions several times but couldn't find anything telling me how many strands of thread to use. Eventually I experimented and settled for two strands for couching and three for the long and short fill. Eventually I found the instruction, right at the very beginning of the article, in the "Before you begin" section! I should have used 1 strand throughout, but by then I had finished the embroidery. I must be getting old!
The leaves were a somewhat tricky shape to cover, and the small hoop meant holding it in my hand, never good for RSI,  but the fabric was good to work with and it wasn't a lengthy task.
The centre is a bead, covered with thread. I was still working with several strands of silk when I did the first one and getting the needle through was tricky. By the time I did the second one, I had found the 1 strand instruction. This made it easier, but gave problems with coverage. There is also a tiny piece of felt, glued over the top of the bead and stitched down. Even more tricky.

The first one is a bit wonky. The second one is better.


Cutting out and assembling took time and patience, but worked.

As you can tell from these photos, the edges of the petals show white threads. This is because the background fabric has quite a lot of white in it.  The green background thread is dyed all the way through, so doesn't present the same problem.  There was no way of avoiding the white threads in the petals as I cut away the excess fabric against the wires, no matter how closely I cut.    

The pin on the back is mounted on felt, pin stitched to help hold the whole thing in place ( I can't get the colour right on this photo - pink=red!)
I resolved the white thread issue in the end with the help of a Porcelain felt pen, just gently touching up the white threads around the edge of the petals.

This is the improvement from the photo with which I began this post. 

There have been quite a few trials in making these, but I think they are fit for purpose - a lapel pin for wearing on Anzac Day or Remembrance Day. One for me, one as a gift.