Search This Blog

Thursday, July 22, 2021

Catch up on projects since April

 The last time I posted here was after Di Kirshner's workshop in April. I have continued to post weekly to my England2020 blog. I am continuing that blog until we emerge from Covid. I had not imagined that would take more than a year! For the moment I continue but hope that one day I can return to this as my main or only blog. 

This is a summary of my projects since April.

The other reason for posting here now is to inform those of you who have an email subscription to this blog, that Feedburner, the service that sends the emails out automatically after posting, is being discontinued in August 2021, with no replacement. I have downloaded the email addresses of all those who have subscriptions and have created an email group. I intend to manually send an email to the group each time I post, using bcc so email addresses are not shared. If you do not want to continue receiving notification, please let me know, or unsubscribe to emails before the end of July. I will check the list of subscribers again on 31 July and adjust my list accordingly.

The top photo is a panel on the Aesop Frame. At the moment that project is on hold. The second photo is a sample I worked up to show how the 16th Century Icelandic couching style of narrative embroidery could be applied to a modern narrative.


I constructed this bag from some pinwale corduroy left over from a smocked dress I made some 15 years ago. The design is the result of a Certificate Course workshop on layered fabric. 

I also finished the blanket I was working from the pack of Sheepjes tiny sample yarns - a cotton/acrylic mix. It is very cosy and soft.

This is a bag for a friend's birthday - honeyeaters appliqued to an Ink and Spindle linen with Indigenous Spirit Figures on the side for protection.


And this panel, also Ink and Spindle,  has gone into another bag with a little bit of embroidery on the circles.
I did another Fisherton-de-la-Mere 2-day class with Christine Bishop. A few years ago I did this class and made a green version. I keep jewellery  in it and like it a lot. I also made the needle book.
I had bought a couple of bundles of remnants from Ink and Spindle, amongst them were two of bag size. and a a distinctive repetitive pattern. I've been embroidering around the pattern. 


One has made its way into a bag and the other one is still in the making.

I also worked a shawl using 10 ply Noro Ito wool and Nightshift pattern. I enjoyed and liked it so much that I bought enough wool to make 2 more, one for my other daughter and one for myself.

I'm working on the second one now.

Last weekend I attended the first day of a two-day course on Melissa Walker's Madagascan Moon Moth. I'm hoping to have the embroidery done by the second day of the course in a month's time, when we will work on construction. I'm making good progress because we are currently in lockdown triggered by a Covid Delta outbreak.

The other thing I did a few days ago was to make a photographic record of my unfinished projects, and unstarted kits. There are far more of the latter than the former.  I have included the composite photos at the end of this post.

I will do a trial run of another post in August, to test the manual email notification.  I hope to show progress on the Madagascan Moon moth, the next shawl, and another bag. Don't expect progress on the projects below!


Monday, April 5, 2021

More than I bargained for: Invisible Hem Finishes Sampler Workshop with Di Kirchner.


The Saturday before Easter the Guild's Certificate Course Workshop was taken by Di Kirchner on invisible hem finishes. The instructions were to bring a piece of homespun 110cm x 25 cm. I wondered how on earth we would use such a large piece of fabric. 

We were also asked to bring a friction pen. I searched everywhere for mine, but in the end left home not having found it. 

At the workshop, I was well out of my comfort zone - measuring, ironing, folding, ironing, tacking, ironing, then finally stitching, to create 6 pleats. Without an easily erasable fabric pen my job was harder. 
To my horror, when I asked Di why the fabric piece was so long, the answer was because we might want to keep going and do more!  I though she had rocks in her head.

Di had brought along a steam station iron. I, who am at best an indifferent ironer, was impressed.  It made a real difference to both the speed and the end result of the pleats.

The workshop focused on 6 finishing stitches - three of them invisible stitches and the remainder decorative stitches that can be used to cover a hemline.


I was hooked. At home I finished the six outlined in the workshop. Without a steam iron station I wasn't going to get the same finish. So I researched steam iron stations on Choice, found the most recommended one online on special and ordered it. It arrived two days later. The one in the photo above is mine, not the one Di had at the workshop.

All I have to do now is reorganise my cupboards to store it conveniently.
Truly hooked. I continued to measure fold and stitch until I had filled the 110cm piece.

Now who has rocks in her head!

I enjoyed mining the A-Z of Embroidery Stitches. The only stitch I used that was entirely new to me was Rosette chain stitch - and it gave me no end of trouble.
I undid it several times and in the end used perle thread rather than stranded, but I still didn't get it even. It is a real tension challenge.

If the sampler was to be useful in identifying stitches it needed labels. I played around with Inktense pencils I had bought in Kendal several years ago, but in the end settled for a fine archival ink pen.


It took a bit of thinking to come up with something useful from the finished sampler. Eventually I dug out some fabric that suited the thread I'd used, cut a piece the same size as the sampler and some edging strips.

As recommended by Di, I scalloped the end of the sampler with buttonhole stitch. I then added the strips of floral cotton to the sides by hand, like bias strips, but in this case, cut on the straight.

My lines, as you can see, are not perfectly place - a combination of the pull in the fabric, the missing friction pen and my error.


I found a cardboard roll, cut it to size and put double-sided tape around the ends. I made two circles in the floral, backed them with interfacing and gathered them to make two caps for the ends of the roll.


I hemmed the large piece of floral and attached it  to the roll, along with the sampler.
Since this is all about finishes I even turned under and whip-stitched the raw join edge underneath.

The new iron was a big help in all this.


The result is a neat roll to keep an embroidery flat in between working sessions or once finished.

I played for quite a while to find a fastening I was happy with. This bow was still tied on the grosgrain ribbon that had adorned a package and it blended perfectly. I wanted the bow for decoration, not to be opened and tied as a fastener, 

In the end I cut the ribbon short, attached one end of it to the calico with a button and worked a button hole on the loose end of the ribbon.

This is a long way from where I thought I was going with a workshop on hem finishes but there you go.

I'm happy with my sampler, my roll - and my new iron! 

Saturday, March 20, 2021

Another Turkmen Pouch

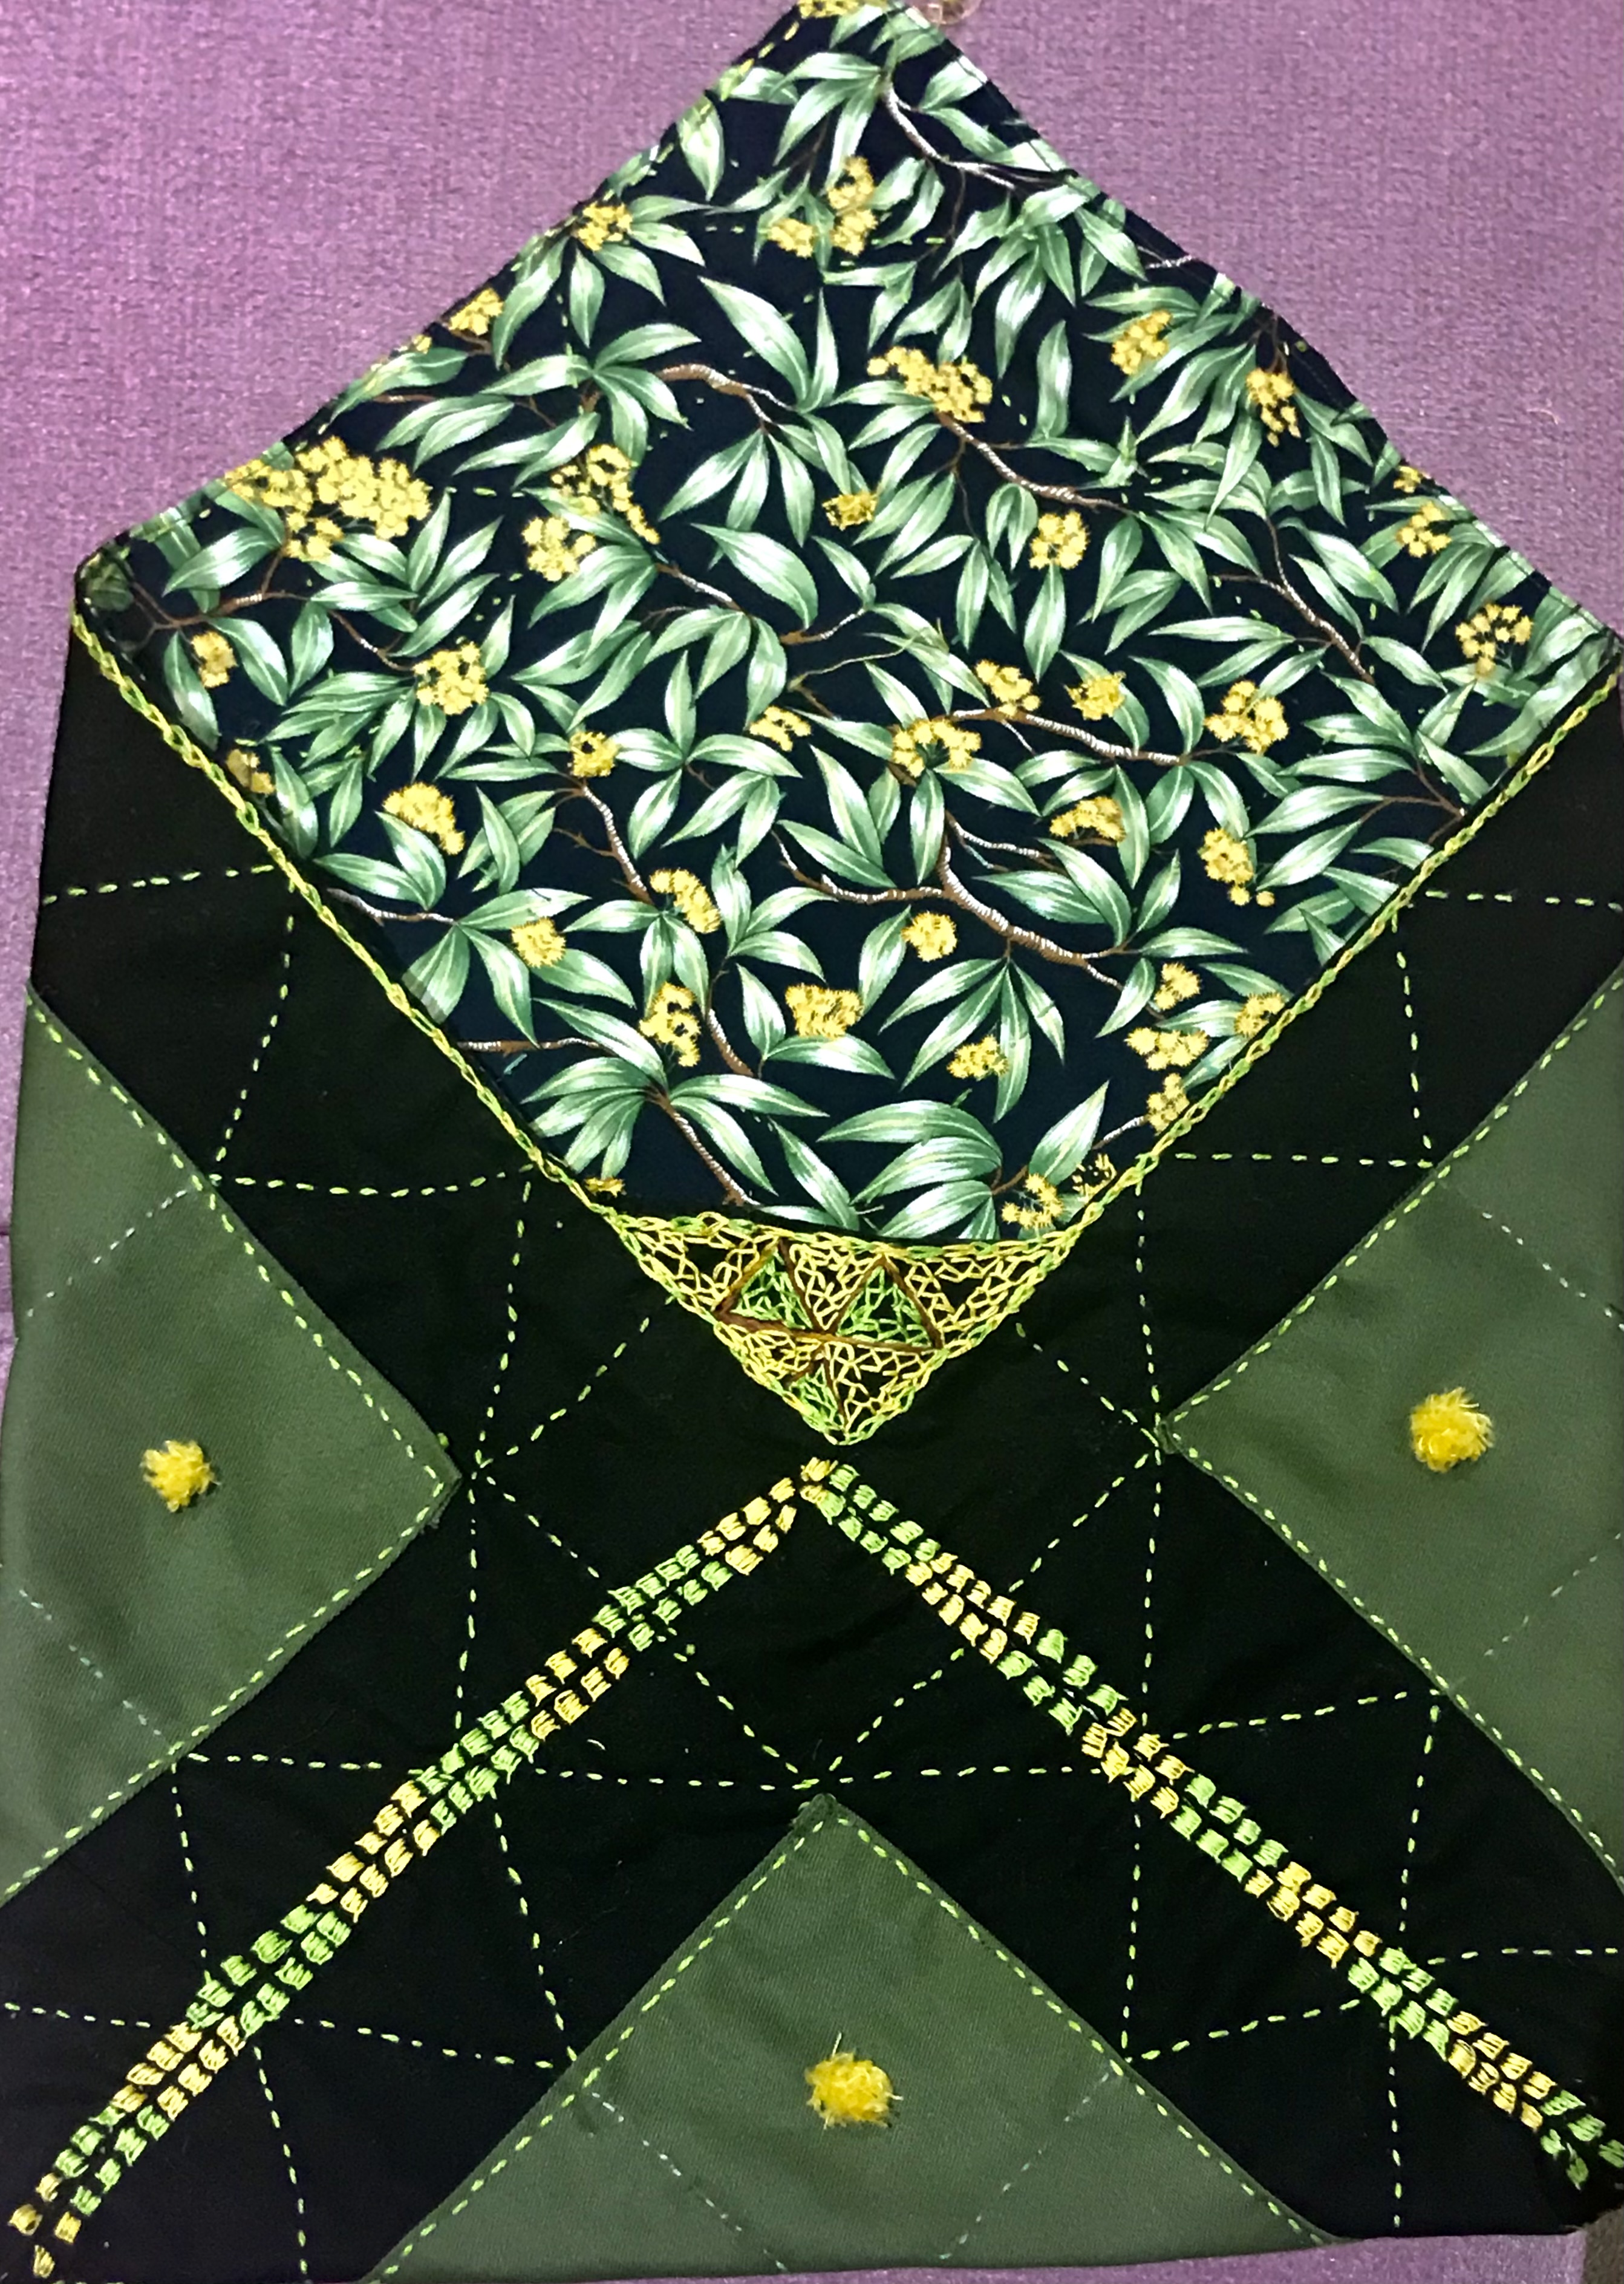
 I've been working on another of Alison Snepp's Turkmen Pouch (Inspirations 69, 2011). Back then I made one, and yes, the green fabric is the same. I've made many variations on this. The shape is versatile.  I cut this out a couple of years ago, when a friend wanted to make one. She finished hers long ago and my fabric stayed in the drawer, cut out but not assembled. The friend now has a craft group engaged in making them, and got me involved.


I had to remind myself of the processes for putting it together. Measuring - never my strong point - is crucial, because the design depends on a more-or-less perfect square. Given the dominance of the wattle lining fabric, I decided to limit myself to threads in the colours in that print - greens, yellow and a little bit of brown. There was already enough black!

The design calls for button-hole pinwheels in the squares of the grid. I don't much like stitching them and I decided it would be fitting to use Ghiordes knots to make little wattle blooms instead.I fluffed them up using my faithful boo-boo stick.  

I liked the result.


The edges are decorated simply, the piece folded and the joins ladder stitched. While this was easy stitching, the black fabric was a bit denser than is ideal for hand-stitching. I realised that the next steps were not going to be easy.                                

I tried several different needles and threads, but stitching along the edge was difficult through 4 layers of fabric, two of them dense. While the colours work, and it has an appropriate folksy look, the stitches are far from smooth and even.

Similarly, the triangular insert with it's turkmen stitch, gives the right effect, but isn't accurate.
The pouch did, however, join up nicely. and works together as it should.


The final challenge was the button and tassels. The button was easy. I have had this one from Tasmania for quite some time.  Made from a large gum nut, the clever artisan who made it inserted a piece of fine dowel to form a shaft. It was, I think, a gift from my daughter Alison after a trip to Hobart. It was easy to add a tassel and attach it to the point of the fold-over, then to make a loop on the back of the pouch
I gathered a few small gumnuts from a street tree and gilded them with acrylic paint, then tested them as a tassel. I decided against it. I thought they would make the pouch a bit fragile and involve too much glue. The gumnuts are too hard to pierce easily with a needle. 

The pouch needs to be used without fear of damaging part of it.


I opted instead for a tassel from variegated linen thread with one gumnut attached. I was able to pierce the gumnut with the point of a darning needle, then insert a fine needle through the small hole with machine thread attached. Once through, I attached a bead to one end of the the thread and tied it on with several knots, then pulled it into the gumnut as a stopper. The other end of the thread I stitched to the tassel. 

If the gumnut comes off in use not much is lost and the tassel still functions.
This is how it folds over for closure.
It can, of course, be easily used  without the closure.

I'm satisfied with this finish. 


The pouch will be useful, and act as an example to anyone wanting to make one in the future.