Search This Blog

Showing posts with label Betsy Morgan. Show all posts

Wednesday, July 16, 2014

Emery jack-in-the-box finish

I am conscious, in writing about how I embroidered and constructed these tools, that the intellectual property of the design and construction belongs to Betsy Morgan. I have been trying to write about each piece in a way that doesn't breach that. It is not always easy to work out how I can describe what I did without encroaching on the teacher's IP. I hope I have succeeded.

The construction of the basic box in which the Jack sits was by now familiar, so I got that bit done and gathered the box, the lid, its lining and the loop to hold the emery.


I was worried that the very fine emery would leak out, so I stitched the bundle of emery closed in a vigorous, if inelegant manner before attaching the ring.


The fiddliest bit was attaching the ribbon to the spring, but it worked OK.


In the end, the 'push' on the lid is quite strong against the bead catch, but it holds, and works.


And the lid? - Looks better than I had hoped, a testament to the hours of work in those petit point lines!


So, the Etui is finished. Here are a couple of photos of the finished pieces, both inside and outside the box.


Wednesday, July 9, 2014

Emery Jack-in-the-box embroidery

This is the very last of the Toy Chest Etui toys for me to make. I can't say I have any wish to make more!

The basic shape is the box with which we are now familiar from the thimble-keep and waxer. This one is very slightly larger than those two. As this was one of the additional kits I purchased at the class, I needed to do the embroidery first.

The little fan motifs in this piece were quite fun to do. I tried not to get too far ahead with these without adding the central rows of petit-point cross-stitch in the centre of each panel - so I didn't end up with all the difficult bits at the end!

I do like the colour combination in this piece.


The tricky bit, however, came, as I knew it would, with the lid.


The central motif of the lid is a series of squares in diagonal stripes - each one thread wide. I chose to do these as diagonal rows rather than as alternating tent stitch in two colours across each horizontal row.

The difficulty is exacerbated by all threads being variegated. At some points the variegation in the two colours in any one square ends up almost identical - an interesting effect, but very tricky to stitch.

 I found this quite a challenge - but got there in the end.

I have rarely been so relieved to reach the end of a piece.


The lid looks wonky to the eye, but for the most part it isn't. The variegation in the thread means you don't get a nice crisp look on the edge.

Now for the construction and FINISH!

Friday, June 20, 2014

Paintbox construction

The paint box construction was interesting, as it involved creating, from a single piece of linen, a structure  that folded to form a box.

This was achieved by cutting skirtex pieces and lashing them to the individual faces of the paintbox.


The linen was folded around the three pieces of skirtex. The lining is then applied over the whole, and also to create an individual pocket on the back.


The two inner pockets hold packets of needles.

The needle threader is attached to a cord and charm, and slots into the slit on the inside lid of the paintbox (the one I embroidered on the wrong side!)


I like this paintbox quite a lot. It was a neat design and fun to construct. It is flat and compact - sitting easily in the etui.


I also think it will be useful!


Monday, June 16, 2014

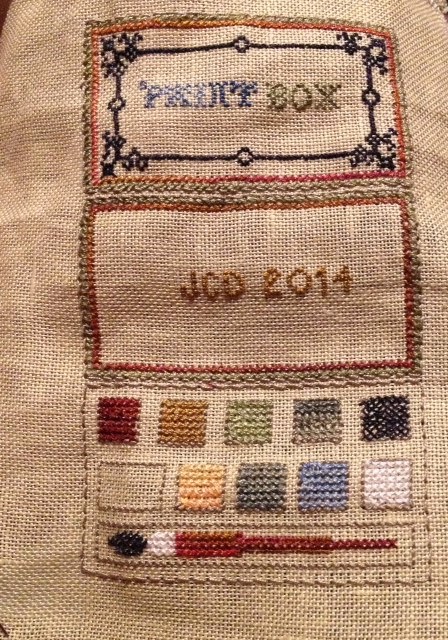
Toy Chest Paint Box embroidery

Although I had a knitting project on the go, I found it very hard to not continue with the two remaining Toy Chest tools. The paintbox needle threader holder beckoned and I went with the call. Unlike the hobbyhorse, which required few stitches and only my normal glasses, the precision and accuracy of the geometric paintbox design meant digging out my magnifying clip-ons. However, once I was set up with light and magnification, the incentive to keep going at every opportunity was very high.

I didn't work this one in a hoop - it was easier on my  hands to keep it in the light without the hoop. Here is the first outline of the paintbox. I love getting the outline in place and a sense of the overall design.


The hardest bit was stitching the design on the first panel - the lid of the paintbox. Single thread cross-stitch on 32 count linen is not what I can do with my mind wandering!


I went with the lettering suggested for the lid - a decision I regret, but I am not unpicking. Both the "A" and the "N" are very hard to read in this lettering, but I figure the context makes it clear.


When it came to the next panel, I embroidered very plain initials, working it out as I went along. Unfortunately, I concentrated so hard on achieving the lettering I forgot to leave the space on the right-hand side to insert the needle-threader - the whole point of the paintbox! I inserted it on the left side, which, as it is only a storage device, should be fine.


The third panel was very straightforward as most of the cross-stitch was over two threads rather than one.


Next post is construction.


Wednesday, June 11, 2014

Hobbyhorse laying tool

I couldn't resist moving quickly on to this additional tool to the Toy Chest Etui. The attraction was partly the shape and colour of the horse and partly the usefulness of a holder for a pointy tool.

The piece of linen supplied was fairly small, so I set it up in a 3 inch hoop and marked the centre. I really enjoyed the way the shape emerged so quickly. In no time at all I had a very recognisable horse.


The basic construction (interfacing, skirtex) was straightforward. The ears and under the jaw needed a little care.


Trickiest was glueing and stitching in the holder for the tool. I have an embroiderer's aversion to glue - but this needs to be really secure.


The ribbon was fiddly, but basic.

Another twisted cord for the reins and voila!

A very pleasing addition to the Toy Chest indeed.


Wednesday, May 21, 2014

Toy Chest Etui - Finished (well...)

I have now finished the Toy Chest Etui and the tools that were in the original kit and class coverage. Here they are, out of the box.

Of course, at the end of the class, when Betsy Morgan offered the three new pieces she had developed, I went with the option to buy. So my sense of completion was modified by the three kits still sitting there, sending out faint 'make me' beeps. The beeps got louder as the desire to have them done and dusted grew. So I'm plunging in.


First, I have tidied up from completing the basic set, put all the instructions, left-over bits of fabric, thread and skirtex along with notes and templates into a folder and out of the way with other reference documents in my cupboard.

The workroom is ready for another project!


Saturday, May 17, 2014

Toy Chest Etui - Waxer Box

The last of the tools/toys that accompany the basic Toy Chest Etui set is a waxer box in the form of a drum. The construction of this is much as it was for the thimble-keep completed in class, apart from the drumsticks constructed on the lid.

With the aid of the instructions, my original blog and my notes, the various tips came back to me.


The drumsticks were a bit tricky. The beads supplied didn't fit on the (toothpick) drumsticks provided, so rather than whittle toothpicks, I substituted slightly larger wooden beads with holes that fitted the toothpicks. They are not quite as cute - but a good colour, and within the realms of possibility.

The wax sits neatly in the box, protected by the clever end covers. This is, I think, one of the more ingenious of the tools for this Etui, and one I can see myself using.


My next post will display the finished Etui with its full set of basic tools.